Attach C# code to DOM events with Blazor event handlers
- 5 minutes
Most HTML elements expose events that are triggered when something significant happens. Such as, when a page finishes loading, the user clicks a button, or the contents of an HTML element are changed. An app can handle an event in several ways:
- The app can ignore the event.
- The app can run an event handler written in JavaScript to process the event.
- The app can run a Blazor event handler written in C# to process the event.
In this unit, you get a detailed look at the third option; how to create a Blazor event handler in C# to process an event.
Handle an event with Blazor and C#
Each element in the HTML markup of a Blazor app supports many events. Most of these events correspond to the DOM events available in regular web applications, but you can also create user-defined events that are triggered by writing code. To capture an event with Blazor, you write a C# method that handles the event, then bind the event to the method with a Blazor directive. For a DOM event, the Blazor directive shares the same name as the equivalent HTML event, such as @onkeydown or @onfocus. For example, the sample app generated by using the Blazor Server App contains the following code on the Counter.razor page. This page displays a button. When the user selects the button, the @onclick event triggers the IncrementCount method that increments a counter indicating how many times the button was clicked. The <p> element on the page displays the value of the counter variable:
@page "/counter"

<h1>Counter</h1>

<p>Current count: @currentCount</p>

<button class="btn btn-primary" @onclick="IncrementCount">Click me</button>

@code {
    private int currentCount = 0;

    private void IncrementCount()
    {
        currentCount++;
    }
}
Many event handler methods take a parameter that provides extra contextual information. This parameter is known as an EventArgs parameter. For example, the @onclick event passes information about which button the user clicked, or whether they pressed a button such as Ctrl or Alt at the same time as clicking the button, in a MouseEventArgs parameter. You don't need to provide this parameter when you call the method; the Blazor runtime adds it automatically. You can query this parameter in the event handler. The following code increments the counter shown in the previous example by five if the user presses the Ctrl key at the same time as clicking the button:
@page "/counter"

<h1>Counter</h1>

<p>Current count: @currentCount</p>

<button class="btn btn-primary" @onclick="IncrementCount">Click me</button>


@code {
    private int currentCount = 0;

    private void IncrementCount(MouseEventArgs e)
    {
        if (e.CtrlKey) // Ctrl key pressed as well
        {
            currentCount += 5;
        }
        else
        {
            currentCount++;
        }
    }
}
Other events provide different EventArgs parameters. For instance, the @onkeypress event passes a KeyboardEventArgs parameter that indicates which key the user pressed. For any of the DOM events, if you don't need this information, you can omit the EventArgs parameter from the event handling method.
Understand event handling in JavaScript versus event handling with Blazor
A traditional web application uses JavaScript to capture and process events. You create a function as part of an HTML <script> element, and then arrange to call that function when the event occurs. For comparison with the preceding Blazor example, the following code shows a fragment from an HTML page that increments a value and displays the result whenever the user selects the Click me button. The code makes use of the jQuery library to access the DOM.
<p id="currentCount">Current count: 0</p>

<button class="btn btn-primary" onclick="incrementCount()">Click me</button>

<!-- Omitted for brevity -->

<script src="https://code.jquery.com/jquery-3.6.0.min.js"></script>
<script>
    var currentCount = 0;

    function incrementCount() {
        currentCount++;
        $('#currentCount').html('Current count:' + currentCount);
    }
</script>
Besides the syntactic differences in the two versions of the event handler, you should note the following functional differences:
- JavaScript doesn't prefix the name of the event with an
@sign; it's not a Blazor directive. - In the Blazor code, you specify the name of the event-handling method when you attach it to an event. In JavaScript, you write a statement that calls the event-handling method; you specify round brackets and any parameters required.
- Most importantly, the JavaScript event handler runs in the browser, on the client. If you're building a Blazor Server App, the Blazor event handler runs on the server and only updates the browser with any changes made to the UI when the event handler completes. Additionally, the Blazor mechanism enables an event handler to access static data shared between sessions; the JavaScript model doesn't. However, handling some frequently occurring events such as
@onmousemovecan cause the user interface to become sluggish because they require a network round-trip to the server. You might prefer to handle events such as these in the browser, using JavaScript.
Important
You can manipulate the DOM using JavaScript code from an event handler and by using C# Blazor code. However, Blazor maintains its own copy of the DOM, which is used to refresh the user interface when required. If you use JavaScript and Blazor code to change the same elements in the DOM, you run the risk of corrupting the DOM. You can also possibly compromise the privacy and security of the data in your web app.
Handle events asynchronously
By default, Blazor event handlers are synchronous. If an event handler performs a potentially long-running operation, such as calling a web service, the thread on which the event handler runs is blocked until the operation completes. This situation can lead to poor response in the user interface. To combat this problem, you can designate an event handler method as asynchronous. Use the C# async keyword. The method must return a Task object. You can then use the await operator inside the event handler method to initiate any long-running tasks on a separate thread and free the current thread for other work. When a long-running task completes, the event handler resumes. The following example shows an event handler that runs a time-consuming method asynchronously:
<button @onclick="DoWork">Run time-consuming operation</button>

@code {
    private async Task DoWork()
    {
        // Call a method that takes a long time to run and free the current thread
        var data = await timeConsumingOperation();

        // Omitted for brevity
    }
}
Note
For detailed information about creating asynchronous methods in C#, read Asynchronous programming scenarios.
Use an event to set the focus to a DOM element
On an HTML page, the user can tab between elements, and the focus naturally travels in the order in which the HTML elements appear on the page. On some occasions, you might need to override this sequence and force the user to visit a specific element.
The simplest way to perform this task is to use the FocusAsync method. This method is an instance method of an ElementReference object. The ElementReference should reference the item to which you want to set the focus. You designate an element reference with the @ref attribute and create a C# object with the same name in your code.
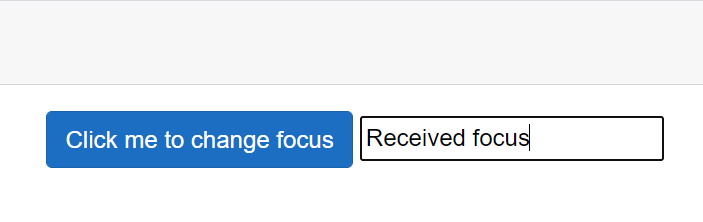
In the following example, the @onclick event handler for the <button> element sets the focus on the <input> element. The @onfocus event handler of the <input> element displays the message "Received focus" when the element gets the focus. The <input> element is referenced through the InputField variable in the code:
<button class="btn btn-primary" @onclick="ChangeFocus">Click me to change focus</button>
<input @ref=InputField @onfocus="HandleFocus" value="@data"/>

@code {
    private ElementReference InputField;
    private string data;

    private async Task ChangeFocus()
    {
        await InputField.FocusAsync();
    }

    private async Task HandleFocus()
    {
        data = "Received focus";
    }
The following image shows the result when the user selects the button:
Note
An app should only direct the focus to a specific control for a specific reason, such as to ask the user to modify input after an error. Don't use focusing to force the user to navigate through the elements on a page in a fixed order. This design can be frustrating to the user who might want to revisit elements to change their input.
Write inline event handlers
C# supports lambda expressions. A lambda expression enables you to create an anonymous function. A lambda expression is useful if you have a simple event handler that you don't need to reuse elsewhere in a page or component. In the initial click count example shown at the start of this unit, you can remove the IncrementCount method, and instead replace the method call with a lambda expression that performs the same task:
@page "/counter"

<h1>Counter</h1>

<p>Current count: @currentCount</p>

<button class="btn btn-primary" @onclick="() => currentCount++">Click me</button>

@code {
    private int currentCount = 0;
}
Note
For details on how lambda expressions work, read Lambda expressions and anonymous functions.
This approach is also useful if you want to provide other arguments for an event-handling method. In the following example, the method HandleClick takes a MouseEventArgs parameter in the same way as an ordinary click event handler, but it also accepts a string parameter. The method processes the click event as before, but also displays the message if the user presses the Ctrl key. The lambda expression calls the HandleCLick method, passing in the MouseEventArgs parameter (mouseEvent), and a string.
@page "/counter"
@inject IJSRuntime JS

<h1>Counter</h1>

<p id="currentCount">Current count: @currentCount</p>

<button class="btn btn-primary" @onclick='mouseEvent => HandleClick(mouseEvent, "Hello")'>Click me</button>

@code {
    private int currentCount = 0;

    private async Task HandleClick(MouseEventArgs e, string msg)
    {
        if (e.CtrlKey) // Ctrl key pressed as well
        {
            await JS.InvokeVoidAsync("alert", msg);
            currentCount += 5;
        }
        else
        {
            currentCount++;
        }
    }
}
Note
This example uses the JavaScript alert function to display the message because there's no equivalent function in Blazor. You use JavaScript interop to call JavaScript from Blazor code. The details of this technique are the subject of a separate module.
Override default DOM actions for events
Several DOM events have default actions that run when the event occurs, regardless of whether there's an event handler available for that event. For example, the @onkeypress event for an <input> element always displays the character that corresponds to the key pressed by the user and then handles the key press. In the next example, the @onkeypress event is used to convert the user's input to uppercase. Additionally, if the user types an @ character, the event handler displays an alert:
<input value=@data @onkeypress="ProcessKeyPress"/>

@code {
    private string data;

    private async Task ProcessKeyPress(KeyboardEventArgs e)
    {
        if (e.Key == "@")
        {
            await JS.InvokeVoidAsync("alert", "You pressed @");
        }
        else
        {
            data += e.Key.ToUpper();
        }
    }
}
If you run this code and press the @ key, the alert is displayed, but the @ character is also added to the input. The addition of the @ character is the default action of the event.

If you want to suppress this character from appearing in the input box, you can override the default action with the preventDefault attribute of the event, like this:
<input value=@data @onkeypress="ProcessKeyPress" @onkeypress:preventDefault />
The event still fires, but only the actions defined by the event handler are performed.
Some events in a child element in the DOM can trigger events in their parent elements. In the following example, the <div> element contains an @onclick event handler. The <button> inside the <div> has its own @onclick event handler. Additionally, the <div> contains an <input> element:
<div @onclick="HandleDivClick">
    <button class="btn btn-primary" @onclick="IncrementCount">Click me</button>
    <input value=@data @onkeypress="ProcessKeyPress" @onkeypress:preventDefault />
</div>

@code {
    private async Task HandleDivClick()
    {
        await JS.InvokeVoidAsync("alert", "Div click");
    }

    private async Task ProcessKeyPress(KeyboardEventArgs e)
    {
        // Omitted for brevity
    }

    private int currentCount = 0;

    private void IncrementCount(MouseEventArgs e)
    {
        // Omitted for brevity
    }
}
When the app runs, if the user clicks any element (or empty space) in the area occupied by the <div> element, the method HandleDivClick runs and displays a message. If the user selects the Click me button, the IncrementCount method runs, followed by HandleDivClick; the @onclick event propagates up the DOM tree. If the <div> was part of another element that also handled the @onclick event, that event handler would also run, and so on, to the root of the DOM tree. You can curtail this upwards proliferation of events with the stopPropagation attribute of an event, as shown here:
<div @onclick="HandleDivClick">
    <button class="btn btn-primary" @onclick="IncrementCount" @onclick:stopPropagation>Click me</button>
    <!-- Omitted for brevity -->
</div>
Use an EventCallback to handle events across components
A Blazor page can contain one or more Blazor components, and components can be nested in a parent-child relationship. An event in a child component can trigger an event-handler method in a parent component by using an EventCallback. A callback references a method in the parent component. The child component can run the method by invoking the callback. This mechanism is similar to using a delegate to reference a method in a C# application.
A callback can take a single parameter. EventCallback is a generic type. The type parameter specifies the type of the argument passed to the callback.
As an example, consider the following scenario. You want to create a component named TextDisplay that enables the user to enter an input string and transform that string in some way. You might want to convert it to upper case, lower case, mixed case, filter characters from it, or perform some other type of transformation. However, when you write the code for the TextDisplay component, you don't know what the transformation process is going to be. Instead, you want to defer this operation to another component. The following code shows the TextDisplay component. It provides the input string in the form of an <input> element that enables the user to enter a text value.
@* TextDisplay component *@
@using WebApplication.Data;

<p>Enter text:</p>
<input @onkeypress="HandleKeyPress" value="@data" />

@code {
    [Parameter]
    public EventCallback<KeyTransformation> OnKeyPressCallback { get; set; }

    private string data;

    private async Task HandleKeyPress(KeyboardEventArgs e)
    {
        KeyTransformation t = new KeyTransformation() { Key = e.Key };
        await OnKeyPressCallback.InvokeAsync(t);
        data += t.TransformedKey;
    }
}
The TextDisplay component uses an EventCallback object named OnKeyPressCallback. The code in the HandleKeypress method invokes the callback. The @onkeypress event handler runs each time a key is pressed and calls the HandleKeypress method. The HandleKeypress method creates a KeyTransformation object using the key the user pressed and passes this object as the parameter to the callback. The KeyTransformation type is a simple class with two fields:
namespace WebApplication.Data
{
    public class KeyTransformation
    {
        public string Key { get; set; }
        public string TransformedKey { get; set; }
    }
}
The key field contains the value entered by the user, and the TransformedKey field holds the transformed value of the key after processing.
In this example, the EventCallback object is a component parameter, and its value is supplied when the component is created. The component named TextTransformer performs this action:
@page "/texttransformer"
@using WebApplication.Data;

<h1>Text Transformer - Parent</h1>

<TextDisplay OnKeypressCallback="@TransformText" />

@code {
    private void TransformText(KeyTransformation k)
    {
        k.TransformedKey = k.Key.ToUpper();
    }
}
The TextTransformer component is a Blazor page that creates an instance of the TextDisplay component. It populates the OnKeypressCallback parameter with a reference to the TransformText method in the code section of the page. The TransformText method takes the KeyTransformation object provided as its argument, and fills in the TransformedKey property with the value found in the Key property converted to upper case. The following diagram illustrates the flow of control when a user enters a value into the <input> field in the TextDisplay component displayed by the TextTransformer page:
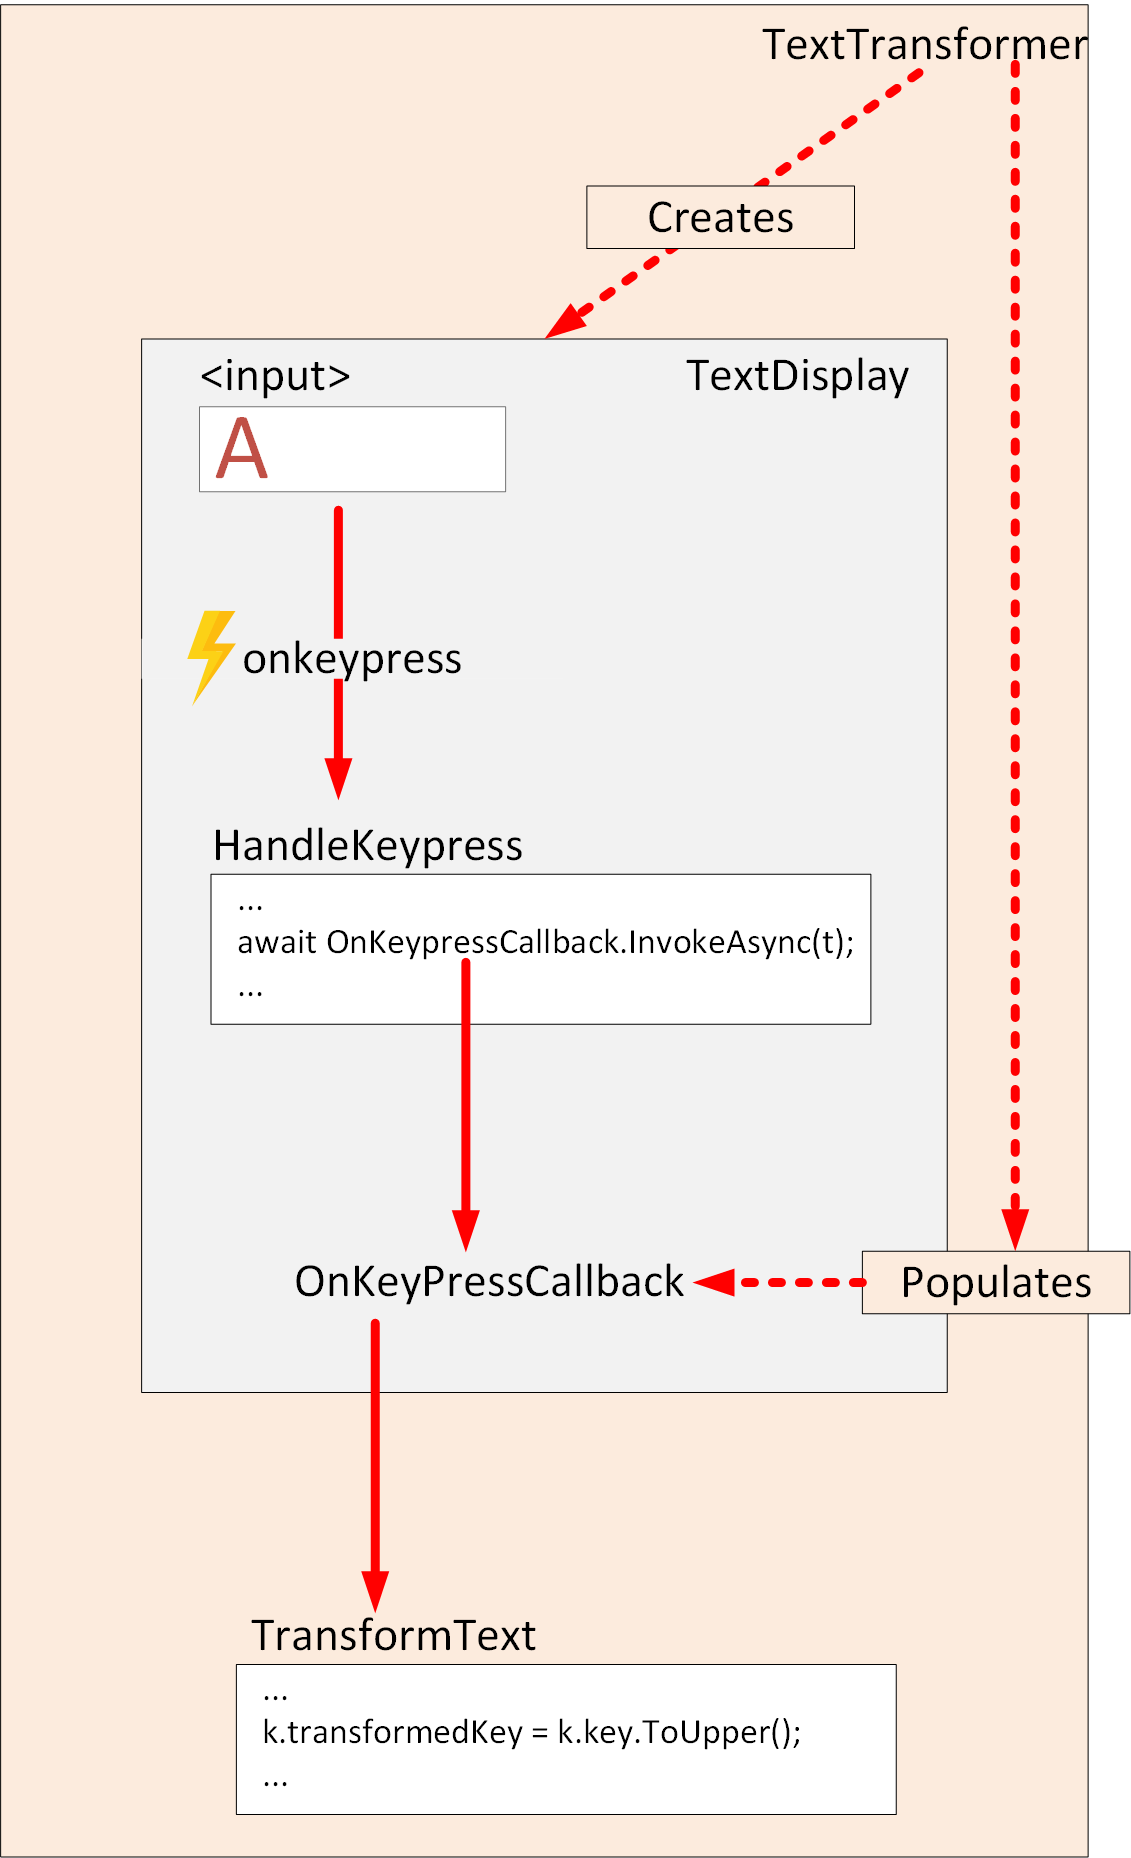
The beauty of this approach is that you can use the TextDisplay component with any page that provides a callback for the OnKeypressCallback parameter. There's complete separation between the display and the processing. You can switch the TransformText method for any other callback that matches the signature of the EventCallback parameter in the TextDisplay component.
You can wire a callback up to an event handler directly without using an intermediate method if the callback is typed with the appropriate EventArgs parameter. For example, a child component might reference a callback that can handle mouse events such as @onclick like this:
<button @onclick="OnClickCallback">
    Click me!
</button>

@code {
    [Parameter]
    public EventCallback<MouseEventArgs> OnClickCallback { get; set; }
}
In this case, the EventCallback takes a MouseEventArgs type parameter, so it can be specified as the handler for the @onclick event.