Exercise - Create a Blazor event handler for onclick events
Blazor gives you the power to connect C# code to HTML DOM events. In this exercise, you use this ability to improve an existing app.
As part of a development team working to enhance a Blazing Pizza app, you're asked to finish the checkout process to capture customers' addresses. You want to add some text fields and improve the checkout process.
In this exercise, you clone an existing app and create a new address component to capture address details. With the fields in place, you set the focus to the first field on the form.
Clone your team's existing app
Note
This module uses the .NET CLI (Command Line Interface) and Visual Studio Code for local development. After completing this module, you can apply the concepts using Visual Studio (Windows), Visual Studio for Mac (macOS), or continue development using Visual Studio Code (Windows, Linux, & macOS).
This module uses the .NET 9.0 SDK. Ensure that you have .NET 9.0 installed by running the following command in your preferred command terminal:
dotnet --list-sdks
Output similar to the following example appears:
8.0.100 [C:\Program Files\dotnet\sdk]
9.0.100 [C:\Program Files\dotnet\sdk]
Ensure that a version that starts with 9 is listed. If none is listed or the command isn't found, install the most recent .NET 9.0 SDK.
If you're creating your first Blazor app, follow the setup instructions for Blazor to install the correct version of .NET and check your machine is set up correctly. Stop at the Create your app step.
Open Visual Studio Code.
Open the integrated terminal from Visual Studio Code by selecting View, then select Terminal from the main menu.
In the terminal, navigate to where you'd like the project to be created.
Clone the app from GitHub.
git clone https://github.com/MicrosoftDocs/mslearn-use-forms-in-blazor-web-apps.git BlazingPizzaSelect File, then select Open folder....
In the Open dialog, navigate to the BlazingPizza folder, and select Select Folder.
Visual Studio Code might prompt you about unresolved dependencies. Select Restore.
Run the app to check everything is working correctly.
In Visual Studio Code, press F5 or select Run > Start Debugging.
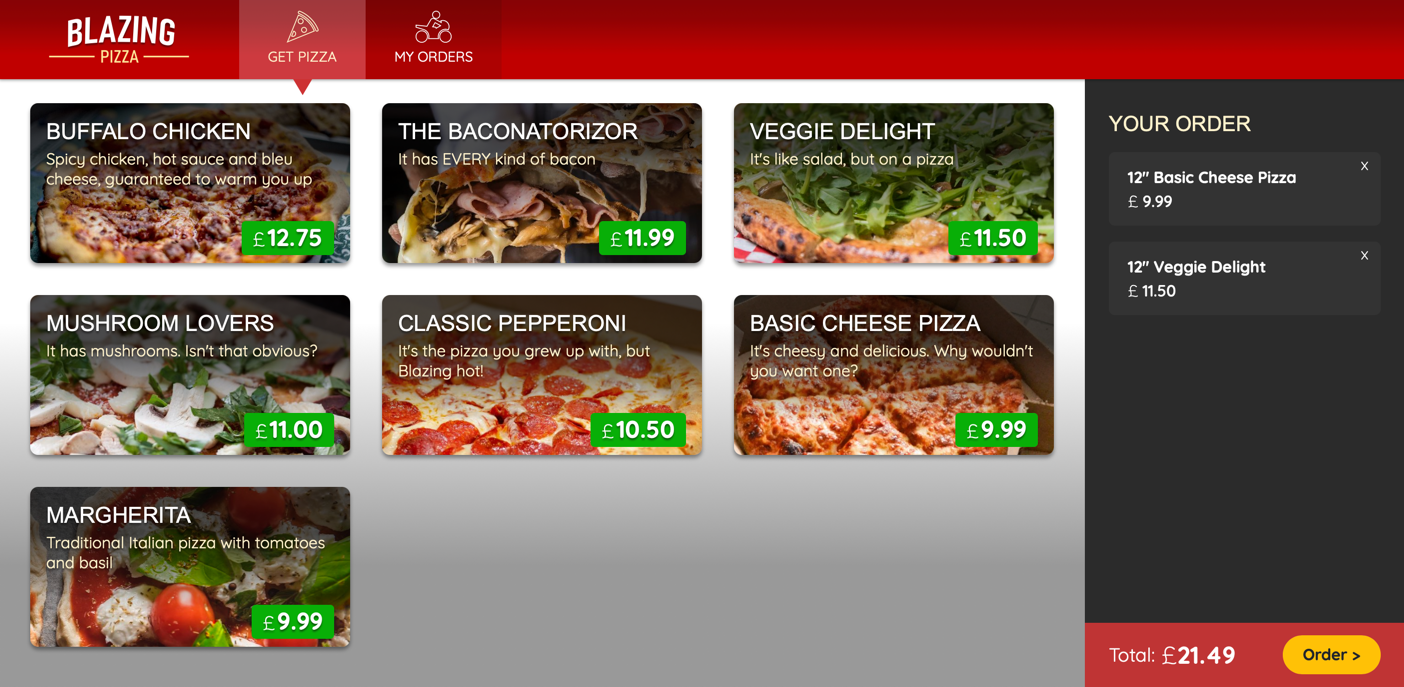
Try configuring some pizzas and adding them to your order. Select Order > at the bottom of the page. You should see the current checkout page.
Press Shift + F5 to stop the app from running.
Refactor the checkout page
In Visual Studio Code, in the file explorer, expand Pages, then select Checkout.razor.
At the moment, the checkout page just shows the list of pizzas that were configured. You're asked to refactor the page to include an address section.
Replace the existing
<div class="main">HTML block to have two columns for data.<div class="main"> <div class="checkout-cols"> <div class="checkout-order-details"> <h4>Review order</h4> <OrderReview Order="Order" /> </div> <div class="checkout-delivery-address"> <h4>Deliver to...</h4> <AddressEditor Address="Order.DeliveryAddress" /> </div> </div> <button class="checkout-button btn btn-warning" @onclick="PlaceOrder" disabled=@isSubmitting> Place order </button> </div>The preceding code connects the HTML
onclickevent for the button element to thePlaceOrderBlazor method in the@codeblock.The refactoring references two new Blazor controls
OrderReviewandAddressEditor. Move the old checkout code that listed the pizzas to theOrderReviewcomponent.In the file explorer, right-click on Shared, then select New File.
Enter OrderReview.razor as the filename.
Add a
foreachloop to display the pizzas in an order.@foreach (var pizza in Order.Pizzas) { <p> <strong> @(pizza.Size)" @pizza.Special.Name (£@pizza.GetFormattedTotalPrice()) </strong> </p> } <p> <strong> Total price: £@Order.GetFormattedTotalPrice() </strong> </p> @code { [Parameter] public Order Order { get; set; } }In the file explorer, right-click on Shared, then select New File.
Enter AddressEditor.razor as the filename.
Add code that uses an
inputelement for each field in an address. TheAddressclass in Model folder shows you all the fields.<div class="form-field"> <label>Name:</label> <div> <input @bind="Address.Name" /> </div> </div> <div class="form-field"> <label>Line 1:</label> <div> <input @bind="Address.Line1" /> </div> </div> <div class="form-field"> <label>Line 2:</label> <div> <input @bind="Address.Line2" /> </div> </div> <div class="form-field"> <label>City:</label> <div> <input @bind="Address.City" /> </div> </div> <div class="form-field"> <label>Region:</label> <div> <input @bind="Address.Region" /> </div> </div> <div class="form-field"> <label>Postal code:</label> <div> <input @bind="Address.PostalCode" /> </div> </div> @code { [Parameter] public Address Address { get; set; } }
Test the new checkout page
In Visual Studio Code, press F5 or select Run > Start Debugging.
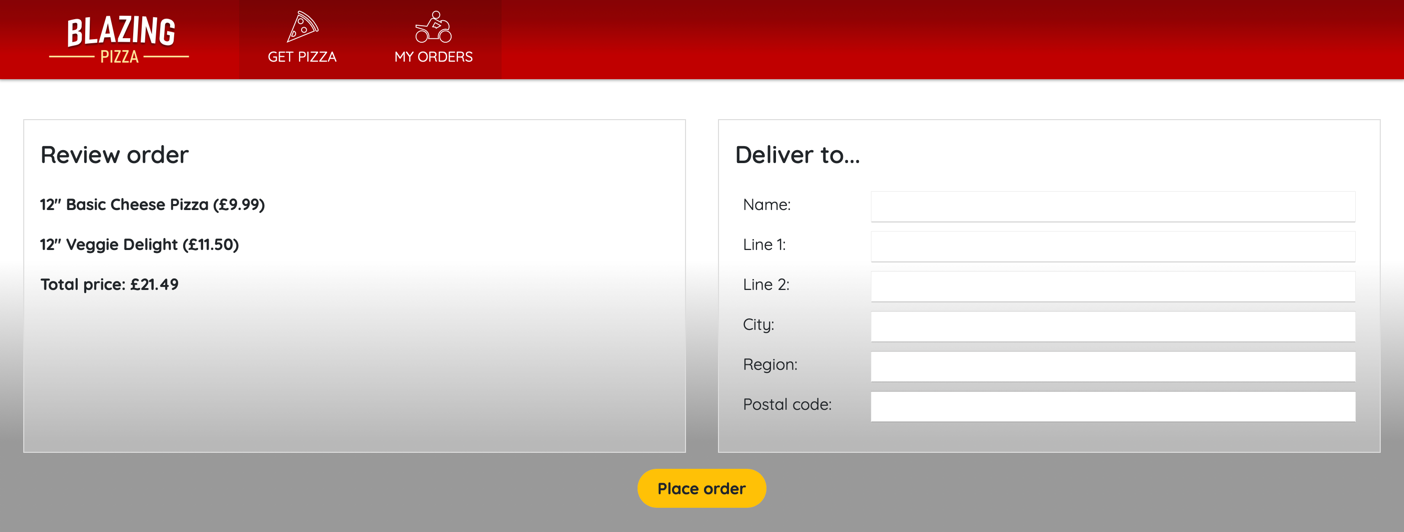
Add some pizzas and select Order > to see the new checkout flow.
Press Shift + F5 to stop the app running.
Improve usability of the form
When the customer is taken to the checkout page, the first thing they do is enter their name. Blazor allows you to set the focus on HTML elements in a page. Let's make our app better by adding this behavior.
In AddressEditor.razor, change the HTML for the name
inputelement to add@ref="startName".<input @ref="startName" @bind="Address.Name" />The Blazor directive
@ref="startName"lets the code block create anElementReferenceto reference the input element. You can then use this element reference to callFocusAsyncafter a page is rendered.Add code to call
FocusAsyncafter a page is loaded under the[Parameter] public Address Address { get; set; }declaration.private ElementReference startName; protected override async Task OnAfterRenderAsync(bool firstRender) { if (firstRender) { await startName.FocusAsync(); } }This code creates the
ElementReferenceand then after a page is rendered sets the focus to theNamefield.In Visual Studio Code, press F5 or select Run > Start Debugging.
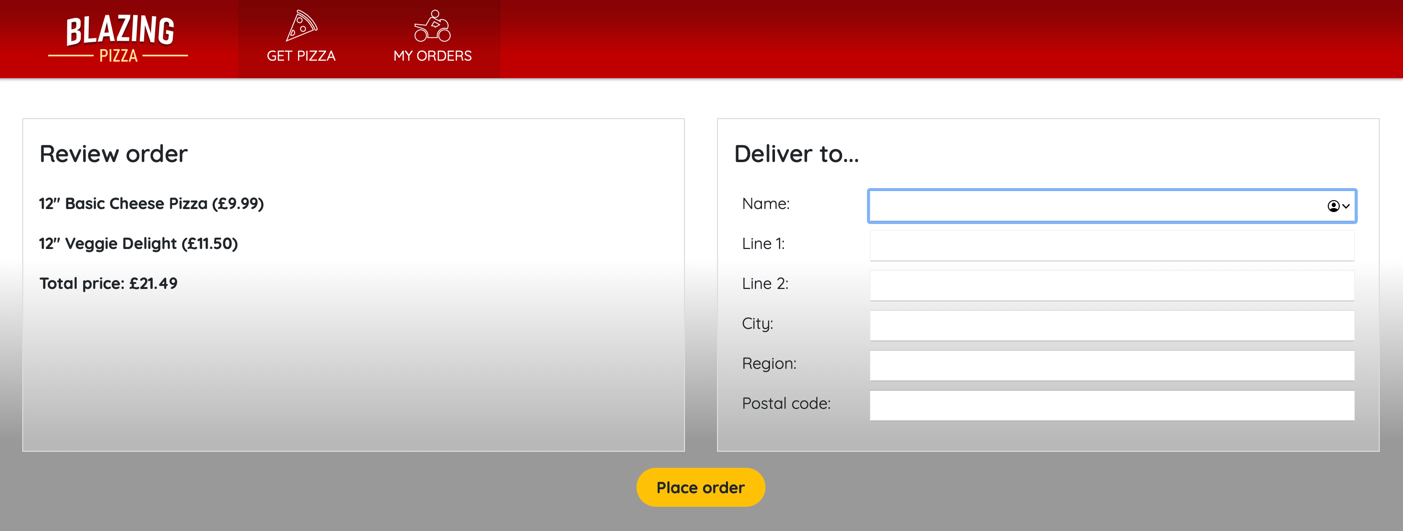
Add some pizzas and select Order > to see that on the checkout page the Name form field has focus.
Press Shift + F5 to stop the app from running.