Take advantage of the power of Blazor forms
- 5 minutes
Users enter data using forms. In a classic web app, you create a form using the <form> element, and enable the user to provide data using <input> elements. When the user submits the form, the input can be validated. If the validation is successful, the appropriate actions can then be taken, such as using the information provided to add a new entry to a database or to update a record.
The facilities the <form> and <input> elements provide are simple but relatively primitive. Blazor extends the capabilities of forms with its <EditForm> component. Additionally, Blazor provides a series of specialized input elements that you can use to format and validate the data the user enters.
In this unit, you'll learn how to use the <EditForm> element and the input elements to build functional forms. You'll also see how to use data binding with a form.
What is an EditForm?
An EditForm is a Blazor component that fulfills the role of an HTML form on a Blazor page. The main differences between an EditForm and an HTML form are:
- Data binding: You can associate an object with an EditForm. The EditForm acts like a view of the object for data entry and display purposes.
- Validation: An
EditFormprovides extensive and extensible validation capabilities. You can add attributes to the elements in anEditFormthat specify validation rules. TheEditFormwill apply these rules automatically. This functionality is described in a later unit in this module. - Form submission: An HTML form sends a post request to a form handler when it's submitted. This form handler is expected to perform the submit process, and then display any results. An
EditFormfollows the Blazor event model; you specify a C# event handler that captures theOnSubmitevent. The event handler performs the submit logic. - Input elements: An HTML form uses an
<input>control to gather user input, and asubmitbutton to post the form for processing. AnEditFormcan use these same elements, but Blazor provides a library of input components that have other features, such as built-in validation and data binding.
Create an EditForm with data binding
The <EditForm> element supports data binding with the Model parameter. You specify an object as the argument for this parameter. The input elements in the EditForm can bind to properties and fields exposed by the model by using the @bind-Value parameter. The following example is based on the WeatherForecast class created by the default Blazor Server App template. The class looks like this:
public class WeatherForecast
{
    public DateTime Date { get; set; }

    public int TemperatureC { get; set; }

    public int TemperatureF => 32 + (int)(TemperatureC / 0.5556);

    public string Summary { get; set; }
}
The model for the EditForm is an instance of the WeatherForecast class stored in the @currentForecast variable, and the input elements are bound to the fields in the class:
@page "/fetchdata"

@using WebApplication.Data
@inject WeatherForecastService ForecastService

<h1>Weather forecast</h1>

<input type="number" width="2" min="0" max="@upperIndex" @onchange="ChangeForecast" value="@index"/>

<EditForm Model=@currentForecast>
    <InputDate @bind-Value=currentForecast.Date></InputDate>
    <InputNumber @bind-Value=currentForecast.TemperatureC></InputNumber>
    <InputText @bind-Value=currentForecast.Summary></InputText>
</EditForm>

@code {
    private WeatherForecast[] forecasts;
    private WeatherForecast currentForecast;
    private int index = 0;
    private int upperIndex = 0;

    protected override async Task OnInitializedAsync()
    {
        forecasts = await ForecastService.GetForecastAsync(DateTime.Now);
        currentForecast = forecasts[index];
        upperIndex = forecasts.Count() - 1;
    }

    private async Task ChangeForecast(ChangeEventArgs e)
    {
        index = int.Parse(e.Value as string);
        if (index <= upperIndex && index >= 0)
        {
            currentForecast = forecasts[index];
        }
    }
}
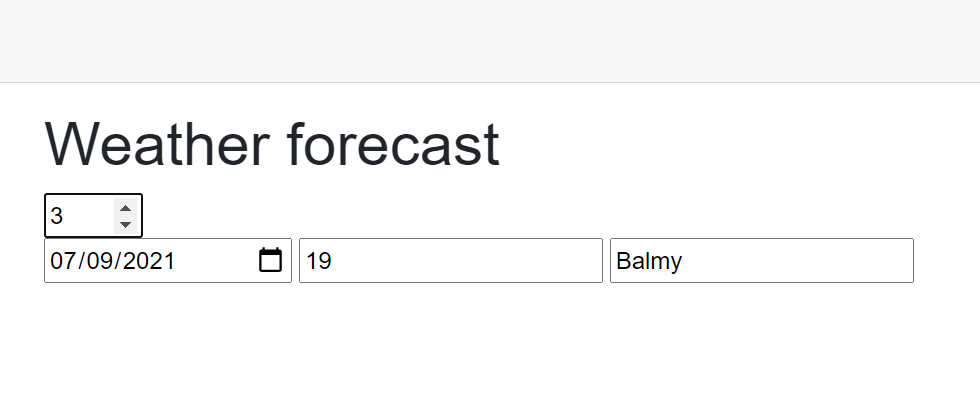
In this example, the OnInitialized event populates an array of WeatherForecast objects by using an external service. The currentForecast variable is set to the first item in the array; this is the object displayed by the EditForm. The user can cycle through the array using the numeric input field above the EditForm on the page. This field's value is used as an index of the array, and the currentForecast variable is set to the object found at that index by using the ChangeForecast method.
The following image shows an example of the page running:
Important
The EditForm component implements two-way data binding. The form displays the values retrieved from the mode. However, the user can update these values in the form, and they'll be pushed back to the model.
Understand Blazor input controls
The HTML <form> element supports the <input> element to enable the user to enter data. The <input> has a type property that specifies the type of the input and how it should be displayed; as a number, a text box, a radio button, a check box, a button, and so on.
Blazor has its own set of components designed to work specifically with the <EditForm> element and support data binding among other features. The following table lists these components. When Blazor renders a page containing these components, they're converted to the corresponding HTML <input> elements listed in the table. Some of the Blazor components are generic; the Blazor runtime ascertains the type parameter depending on the type of the data bound to the element:
| Input component | Rendered as (HTML) |
|---|---|
InputCheckbox |
<input type="checkbox"> |
InputDate<TValue> |
<input type="date"> |
InputFile |
<input type="file"> |
InputNumber<TValue> |
<input type="number"> |
InputRadio<TValue> |
<input type="radio"> |
InputRadioGroup<TValue> |
Group of child radio buttons |
InputSelect<TValue> |
<select> |
InputText |
<input> |
InputTextArea |
<textarea> |
Each of these elements has attributes that Blazor recognizes. Examples such as DisplayName, which is used to associate an input element with a label, and @ref, which you can use to save a reference to a field in a C# variable. Any unrecognized non-Blazor attributes are passed unchanged to the HTML renderer. This means you can utilize HTML input element attributes. For example, you can add the min, max, and step attributes to an InputNumber component, and they'll function correctly as part of the <input type="number"> element that's rendered. In the previous example, you could specify the TemperatureC input field as:
<EditForm Model=@currentForecast>
    <InputNumber @bind-Value=currentForecast.TemperatureC width="5" min="-100" step="5"></InputNumber>
</EditForm>
The next example shows how to use the InputRadioGroup<TValue> and InputRadio<TValue> components. You typically use a radio button group to present a series of radio buttons. Each button enables the user to select one value from a given set. An EditForm can contain multiple RadioButtonGroup<TValue> components, and each group can be bound to a field in the model for the EditForm. The following example presents details from a clothing-store app. The form displays data for T-shirts. The Shirt model class looks like this:
public enum ShirtColor
{
    Red, Blue, Yellow, Green, Black, White
};

public enum ShirtSize
{
    Small, Medium, Large, ExtraLarge
};

public class Shirt
{
    public ShirtColor Color { get; set; }
    public ShirtSize Size { get; set; }
    public decimal Price;
}
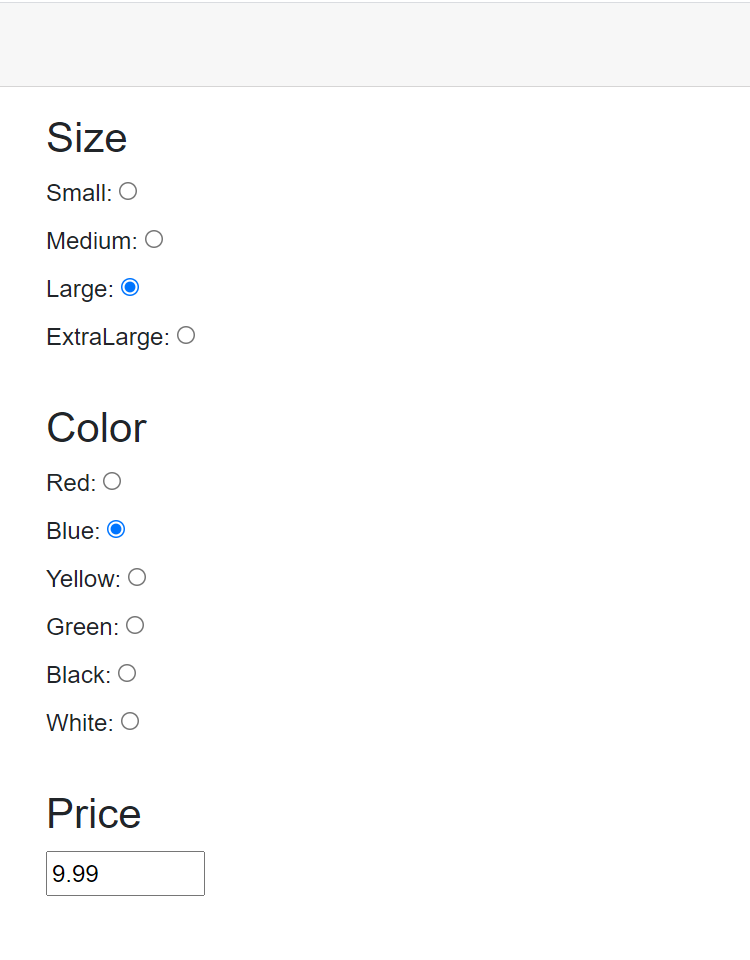
Notice that the color and size of the T-shirt are specified as enumerations. In the following Razor page, the code creates a Shirt object to act as test data. The <EditForm> element is bound to this object. The form displays the size, color, and price of the T-shirt. The first <InputRadioGroup> element is attached to the Size property. The foreach loop iterates through the possible values in the enumeration and creates a <InputRadio> element for each one. The Name attribute of the <InputRadio> element must match that of the <InputRadioGroup> element; the HTML renderer uses this attribute to tie the group and radio buttons together. The second <InputRadioGroup> element is attached to the Color property, and uses the same technique to generate radio buttons for each size. The final element displays the price using an <InputNumber> element. This element applies the max, min, and step attributes available with the HTML <input> element. This example uses <label> elements to display the name of the value associated with each component.
<EditForm Model="@shirt">
    <label>
        <h3>Size</h3>
        <InputRadioGroup Name="size" @bind-Value=shirt.Size>
            @foreach(var shirtSize in Enum.GetValues(typeof(ShirtSize)))
            {
                <label>@shirtSize:
                    <InputRadio Name="size" Value="@shirtSize"></InputRadio>
                </label>
                <br />
            }
        </InputRadioGroup>
    </label>
    <p></p>
    <label>
        <h3>Color</h3>
        <InputRadioGroup Name="color" @bind-Value=shirt.Color>
            @foreach(var shirtColor in Enum.GetValues(typeof(ShirtColor)))
            {
                <label>@shirtColor:
                    <InputRadio Name="color" Value="@shirtColor"></InputRadio>
                </label>
                <br />
            }
        </InputRadioGroup>
    </label>
    <p></p>
    <label>
        <h3>Price</h3>
        <InputNumber @bind-Value=shirt.Price min="0" max="100" step="0.01"></InputNumber>
    </label>
</EditForm>

@code {
    private Shirt shirt = new Shirt
    {
        Size = ShirtSize.Large,
        Color = ShirtColor.Blue,
        Price = 9.99M
    };
}
When you run the form, it looks like this:
Handle form submission
You've seen that you can use an EditForm to modify data in the underlying model. When the changes are complete, you can submit the form to validate the data on the server and save the changes. Blazor supports two types of validation; declarative and programmatic. Declarative validation rules operate on the client, in the browser. They're useful for performing basic client-side validation before data is transmitted to the server. Server-side validation is useful for handling complex scenarios that aren't available with declarative validation, such as cross-checking the data in a field against data from other sources. A real-world application should utilize a combination of client-side and server-side validation. The client-side validation traps basic user input errors and prevents many cases of invalid data being sent to the server for processing. Server-side validation ensures that a user request to save data doesn't attempt to bypass data validation and store incomplete or corrupt data.
Note
You can also trap JavaScript events such as onchange and oninput, and the Blazor equivalent @onchange and @oninput events for many controls in an EditForm. You can use these events to examine and validate data programmatically, on a field-by-field basis, before the user submits the form. However, this approach isn't recommended. It can be frustrating to a user to have validation messages appear as they enter each keystroke or tab between fields. Save validation for when the user has completed their input.
An EditForm has three events that run when it's submitted:
OnValidSubmit: This event is triggered if the input fields successfully pass the validation rules defined by their validation attributes.OnInvalidSubmit: This event is triggered if any of the input fields on the form fail the validation defined by their validation attributes.OnSubmit: This event occurs when the EditForm is submitted regardless of whether all of the input fields are valid or not.
The OnValidSubmit and OnInvalidSubmit events are useful for an EditForm that implements basic validation at the individual input field level. If you have more complex validation requirements, such as cross-checking one input field against another to ensure a valid combination of values, then consider using the OnSubmit event. An EditForm can either handle the OnValidSubmit and OnInvalidSubmit pair of events or the OnSubmit event but not all three. You trigger submission by adding a Submit button to the EditForm. When the user selects this button, the submit events specified by the EditForm are triggered.
Note
The build and deploy process doesn't check for an invalid combination of submit events, but an illegal selection will generate an error at runtime. For example, if you attempt to use OnValidSubmit with OnSubmit, your application will generate the following runtime exception:
Error: System.InvalidOperationException: When supplying an OnSubmit parameter to EditForm, do not also supply OnValidSubmit or OnInvalidSubmit.
The EditForm tracks the state of the current object acting as model, including which fields have been changed and their current values, using an EditContext object. The submit events are passed this EditContext object as a parameter. An event handler can use the Model field in this object to retrieve the user's input.
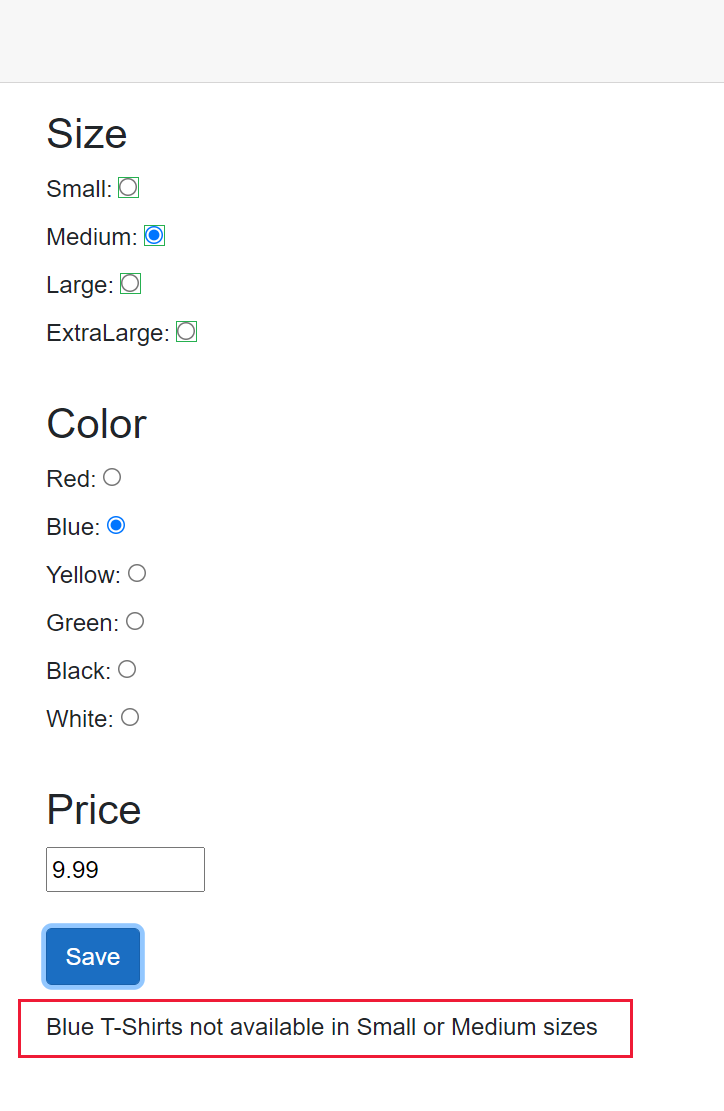
The following example shows the EditForm from the previous example with a submit button. The EditForm captures the OnSubmit event to validate the changes made to a T-shirt object. In this example, only certain combinations of values are allowed:
- Red T-shirts aren't available in the Extra Large size.
- Blue T-shirts aren't available in the Small or Medium sizes.
- White T-shirts have a maximum price of $50.
If an illegal combination is detected, the Message field on the form displays the reason for the validation failure. If the fields are valid, the data is processed and the data is saved (the logic for this process isn't shown).
<EditForm Model="@shirt" OnSubmit="ValidateData">
    <!-- Omitted for brevity -->
    <input type="submit" class="btn btn-primary" value="Save"/>
    <p></p>
    <div>@Message</div>
</EditForm>

@code {
    private string Message = String.Empty;

    // Omitted for brevity

    private async Task ValidateData(EditContext editContext)
    {
        if (editContext.Model isn't Shirt shirt)
        {
            Message = "T-Shirt object is invalid";
            return;
        }

        if (shirt is { Color: ShirtColor.Red, Size: ShirtSize.ExtraLarge })
        {
            Message = "Red T-Shirts not available in Extra Large size";
            return;
        }

        if (shirt is { Color: ShirtColor.Blue, Size: <= ShirtSize.Medium)
        {
            Message = "Blue T-Shirts not available in Small or Medium sizes";
            return;
        }

        if (shirt is { Color: ShirtColor.White, Price: > 50 })
        {
            Message = "White T-Shirts must be priced at 50 or lower";
            return;
        }

        // Data is valid
        // Save the data
        Message = "Changes saved";
    }
}
The following image shows the results if the user attempts to provide invalid data: