Validate user input implicitly without writing validation code
- 5 minutes
In a form, you should provide instructions to the website user on how to complete each value properly, but you should also check the values that they enter. Blazor provides simple tools that can perform this validation with the minimum of custom code.
In this unit, you learn how to annotate models so that Blazor knows what data to expect. You also learn how to configure a form so it validates and responds to user data correctly.
Validate user input in Blazor forms
When you collect information from a website user, it's important to check that it makes sense and is in the right form:
- For business reasons: Customer information such as a telephone number or order details must be correct to give good service to users. For example, if your webpage can spot a malformed telephone number as soon as the user enters it, you can prevent costly delays later.
- For technical reasons: If your code uses form input for calculations or other processing, incorrect input can cause errors and exceptions.
- For security reasons: Malicious users might try to inject code by exploiting input fields that aren't checked.
Website users are familiar with validation rules that check for the presence and correct format of the details they enter. Required fields are often marked with an asterisk or a Required label. If they omit a value or enter a poorly formatted value, they see a validation message instructing them on how to correct the problem. The validation message might appear when the user tabs out of a field or when they select the Submit button.
Here's an example form where the user submits invalid data. In this case, there are validation messages at the bottom of the form and invalid fields are highlighted in red. You'll build this form in the next exercise:
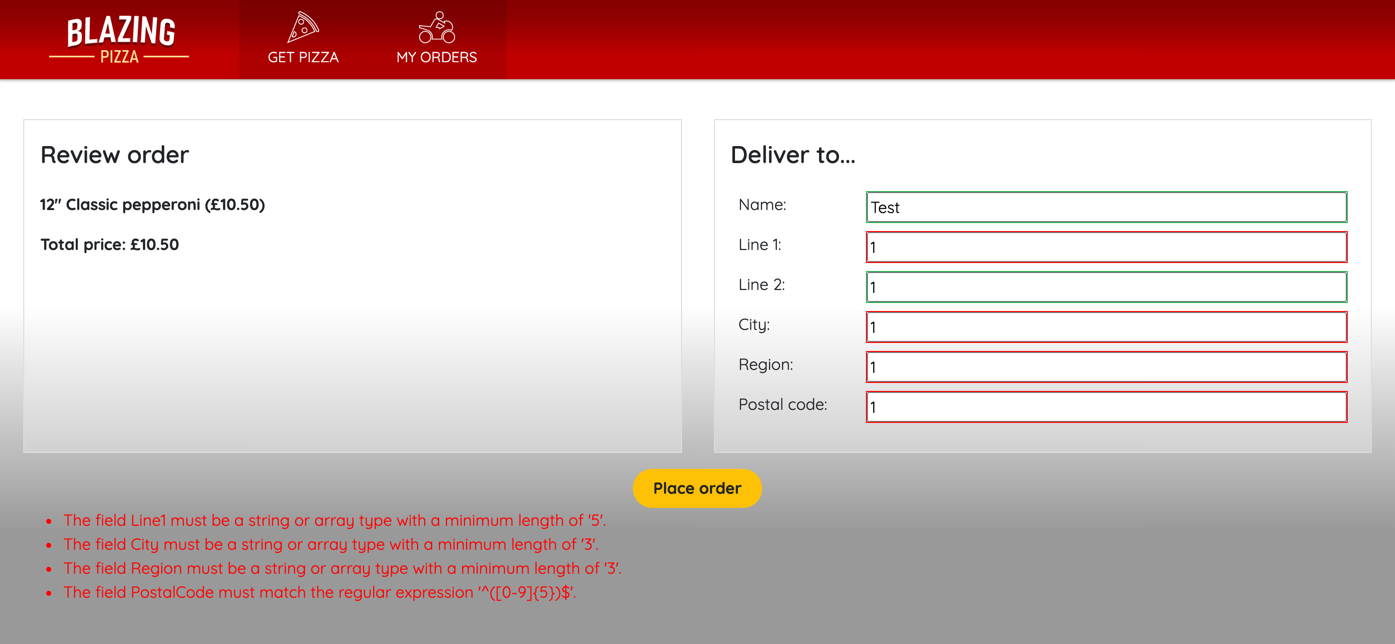
It's a good idea to make validation messages as helpful as possible. Don't assume any knowledge from the user; for example, not everyone knows the format of a valid email address.
When you use the EditForm component in Blazor, you have versatile validation options available without writing complex code:
- In your model, you can use data annotations against each property to tell Blazor when values are required and what format they should be in.
- Within your
EditFormcomponent, add the DataAnnotationsValidator component, which checks the model annotations against the user's entered values. - Use the ValidationSummary component when you want to display a summary of all the validation messages in a submitted form.
- Use the ValidationMessage component when you want to display the validation message for a specific model property.
Prepare models for validation
Start by telling the DataAnnotationsValidator component what valid data looks like. You declare validation restrictions by using annotation attributes in your data model. Consider this example:
using  System.ComponentModel.DataAnnotations;

public class Pizza
{
    public int Id { get; set; }

    [Required]
    public string Name { get; set; }

    public string Description { get; set; }

    [EmailAddress]
    public string ChefEmail { get; set;}

    [Required]
    [Range(10.00, 25.00)]
    public decimal Price { get; set; }
}
We use this model in a form that enables Blazing Pizza personnel to add new pizzas to the menu. It includes the [Required] attribute to ensure that the Name and Price values are always completed. It also uses the [Range] attribute to check that the price entered is within a sensible range for a pizza. Finally, it uses the [EmailAddress] attribute to check the ChefEmail value entered is a valid email address.
Other annotations that you can use in a model include:
[ValidationNever]: Use this annotation when you want to ensure that the field is never included in validation.[CreditCard]: Use this annotation when you want to record a valid credit card number from the user.[Compare]: Use this annotation when you want to ensure that two properties in the model match.[Phone]: Use this annotation when you want to record a valid telephone number from the user.[RegularExpression]: Use this annotation to check the format of a value by comparing it to a regular expression.[StringLength]: Use this annotation to check that the length of a string value doesn't exceed a maximum length.[Url]: Use this annotation when you want to record a valid URL from the user.
Note
Regular expressions are widely used to compare strings against patterns and also to modify strings. You can use them to define custom formats that form values must conform to. To learn more about regular expressions in .NET, see .NET regular expressions.
Add validation components to the form
To configure your form to use data-annotation validation, first make sure the input control is bound to the model properties. Then, add the DataAnnotationsValidator component somewhere within the EditForm component. To display the messages that validation generates, use the ValidationSummary component, which shows all the validation messages for all controls in the form. If you prefer to show validation messages next to each control, use multiple ValidationMessage components. Remember to tie each ValidationMessage control to a specific property of the model, by using the For attribute:
@page "/admin/createpizza"

<h1>Add a new pizza</h1>

<EditForm Model="@pizza">
    <DataAnnotationsValidator />
    <ValidationSummary />

    <InputText id="name" @bind-Value="pizza.Name" />
    <ValidationMessage For="@(() => pizza.Name)" />

    <InputText id="description" @bind-Value="pizza.Description" />

    <InputText id="chefemail" @bind-Value="pizza.ChefEmail" />
    <ValidationMessage For="@(() => pizza.ChefEmail)" />

    <InputNumber id="price" @bind-Value="pizza.Price" />
    <ValidationMessage For="@(() => pizza.Price)" />
</EditForm>

@code {
    private Pizza pizza = new();
}
Control your app's form validation
Blazor performs validation at two different times:
- Field validation is executed when a user tabs out of a field. Field validation ensures that a user is aware of the validation problem at the earliest possible time.
- Model validation is executed when the user submits the form. Model validation ensures that invalid data isn't stored.
If a form fails validation, messages are displayed in the ValidationSummary and ValidationMessage components. To customize these messages, you can add an ErrorMessage attribute to the data annotation for each field in the model:
public class Pizza
{
    public int Id { get; set; }

    [Required(ErrorMessage = "You must set a name for your pizza.")]
    public string Name { get; set; }

    public string Description { get; set; }

    [EmailAddress(ErrorMessage = "You must set a valid email address for the chef responsible for the pizza recipe.")]
    public string ChefEmail { get; set;}

    [Required]
    [Range(10.00, 25.00, ErrorMessage = "You must set a price between $10 and $25.")]
    public decimal Price { get; set; }
}
The built-in validation attributes are versatile, and you can use regular expressions to check against many kinds of text patterns. However, if you have specific or unusual requirements for validation, you might be unable to satisfy them precisely with built-in attributes. In these circumstances, you can create a custom validation attribute. Start by creating a class that inherits from the ValidationAttribute class and overrides the IsValid method:
public class PizzaBase : ValidationAttribute
{
    public string GetErrorMessage() => $"Sorry, that's not a valid pizza base.";

    protected override ValidationResult IsValid(
        object value, ValidationContext validationContext)
    {
        if (value != "Tomato" || value != "Pesto")
        {
            return new ValidationResult(GetErrorMessage());
        }

        return ValidationResult.Success;
    }
}
Now, you can use your custom validation attribute as you use the built-in attributes in the model class:
public class Pizza
{
    public int Id { get; set; }

    [Required(ErrorMessage = "You must set a name for your pizza.")]
    public string Name { get; set; }

    public string Description { get; set; }

    [EmailAddress(
        ErrorMessage = "You must set a valid email address for the chef responsible for the pizza recipe.")]
    public string ChefEmail { get; set;}

    [Required]
    [Range(10.00, 25.00, ErrorMessage = "You must set a price between $10 and $25.")]
    public decimal Price { get; set; }

    [PizzaBase]
    public string Base { get; set; }
}
Handle form validations server-side on form submission
When you use an EditForm component, three events are available for responding to form submission:
OnSubmit: This event fires whenever the user submits a form, regardless of the results of validation.OnValidSubmit: This event fires when the user submits a form and their input passes validation.OnInvalidSubmit: This event fires when the user submits a form and their input fails validation.
If you use OnSubmit, the other two events aren't fired. Instead, you can use the EditContext parameter to check whether to process the input data or not. Use this event when you want to write your own logic to handle form submission:
@page "/admin/createpizza"

<h1>Add a new pizza</a>

<EditForm Model="@pizza" OnSubmit=@HandleSubmission>
    <DataAnnotationsValidator />
    <ValidationSummary />

    <InputText id="name" @bind-Value="pizza.Name" />
    <ValidationMessage For="@(() => pizza.Name)" />

    <InputText id="description" @bind-Value="pizza.Description" />

    <InputText id="chefemail" @bind-Value="pizza.ChefEmail" />
    <ValidationMessage For="@(() => pizza.ChefEMail)" />

    <InputNumber id="price" @bind-Value="pizza.Price" />
    <ValidationMessage For="@(() => pizza.Price" />
</EditForm>

@code {
    private Pizza pizza = new();

    void HandleSubmission(EditContext context)
    {
        bool dataIsValid = context.Validate();
        if (dataIsValid)
        {
            // Store valid data here
        }
    }
}
If you use OnValidSubmit and OnInvalidSubmit instead, you don't have to check the validation state within each event handler:
@page "/admin/createpizza"

<h1>Add a new pizza</a>

<EditForm Model="@pizza" OnValidSubmit=@ProcessInputData OnInvalidSubmit=@ShowFeedback>
    <DataAnnotationsValidator />
    <ValidationSummary />

    <InputText id="name" @bind-Value="pizza.Name" />
    <ValidationMessage For="@(() => pizza.Name)" />

    <InputText id="description" @bind-Value="pizza.Description" />

    <InputText id="chefemail" @bind-Value="pizza.ChefEmail" />
    <ValidationMessage For="@(() => pizza.ChefEMail)" />

    <InputNumber id="price" @bind-Value="pizza.Price" />
    <ValidationMessage For="@(() => pizza.Price" />
</EditForm>

@code {
    private Pizza pizza = new();

    void ProcessInputData(EditContext context)
    {
        // Store valid data here
    }

    void ShowFeedback(EditContext context)
    {
        // Take action here to help the user correct the issues
    }
}