Exercise - Create a canvas app
Learning objective
In this exercise, learners use Copilot to create a canvas application that employees can use to request maintenance issues. You use copilot to build the data model and initial application layout.
Upon successful completion of this lab, you:
- Use Copilot to aid you in creating a data model to support your app.
- Modify a canvas application.
Scenario
Contoso College is looking for an application that employees can use to report maintenance issues throughout campus. Contoso wants to build canvas application that employees can access from their phones as needed.
Upon successful completion of this lab, you:
- Use Copilot to aid you in creating a data model to support your app.
- Modify a canvas application.
Task 1: Build data model and create app
Open a web browser and navigate to the Power Apps maker portal.
Using the navigation on the left, select Create.
Under Create your apps, choose Start with Copilot.
In the Describe the tables that you want copilot to build screen, type: "Create a single table for submitting maintenance issues."
Select the Table options button. From the menu that appears, select One Table.
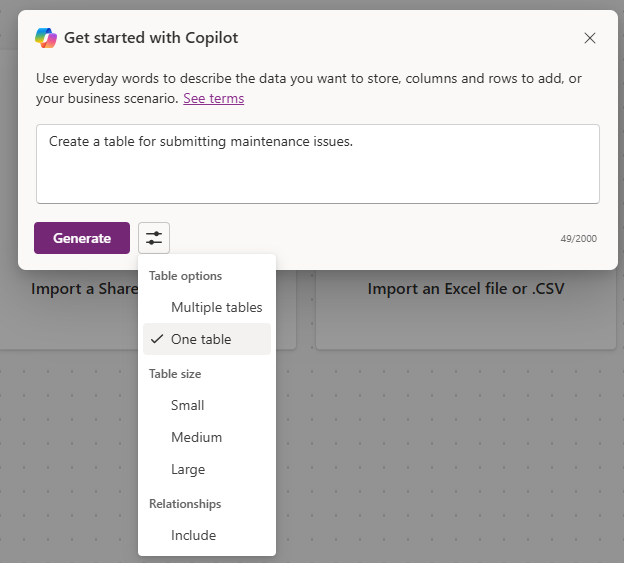
Select the Generate button.
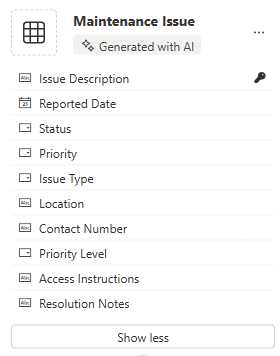
Copilot created a Maintenance Issue table. Next, we add more columns to the table.
In the Copilot pane, enter: "Add a choice column called Issue Type."
In the Copilot pane, individually add the following prompts.
- "Add a text column named Location."
- "Add a text column named Contact Number"
- "Add a choice column named Priority level."
- "Add a text column named Access Instructions."
- "Add a text column named Resolution Notes."
Next we're going to remove any unnecessary columns, as they'll be replaced with Lookup Columns.
If they exist in your table enter the following commands to remove them.
- "Remove the Reported By column."
- "Remove the Assigned To / Technician column."
Your Maintenance Issue table should resemble the image shown:
Next, we're going to add the user table to the data model so we can associate Maintenance Issue requests with specific users.
On the Command bar, select + Existing table.
Switch from Recommended to All Tables.
In the Search field, enter User.
Select the User table and select the Add Selected button.
On the Command bar, select Create relationships.
Configure the relationship as follows:
- One: User
- Many: Maintenance Issue
- Display Name: Requesting Employee
Select Done.
On the Command bar, select Create relationships.
Configure the relationship as follows:
- One: User
- Many: Maintenance Issue
- Display Name: Assigned to
- Select Advanced Options, and change the Schema Name to AssignedUser.
Select Done.
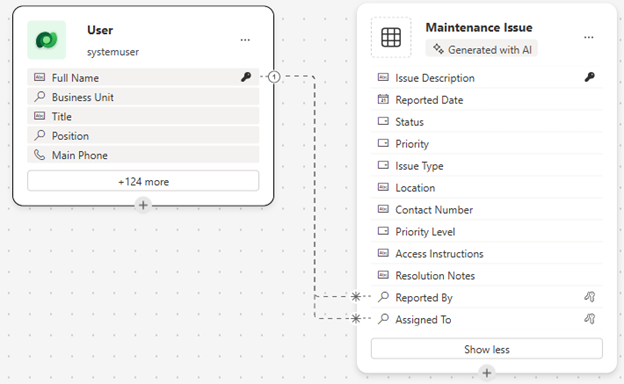
Your completed data model should resemble the image shown:
- Select the Save and open app button.
Note
It can take several minutes for your new app to be created.
Task 2: Personalize your new app
Now that your new app is created, we make some modifications to it to best fit our needs. We start by making some modifications to the Welcome screen.
- With your new app open, select the Image placeholder above the Maintenance Issues text.
- From the menu that appears, select Edit > Stock Images
- In the Search field, enter Medical, select the image of the Computer Keyboard and stethoscope, and choose Insert.
- Next, select the Image placeholder above Users.
- In the Search field, enter People, select the image you want to use, and choose Insert.
- From the menu that appears, select Edit > Stock Images.
Next, we're going to adjust the size of the images to make them easier for users to read. Additionally, we're going to adjust the text that is displayed for each item.
On the Command bar, select the Properties button. (Located just to the right of the Editing button.)
Select the image above Maintenance Issues.
In the Properties panel, configure the image as follows:
- Image Position: Fill
- Width: 350
- Height: 350
Repeat the earlier step to set the Height and Width of the Users image to 350 x 350.
Select the text below Maintenance Issues.
In the Properties panel, select the Text field, and change the text to: "Submit Maintenance Issue."
Select the Welcome Screen text in the Header.
In the Properties pane, set Show Logo to Off.
Set Profile Picture to Off.
In the Properties pane under the Style and theme group, select the Fill color icon.
Change the color to Black.
Make sure that you still have the Header selected, and change the Title, to Contoso Issue Reporting.
Your app resembles the image shown.

Task 3: Add a new screen to your app
We decide that, in addition to submitting Maintenance Issues, it makes sense for users to add assets.
With your app still open, If necessary, expand the Copilot pane. In Copilot enter the following text: "Add a new screen called Assets." Select Send.
Select the Keep it button to accept the screen.
A new screen called Assets is added to your app.
On the screen, select With Data.
In the Select Data Source screen, select Create new tables.
In Copilot, enter the following text: "Create a new table called Assets. It should include the following columns. Asset Name, Asset ID, Asset Type, Asset Location, Data Installed, and Department."
Select Generate.
If another table (Department) was added, Use copilot to Delete it by entering: "Remove Department Table."
After your table is created, select Save and exit.
Back in your App, select With Data again.
A new Asset screen is added to your app.
If necessary, on the Command bar, select the Properties button. (Next to the Editing button.)
Next, select in the list of Assets. A Pencil icon should appear, select the Pencil icon.
Select the Insert button and choose Text Label.
Position the Text Label, of it's located by the Asset Location.
With the Text Label selected, in the formula bar enter the following text: ThisItem.’Asset Type’
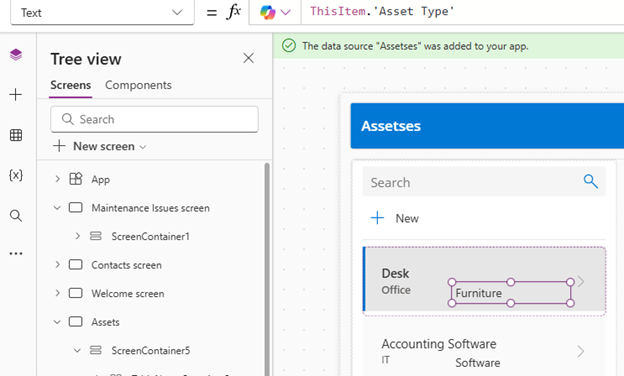
Select in the background of the Form.
Set the Columns property to 1.
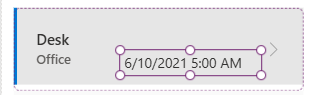
Your completed screen should resemble the image shown.

Task 4: Update the Welcome screen
Upon review, we decide that the ability to create users in this app is unnecessary, so we change the Welcome Screen to allow access to Assets.
- Using Tree view, select the Welcome Screen.
- Select the Image above Users / Contacts.
- From the menu that appears, select Edit, and choose Stock Images.
- In the Search field, enter Equipment, and select an image to use.
- Set the OnSelect property of the image to: Navigate('Assets')

- Select the Users/Contacts text and set the Text property to Assets.
- Select the Text below Equipment and change the Text property to: "View and Create asset records."
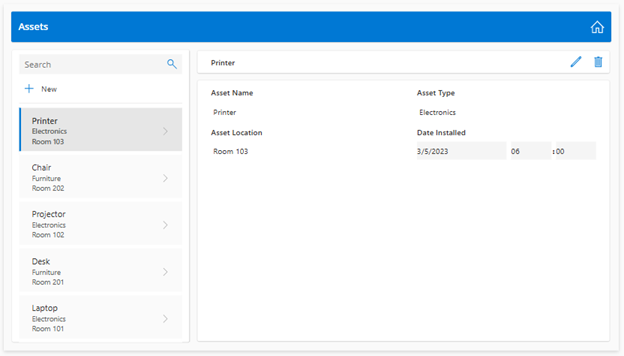
Task 5: Test your application
Next, Lets test your app to ensure that it's functioning correctly.
- On the Command bar, select the Play button.
- Select the Assets image.
- In the Search field, enter Office. (Notice how the list filters)
- Select the Office Chair record.
- Select the Edit (Pencil) button. Change the Category to Furniture.
- Change the Asset Type to Equipment.
- Select the Save button (Checkmark)
- Select the Save button.
- Notice how the Asset Type of the Desk changes to Equipment.
- Select the Home button.
- Select the Purple X to leave Preview mode.
Task 6: Save and publish the app
Goal: Save and publish the app to make it accessible across web browsers, mobile devices, or embedded platforms like SharePoint or Teams.
- In Power Apps Studio, select the Save button.
- In the Save as screen, set the Name to Contoso Issue Reporting, select Save.
- Select the Publish button.