Understand Azure Pipelines
You can automate the steps in your deployment process by using a pipeline. Each time you make a change to your code and commit the change to your Git repository, the pipeline runs your predefined process. A pipeline can verify that your Bicep code meets your quality standards, and it then automates the steps to deploy your resources to Azure. The process is defined in a pipeline definition that you create.
Azure Pipelines is a feature of the Azure DevOps service. Azure DevOps also includes Azure Repos, which hosts the Git repositories you use to store and share your code with your collaborators. When you store your Bicep code in Git, Azure Pipelines can access your code to automate your deployment processes. In this unit, you'll learn about Azure Pipelines.
What is a pipeline?
A pipeline is the repeatable process that you use to test and deploy your code defined in a configuration file. A pipeline includes all the steps you want to execute and in what order.
When you work with Azure Pipelines, you define your pipeline in a YAML file. A YAML file is a structured text file, similar to how Bicep is a structured text file. You can create and edit YAML files by using any text editor. In this module, you'll use Visual Studio Code. Visual Studio Code offers an extension that can make it easier to edit Azure DevOps YAML pipeline files. The Azure DevOps web interface also provides some tools that you can use to view and edit your pipeline YAML files.
Note
Azure Pipelines includes classic pipelines, an earlier version of the pipelines feature. YAML-based pipelines have replaced classic pipelines. In this module, we discuss only YAML pipelines. We recommend that you use YAML pipelines.
Because a pipeline YAML file is a code file, the file is stored with your Bicep code in your Git repository. You use Git features to collaborate on your pipeline definition. You can manage different versions of your pipeline file by using commits and branches. In a future module, you'll also learn about other advanced features of pipelines, like templates. Templates make pipeline definitions easy to reuse.
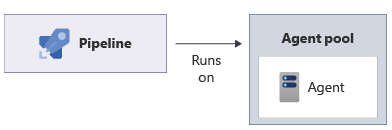
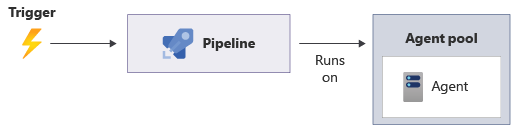
Agents and pools
Until now, you've deployed your Bicep files from your local computer. After you write a Bicep file, you deploy it to Azure by using the Azure CLI or Azure PowerShell. These tools use your computer's resources to submit the file to Azure. They use your personal identity to authenticate you to Azure and to verify that you have the permissions to deploy the resources.
A pipeline also needs access to a computer so it can execute the deployment steps. Azure Pipelines uses a machine called an agent. An agent is a computer that's configured to run deployment steps for a pipeline. Each agent already has the Bicep and Azure tooling you used in earlier modules, so it can do the same things you do from your own computer. Instead of a human executing commands, the Azure Pipelines service instructs the agent to run the steps that you've defined in a YAML file.
Azure Pipelines provides multiple types of agents for different operating systems, like Ubuntu or Windows, and different sets of tools. Microsoft runs these agents, so you don't have to maintain any compute infrastructure for the agents. The agents sometimes are called Microsoft-hosted agents or hosted agents because they're hosted on your behalf. When your pipeline runs, a hosted agent is automatically created. When your pipeline is finished running, the hosted agent is automatically deleted. You can't access hosted agents directly, so it's important that your pipeline contains all the steps necessary to deploy your solution.
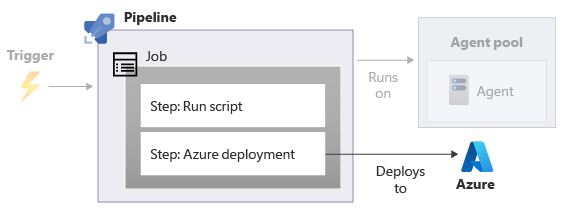
An agent pool contains multiple agents of the same type. When you create your pipeline, you tell Azure Pipelines which agent pool to use to execute each set of steps. When your pipeline runs, it waits for an agent from the pool to become available, and then it instructs the agent to run your deployment steps. Any agent in the pool might be assigned to run your pipeline.
Note
You have the option to create a custom agent that's called a self-hosted agent. You might create a self-hosted agent if you have specific software that you need to run as part of your pipeline or if you need to control precisely how the agent is configured. We don't discuss self-hosted agents in this module, but we provide a link to more information in the summary.
Triggers
To instruct Azure Pipelines when to run your pipeline, you create a trigger. You can choose from multiple types of triggers. For now, you'll use a manual trigger. You'll manually tell Azure Pipelines when to start running your pipeline. Later in this module, you'll learn more about other types of triggers.
Steps
A step represents a single operation that the pipeline performs. A step is similar to an individual command that you run in Bash or PowerShell. For most deployments, you execute several steps in a sequence. You define the sequence and all the details of each step in your pipeline YAML file.
Azure Pipelines offers two types of steps:
- Scripts: Use a script step to run a single command or a sequence of commands in Bash, PowerShell, or the Windows command shell.
- Tasks: A task is a convenient way to access many different capabilities without writing script statements. For example, a built-in task can run the Azure CLI and Azure PowerShell cmdlets to test your code or upload files to an FTP server. Anyone can write a task and share it with other users by publishing the task in the Visual Studio Marketplace. A large set of commercial and open-source tasks are available.
Some people prefer to use script statements instead of built-in tasks because they offer more control over what's executed. Other people prefer to use tasks so that they don't have to write and manage scripts. In this module, we use a mixture of both approaches.
Jobs
In Azure Pipelines, a job represents an ordered set of steps. You always have at least one job in a pipeline, and when you create complex deployments, it's common to have more than one job.
Note
You can set each job to run on a different agent pool. Running jobs on different agent pools is useful when you build and deploy solutions that need to use different operating systems in different parts of the job pipeline.
For example, suppose you're building an iOS app and the app's back-end service. You might have one job that runs on a macOS agent pool to build the iOS app and another job that runs on an Ubuntu or Windows agent pool to build the back end. You might even tell the pipeline to run the two jobs simultaneously, which speeds up your pipeline's execution.
Throughout this module, we declare the agent pool at the root of the pipeline definition files, so all jobs in the pipelines use the same agent pool.
Note
You also can use stages in Azure Pipelines to divide your pipeline into logical phases and add manual checks at various points in your pipeline's execution. You'll learn more about stages in future modules.
Basic pipeline example
Now that you know the basic concepts in Azure Pipelines, let's look at a simple pipeline definition in YAML:
trigger: none

pool:
  vmImage: ubuntu-latest

jobs:
- job:
  steps:
  - script: echo Hello, world!
    displayName: 'Run a one-line script'

  - script: |
      echo We'll add more steps soon.
      echo For example, we'll add our Bicep deployment step.
    displayName: 'Run a multi-line script'
Let's look at each part of the file in detail:
triggertells your pipeline when to execute. In this case,trigger: nonetells Azure Pipelines that you want to manually trigger the pipeline.poolinstructs the pipeline which agent pool to use when it runs the pipeline steps. In this example, the pipeline runs on an agent running the Ubuntu operating system, which comes from the pool of Microsoft-hosted agents.jobsgroups together all the jobs in your pipeline.jobtells your pipeline that you have a single job.Tip
When you have only one job in your pipeline, you can omit the
jobsandjobkeywords. We includedjobhere to make it clear how the concepts work together in a pipeline.stepslists the sequence of actions to run in the job. The example YAML includes two steps. Both steps run a simple script to echo some text. Each step has adisplayNamevalue, which is a human-readable name for the step. You'll see the display name when you look at the pipeline logs. To create a multi-line script step, use the pipe character (|) as shown in the example. After your step executes, you'll see the outputs in the pipeline log.
Important
In YAML files, indentation is important. Take a look at the example YAML. Some lines in the YAML are indented by two or four spaces. The number of spaces you use is important. If you don't indent your file correctly, Azure Pipelines can't interpret it. Visual Studio Code helps you find and fix errors in your YAML file indentation.