Deploy Bicep files by using a workflow
Now that you've created a basic workflow, you're ready to set up the workflow to deploy your Bicep files. In this unit, you'll learn how to deploy Bicep code from a workflow and how to set up the deployment steps.
Note
The commands in this unit are shown to illustrate concepts. Don't run the commands yet. You'll practice what you learn here soon.
Check out your code
Your Bicep files are stored in your Git repository. In GitHub Actions, you need to explicitly tell the workflow to check out the files from your Git repository. Otherwise, your workflow won't have access to the files. This step is usually the first thing your job does.
To check out your code, you can use the actions/checkout@v3 action:
name: MyWorkflow

jobs:
  deploy:
    runs-on: ubuntu-latest
    steps:
    - uses: actions/checkout@v3
      with:
        path: repo
Notice that the workflow includes the uses keyword. The keyword indicates you want to use a predefined action named actions/checkout.
Like Bicep resources, actions are always versioned. In this case, the workflow uses version 3, so @v3 is appended to the action name.
After the workflow includes this action, your repository's code will be checked out onto the runner's file system. You specify the path the files should be stored in by using the path parameter.
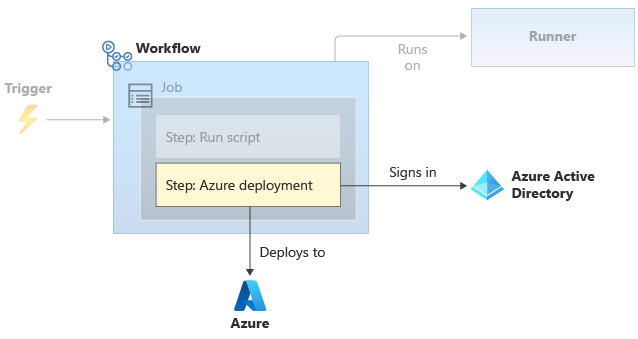
Authenticate to Azure
When you deploy a Bicep file from your own computer, you use the Azure CLI or Azure PowerShell. Before you can deploy your code, you need to sign in to Azure. Usually, the tools ask you to enter your credentials in a browser. After your credentials are verified, your permissions to deploy resources are confirmed and you can use the tools to deploy your Bicep file.
Tip
In this module, you'll create a workload identity for your workflow to use. The module Authenticate your Azure deployment workflow by using workload identities provides a more detailed explanation of workload identities including how they work, as well as how you create them, assign them roles, and manage them.
Deployment by workflow requires authentication, too. Because workflows run without human intervention, workflows authenticate to Azure by using a workload identity. GitHub and Microsoft Entra ID work together to securely authenticate your workflow without needing any credentials.
When your workflow needs to communicate with Azure, a workflow step signs in to Azure by using a workload identity. Then, the steps that are defined in the workflow use the workflow's identity.
You must ensure that your workload identity has the permissions it needs to execute your deployment steps. For example, you might need to assign the workload identity the Contributor role for the resource group where you deploy your resources.
Warning
It might seem easier to store your user credentials in your YAML file, then sign in by using the az login command. You should never use this approach to authenticate your workflow. Credentials in a YAML file are stored in clear text. Anyone who has access to your repository can see and use the credentials. Even if you restrict access to your GitHub repository, whenever someone clones your repository, the YAML file that holds the credentials will be on that person's computer.
Sign in to Azure
Before your workflow can execute commands against your Azure environment, it first needs to sign in. There's an action named azure/login that handles the sign-in process. You also need to grant permission for your workflow to work with authentication tokens.
name: MyWorkflow

on: [workflow_dispatch]

permissions:
  id-token: write
  contents: read

jobs:
  deploy:
    runs-on: ubuntu-latest
    steps:
    - uses: actions/checkout@v3
      with:
        path: repo
    - uses: azure/login@v1
      with:
        client-id: ${{ secrets.AZURE_CLIENT_ID }}
        tenant-id: ${{ secrets.AZURE_TENANT_ID }}
        subscription-id: ${{ secrets.AZURE_SUBSCRIPTION_ID }}
The azure/login action requires that you provide three pieces of information to use a workload identity: a Microsoft Entra application ID, your Microsoft Entra tenant (directory) ID, and the Azure subscription ID that you want to work with.
After this action has executed, your runner will be authenticated and able to run statements against your Azure environment.
Deploy your Bicep file
After your workflow signs in to Azure, it can use the workload identity to run the Bicep deployment. In GitHub Actions, you use the azure/arm-deploy action to initiate a Bicep deployment.
Note
There are other ways you can deploy Bicep files from GitHub Actions. For example, you can use the azure/CLI action and then provide Azure CLI commands to run your deployments. However, because the azure/arm-deploy task is specifically designed for deployments, you'll use that in this module.
Here's an example of how you can configure a step to use the azure/arm-deploy action:
name: MyWorkflow

on: [workflow_dispatch]

permissions:
  id-token: write
  contents: read

jobs:
  deploy:
    runs-on: ubuntu-latest
    steps:
    - uses: actions/checkout@v3
      with:
        path: repo
    - uses: azure/login@v1
      with:
        client-id: ${{ secrets.AZURE_CLIENT_ID }}
        tenant-id: ${{ secrets.AZURE_TENANT_ID }}
        subscription-id: ${{ secrets.AZURE_SUBSCRIPTION_ID }}
    - uses: azure/arm-deploy@v1
      with:
        resourceGroupName: ${{ env.AZURE_RESOURCEGROUP_NAME }}
        template: ./deploy/main.bicep
        parameters: environmentType=Test
The azure/arm-deploy action accepts several parameters, including:
resourceGroupName: The name of the resource group where you want to deploy the resources that are defined in the Bicep file.template: The path to the Bicep file in your repository. The path is relative to the repository's root.parameters: Indicates any parameter values you provide at deployment time. In this example, we provide a value for the environmentType parameter.
Because the previous azure/login action already signed your workflow in to Azure, the azure/arm-deploy step executes on an authenticated runner.
Variables
Often, your workflows contain values that you want to reuse in multiple places in your workflow file. You might also want to store these values at the top of the workflow file for easy reference, and to be able to change the values easily. In your workflow, the variables you define will be surfaced as environment variables. To define reusable values, use variables.
Create a variable
You can create variables at different levels in your workflow file. However, if you want them to be available for your whole workflow file, you define them near the top of the file, just below your on statement. To define your variables, use the env parameter:
env:
    AZURE_RESOURCEGROUP_NAME: gh-actions
    AZURE_WEBAPP_NAME: webapp-gh-actions
In the preceding example, we specify two environment variables.
Use a variable in your workflow
After you've created a variable, you use a special syntax to refer to it within your workflow's YAML file, like this:
${{ env.AZURE_RESOURCEGROUP_NAME }}
Default environment variables
GitHub Actions also uses default environment variables. Default environment variables contain predefined information you might want to use in your workflow. Here are some of the default environment variables you can use in your workflow:
github.sha: The identifier of the Git commit that triggered the workflow to execute.github.run_number: A unique number for each run of a particular workflow in a repository. This number begins at 1 for the workflow's first run and increments with each new run. You might use this variable to name your Azure deployment, so you can track the deployment back to the specific workflow run that triggered it.Note
In GitHub Actions, you can re-execute a workflow run. When you do this, the run number doesn't change, so you shouldn't use the
github.run_numbervariable to count how many times your workflow has executed.
Secrets
Sometimes, you need to store secret information for your workflow to use, like a database password or API key. You use GitHub secrets to securely store information that contains credentials or sensitive information. Your workflow can access the secret's value.
Secrets are created in your GitHub repository settings. A secret is available to all of the workflows in the repository. In a later module, you'll learn about environments, which enable you to restrict the use of secrets to deployments to a specific environment.
Warning
By default, GitHub Actions obfuscates secret variable values in workflow logs, but you need to follow good practices as well. Your workflow steps have access to the values of secrets. If your workflow includes a step that doesn't handle a secret securely, there's a chance the secret value might be shown in the workflow logs. You should always carefully review the any changes to a workflow definition file to verify the secrets won't be mishandled.
You can create secrets by using the GitHub web interface. To refer to a secret value in your workflow, use the following syntax:
${{ secrets.NAME_OF_THE_SECRET }}
When your workflow starts, the runner that's running your deployment steps has access to the decrypted GitHub secret value. GitHub Actions is designed to not reveal secret values in your workflow logs.
Tip
Just like Bicep parameters, you don't need to create variables for everything. It's a good idea to create variables for anything that might change between environments, and GitHub secrets for anything that's secret. Because the workflow will always use the same Bicep file, you don't need to create a variable for the path.
In this module, you'll use GitHub secrets to store the information the azure/login task needs to sign in to Azure: your Microsoft Entra subscription and tenant ID and the workload identity's application registration ID.