Create an agent in SharePoint
To create an agent in SharePoint, a user must have Edit permissions or higher for the SharePoint site or document library for which they plan to create the agent. While you use Copilot Studio to create agents in Copilot Chat, you use the Copilot agent tool in SharePoint to create SharePoint agents.
You can create your own SharePoint agent and edit a previously created agent by:
- Customizing its branding and purpose.
- Adding or removing the sites, pages, and files your agent should include as knowledge sources beyond the current SharePoint site.
- Refining the agent's behavior by writing customized prompts tailored to the purpose and scope of the agent.
Note
The agent only answers your questions using information from sites, pages, and files that you already have access to and included as the agent's sources. To get information from other sources, you might need to update permissions for yourself, or the people you want to share the agent with.
After you sign into your SharePoint site, there are four places from which you can initiate the process to create a new agent:
- The SharePoint site's homepage
- The command bar of a document library
- The context menu of the selected files in a document library
- The agent chat pane
No matter where you choose to create your agent from, once you select the option to create a new agent, the agent is immediately ready and scoped to your selection.
The following four sections examine each of these places from which you can create an agent in SharePoint.
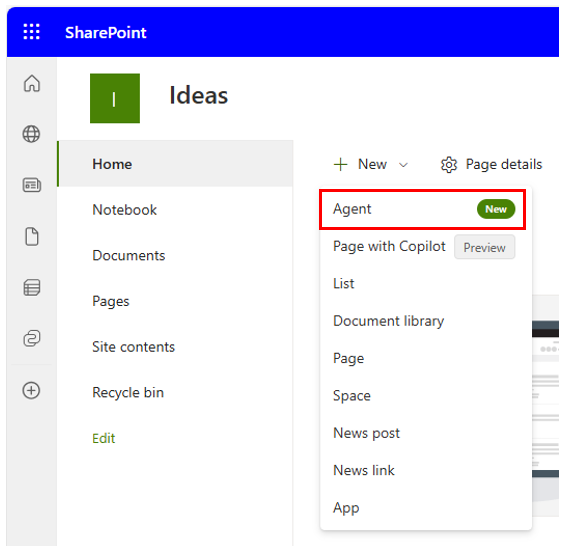
From the SharePoint site's homepage
On the site home page, select +New and then select Agent from the drop-down menu that appears.
From the command bar of a document library
On a document library, you can choose Create an agent for all supported files in this library.

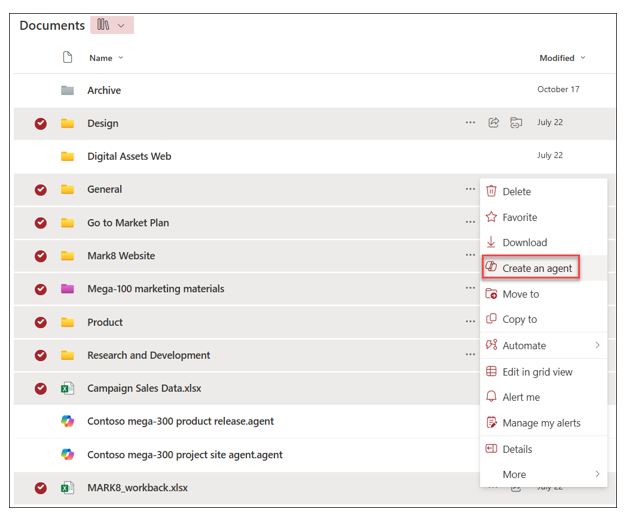
From the context menu of the selected files in a document library
Instead of creating an agent for all files in a document library, sometimes you might want to include just some of the files in an agent rather than all the files. In this case, you can select the files you want, then select Create an agent from the context menu by either right-clicking or selecting the ellipsis next to one of the selected files:
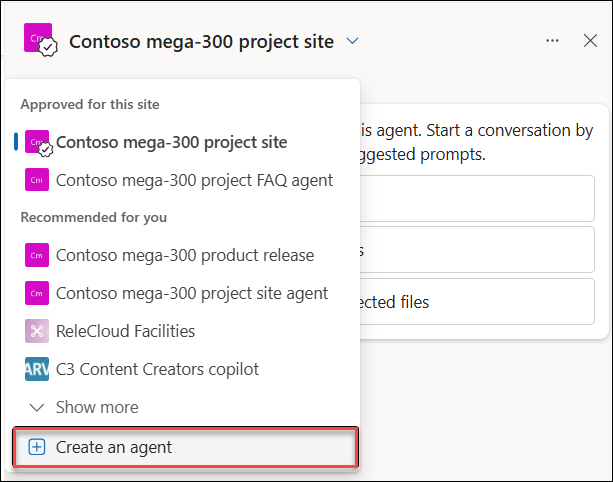
From the agent chat pane
On any site, page, or document library, select the Copilot button on the upper right corner of the window to open the agent. Next, select the drop-down next to the current agent and then select Create an agent.
Steps to create an agent in SharePoint
Once you initiate the process of creating SharePoint agent through any of the prior methods, the Copilot agent tool in SharePoint opens. This step creates a draft version of your agent, which it displays in the Create your new agent window.
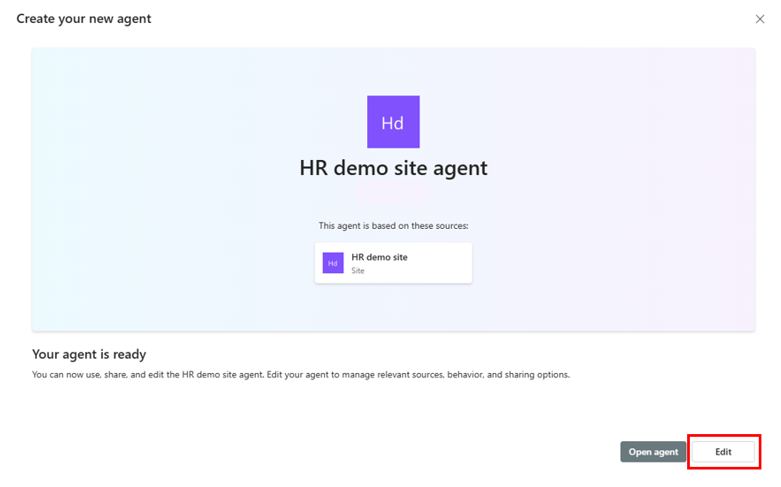
You must then select the Edit button to configure your agent. Doing so opens the Create your new agent form that contains three tabs – Overview, Sources, and Behavior. The Overview tab is opened first.
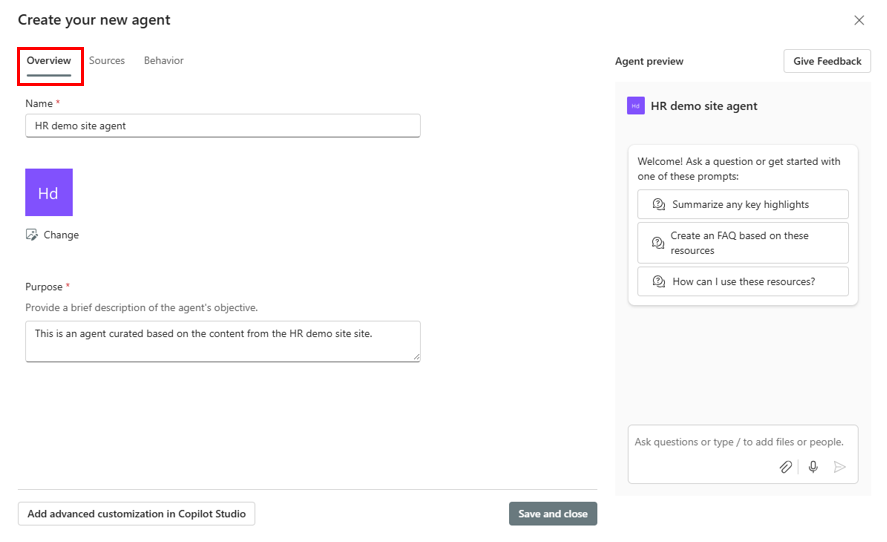
In the Overview tab, you must enter the agent's name and description. Default values are provided for each field, but you can change them if you wish. This tab also displays the default icon associated with the agent. You can select the Change option if you wish to customize the icon. An agent icon must be a .png file that's doesn't exceed 1 MB in size.
Here's how the "create" process works:
- When you first access the Edit agent form, you're configuring a draft version of the agent.
- From the Overview tab, you can navigate back and forth between the tabs and make any changes that you want without selecting the Save and close button. Until you select the Save and close button, all changes that you make on each of the tabs are made to the draft version of the agent.
- Once you select the Save and close button, the agent is changed to a live version. You can continue to make changes at that point from any of the tabs, but any changes you make are made to the live version of the agent.
After configuring the Overview tab, you should select the Sources tab.
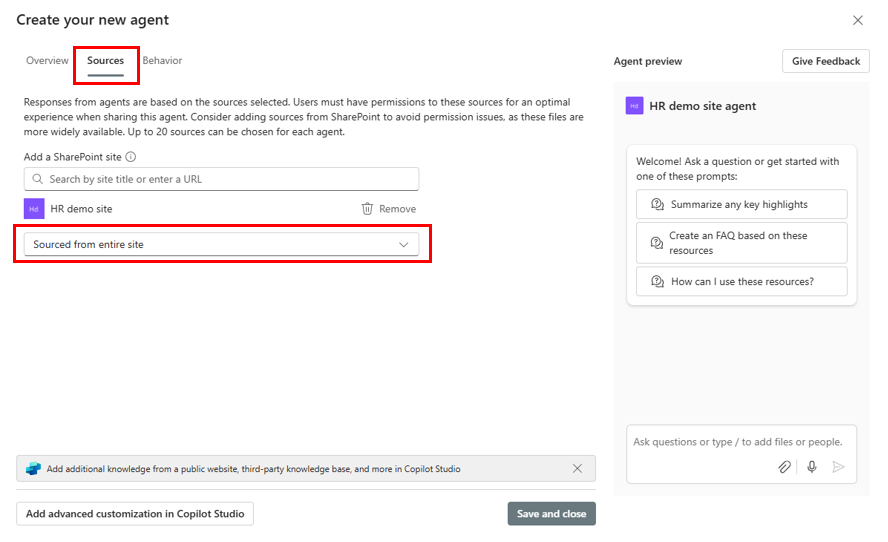
The Sources tab enables you to define more sources to the draft version of your agent. A SharePoint site agent is similar to an agent created in Copilot Chat in that you can add up to 20 sources for an individual agent. However, the format of this tab is a little different from the Knowledge area in Copilot Studio that's used to create Copilot Chat agents.
The default source for a SharePoint agent is the entire SharePoint site. You can see this option in the source field, where the default value is Source from entire site. If you select this field, a drop-down menu appears with another option - Sourced from document libraries, folders, or files.
If you select the Sourced from document libraries, folders, or files option, the following menu option appears on below it: +Add document libraries, folders, or files. If you select this menu option, the Pick items window appears.

The Pick items window displays the Documents folder for the SharePoint site associated with the agent. You have several options here:
- Select all the files and folders in the Documents library. Choose the Select button to select the entire Documents library. Doing so returns you the Sources tab and displays Documents below the Sourced from document libraries, folders, or files field.
- Select specific files and folders within the Documents library. When you do so, a check mark appears next to the selected files and folders. Doing so returns you the Sources tab and displays the selected files and folders below the** Sourced from document libraries, folders, or files** field.
Once you're back on the Sources tab, you can select the +Add document libraries, folders, or files option if you want to add more libraries, files, or folders.
Once you finish defining your sources, you should select the Behavior tab.
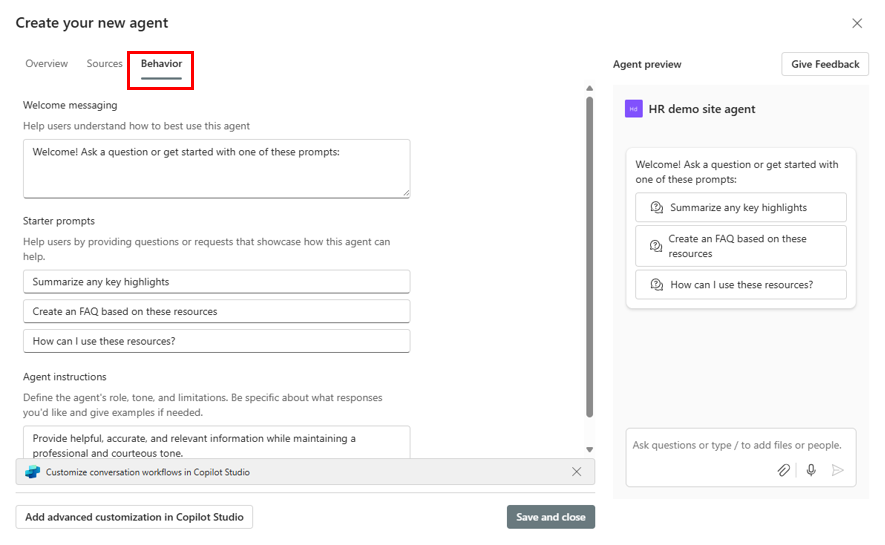
The Behavior tab allows you to define a Welcome message, which is displayed when a user selects this agent in SharePoint. This message field is available in SharePoint agents, but not in Copilot Chat agents.
From here, you can configure up to three starter prompts. This field is also different from starter prompts in Copilot Chat agents. SharePoint agents are limited to three starter prompts, whereas Copilot Chat agents can have an unlimited number of starter prompts.
Finally, you can define the instructions for the agent using natural language text, just like you do when using Copilot Studio to create an agent in Copilot Chat. That being said, there's a significant difference between the two tools regarding the instructions:
- When you define instructions in Copilot Chat, Copilot Studio prompts you for any refinements that you might want to make to the instructions. Depending on what the user includes in the instructions, Copilot Studio typically asks the user questions to refine the instructions. For example, Copilot Studio might ask a question such as "Do you want the tone of the answers to be professional or casual?"
- When you're using the Copilot agent tool in SharePoint, it doesn't carry on a conversation with you regarding changes to the instructions like Copilot Studio does for agents in Copilot Chat. In SharePoint, you can always refine the instructions manually, but the Copilot agent tool doesn't prompt you with any suggested changes.
Up to this point, the following differences in creating Copilot Chat agents and SharePoint agents have been defined:
- The Copilot tool in SharePoint doesn't allow you to configure your agent based on a predefined agent template.
- You can enter a Welcome message in a SharePoint agent, which isn't available in Copilot Chat agents.
- You can only have a maximum of three starter prompts in a SharePoint agent versus an unlimited number of starter prompts in a Copilot Chat agent.
- The Copilot tool in SharePoint doesn't carry on a conversation with you to refine instructions like Copilot Studio does in Copilot Chat.
There's one final difference between these two tools. This difference is probably the most significant of all, since it reflects the different needs and functionalities of the two platforms. If you recall, Copilot Studio allows you to enable two other capabilities in Copilot Chat agents - the Code Interpreter and the Image Generator. These features aren't available in the Copilot tool in SharePoint. The reason for this difference is due to the specific design and intended use cases of each platform.
- Copilot Studio. This tool is designed to create more interactive and versatile Copilot Chat agents that can handle a wide range of tasks, including generating images and interpreting code. These capabilities are useful in dynamic chat environments where users might need immediate visual aids or code execution.
- Copilot tool in SharePoint. The primary focus of SharePoint agents is to enhance content discovery, streamline workflows, and provide insights based on the content within SharePoint sites. These agents are tailored to support document management, collaboration, and information retrieval tasks. As such, they don't include capabilities like image generation or code interpretation, which are less relevant to the typical use cases within SharePoint. If you need an agent with image generation or code interpretation capabilities, using Copilot Studio in Copilot Chat would be the appropriate choice.
Once you're done making your final changes to the SharePoint agent, select the Save and close button to save your changes. If the agent was in draft mode, then saving it converts it to a live agent.
Test the agent
Copilot Studio and the Copilot agent tool in SharePoint share one other common trait. They both provide a test feature that allows you to test the agent either while it's in draft mode or after it went live. Testing an agent is covered in greater detail in a later training unit.