Exercise - Add a parameter file and secure parameters
In this exercise, you'll create a parameters file that provides values for the Bicep file that you previously created. In the same parameters file, you'll also add Azure Key Vault references to securely provide sensitive information.
During the process, you'll do the following tasks:
- Add some secure parameters.
- Create a parameters file.
- Test the deployment to ensure that the parameters file is valid.
- Create a key vault and secrets.
- Update the parameters file to refer to the key vault secrets.
- Re-test the deployment to ensure that the parameters file is still valid.
Remove the default value for the App Service plan SKU
To make your template work across environments, the Azure App Service plan's SKU details will be provided in a parameters file rather than by a default value.
In the main.bicep file in Visual Studio Code, update the appServicePlanSku parameter to remove its default value.
@description('The name and tier of the App Service plan SKU.')
param appServicePlanSku object
Add new parameters
Now you need to add a SQL server and database. First, you'll add parameters for the administrator login and password, and the database SKU. You'll set their values later.
In the main.bicep file in Visual Studio Code, add the sqlServerAdministratorLogin, sqlServerAdministratorPassword, and sqlDatabaseSku parameters underneath the current parameter declarations. When you're finished, your parameter declarations should look like this example:
@description('The name of the environment. This must be dev, test, or prod.')
@allowed([
  'dev'
  'test'
  'prod'
])
param environmentName string = 'dev'

@description('The unique name of the solution. This is used to ensure that resource names are unique.')
@minLength(5)
@maxLength(30)
param solutionName string = 'toyhr${uniqueString(resourceGroup().id)}'

@description('The number of App Service plan instances.')
@minValue(1)
@maxValue(10)
param appServicePlanInstanceCount int = 1

@description('The name and tier of the App Service plan SKU.')
param appServicePlanSku object

@description('The Azure region into which the resources should be deployed.')
param location string = 'eastus'

@secure()
@description('The administrator login username for the SQL server.')
param sqlServerAdministratorLogin string

@secure()
@description('The administrator login password for the SQL server.')
param sqlServerAdministratorPassword string

@description('The name and tier of the SQL database SKU.')
param sqlDatabaseSku object
Notice that you're not specifying default values for the sqlServerAdministratorLogin and sqlServerAdministratorPassword parameters. It's bad security practice to add default values for secure parameters. Also, you're not specifying a default value for sqlDatabaseSku. You'll specify a value in a parameters file.
Add new variables
In the main.bicep file in Visual Studio Code, add the sqlServerName and sqlDatabaseName variables underneath the existing variables. When you're finished, your variable declarations should look like this example:
var appServicePlanName = '${environmentName}-${solutionName}-plan'
var appServiceAppName = '${environmentName}-${solutionName}-app'
var sqlServerName = '${environmentName}-${solutionName}-sql'
var sqlDatabaseName = 'Employees'
Add SQL server and database resources
In the main.bicep file in Visual Studio Code, add the following code to the bottom of the file:
resource sqlServer 'Microsoft.Sql/servers@2024-05-01-preview' = {
  name: sqlServerName
  location: location
  properties: {
    administratorLogin: sqlServerAdministratorLogin
    administratorLoginPassword: sqlServerAdministratorPassword
  }
}

resource sqlDatabase 'Microsoft.Sql/servers/databases@2024-05-01-preview' = {
  parent: sqlServer
  name: sqlDatabaseName
  location: location
  sku: {
    name: sqlDatabaseSku.name
    tier: sqlDatabaseSku.tier
  }
}
Save the changes to the file.
Verify your Bicep file
After you've completed all of the preceding changes, your Bicep file should look like this example:
@description('The name of the environment. This must be dev, test, or prod.')
@allowed([
  'dev'
  'test'
  'prod'
])
param environmentName string = 'dev'

@description('The unique name of the solution. This is used to ensure that resource names are unique.')
@minLength(5)
@maxLength(30)
param solutionName string = 'toyhr${uniqueString(resourceGroup().id)}'

@description('The number of App Service plan instances.')
@minValue(1)
@maxValue(10)
param appServicePlanInstanceCount int = 1

@description('The name and tier of the App Service plan SKU.')
param appServicePlanSku object

@description('The Azure region into which the resources should be deployed.')
param location string = 'eastus'

@secure()
@description('The administrator login username for the SQL server.')
param sqlServerAdministratorLogin string

@secure()
@description('The administrator login password for the SQL server.')
param sqlServerAdministratorPassword string

@description('The name and tier of the SQL database SKU.')
param sqlDatabaseSku object

var appServicePlanName = '${environmentName}-${solutionName}-plan'
var appServiceAppName = '${environmentName}-${solutionName}-app'
var sqlServerName = '${environmentName}-${solutionName}-sql'
var sqlDatabaseName = 'Employees'

resource appServicePlan 'Microsoft.Web/serverfarms@2024-04-01' = {
  name: appServicePlanName
  location: location
  sku: {
    name: appServicePlanSku.name
    tier: appServicePlanSku.tier
    capacity: appServicePlanInstanceCount
  }
}

resource appServiceApp 'Microsoft.Web/sites@2024-04-01' = {
  name: appServiceAppName
  location: location
  properties: {
    serverFarmId: appServicePlan.id
    httpsOnly: true
  }
}

resource sqlServer 'Microsoft.Sql/servers@2024-05-01-preview' = {
  name: sqlServerName
  location: location
  properties: {
    administratorLogin: sqlServerAdministratorLogin
    administratorLoginPassword: sqlServerAdministratorPassword
  }
}

resource sqlDatabase 'Microsoft.Sql/servers/databases@2024-05-01-preview' = {
  parent: sqlServer
  name: sqlDatabaseName
  location: location
  sku: {
    name: sqlDatabaseSku.name
    tier: sqlDatabaseSku.tier
  }
}
If it doesn't, either copy the example or adjust your template to match the example.
Create a parameters file
Open Visual Studio Code, and open the folder where the main.bicep file is located. In the same folder, create a new file called main.parameters.dev.json.
In the main.parameters.dev.json file, add the following code:
{
  "$schema": "https://schema.management.azure.com/schemas/2019-04-01/deploymentParameters.json#",
  "contentVersion": "1.0.0.0",
  "parameters": {
    "appServicePlanSku": {
      "value": {
        "name": "F1",
        "tier": "Free"
      }
    },
    "sqlDatabaseSku": {
      "value": {
        "name": "Standard",
        "tier": "Standard"
      }
    }
  }
}
Save the changes to the file.
Deploy the Bicep template with the parameters file
Run the following Azure CLI command in the terminal. Notice that you're providing a parameters file for the deployment.
az deployment group create \
  --name main \
  --template-file main.bicep \
  --parameters main.parameters.dev.json
Run the following Azure PowerShell command in the terminal. Notice that you're providing a parameters file for the deployment.
New-AzResourceGroupDeployment `
  -Name main `
  -TemplateFile main.bicep `
  -TemplateParameterFile main.parameters.dev.json
You're prompted to enter the values for sqlServerAdministratorLogin and sqlServerAdministratorPassword parameters when you execute the deployment. You don't need to specify solutionName because it has a default value specified in the template. You don't need to specify the other parameter values because their values are specified in the parameters file.
Tip
When you enter the secure parameters, the values you choose must follow some rules:
sqlServerAdministratorLoginmust not be an easily guessable login name likeadminorroot. It can contain only alphanumeric characters and must start with a letter.sqlServerAdministratorPasswordmust be at least eight characters long and include lowercase letters, uppercase letters, numbers, and symbols. For more information on password complexity, see the SQL Azure password policy.
If the parameter values don't meet the requirements, Azure SQL won't deploy your server.
Also, make sure you keep a note of the login and password that you enter. You'll use them in the next section.
The deployment might take a couple of minutes to finish.
Create a key vault and secrets
Your toy company already has a key vault with the secrets it needs for its deployments. To simulate this scenario, you'll create a new key vault and add some secrets to use.
In the terminal, execute the following commands to create the key vault and secrets. Update the variable values before you execute these commands. Key vault names must be a globally unique string of 3 to 24 characters that can contain only uppercase and lowercase letters, hyphens (-), and numbers. For example, demo-kv-1234567abcdefg.
Caution
Make sure you use the same login and password that you used in the previous step. If you don't, the next deployment won't complete successfully.
For the keyVaultName replace YOUR-KEY-VAULT-NAME with a name for your key vault. The read commands for the login and password variables will prompt you for values. As you type, the values aren't displayed in the terminal and aren't saved in your command history.
To protect the variable values in your Bash terminal session, be aware of the following items:
- Variable values aren't stored as a secure string and can be displayed by entering a command like
$yourVariableNameon the command line or with theechocommand. In this exercise, after your vault secrets are created, you can remove each variable's existing value by running thereadcommands without inputting a value. - The
az keyvault secret setuses the--valueparameter to create a secret's value. The command's output displays a property namedvaluethat contains the secret's value. You can suppress the command's entire output with the parameter--output noneas shown in the example.
To create the keyVaultName, login, and password variables, run each command separately. Then you can run the block of commands to create the key vault and secrets.
keyVaultName='YOUR-KEY-VAULT-NAME'
read -s -p "Enter the login name: " login
read -s -p "Enter the password: " password

az keyvault create --name $keyVaultName --location eastus --enabled-for-template-deployment true
az keyvault secret set --vault-name $keyVaultName --name "sqlServerAdministratorLogin" --value $login --output none
az keyvault secret set --vault-name $keyVaultName --name "sqlServerAdministratorPassword" --value $password --output none
Note
You're setting the --enabled-for-template-deployment setting on the vault so that Azure can use the secrets from your vault during deployments. If you don't set this setting then, by default, your deployments can't access secrets in your vault.
Also, whoever executes the deployment must also have permission to access the vault. Because you created the key vault, you're the owner, so you won't have to explicitly grant the permission in this exercise. For your own vaults, you need to grant access to the secrets.
For the keyVaultName replace YOUR-KEY-VAULT-NAME with a name for your key vault. The Read-Host commands for the login and password variables will prompt you for values. As you type, the values aren't displayed in the terminal and aren't saved in your command history. The values are stored as a secure string.
To create the keyVaultName, login, and password variables, run each command separately. Then you can run the block of commands to create the key vault and secrets.
$keyVaultName = 'YOUR-KEY-VAULT-NAME'
$login = Read-Host "Enter the login name" -AsSecureString
$password = Read-Host "Enter the password" -AsSecureString

New-AzKeyVault -VaultName $keyVaultName -Location eastus -EnabledForTemplateDeployment
Set-AzKeyVaultSecret -VaultName $keyVaultName -Name 'sqlServerAdministratorLogin' -SecretValue $login
Set-AzKeyVaultSecret -VaultName $keyVaultName -Name 'sqlServerAdministratorPassword' -SecretValue $password
Note
You're setting the -EnabledForTemplateDeployment setting on the vault so that Azure can use the secrets from your vault during deployments. If you don't set this setting then, by default, your deployments can't access secrets in your vault.
Also, whoever executes the deployment must also have permission to access the vault. Because you created the key vault, you're the owner, so you won't have to explicitly grant the permission in this exercise. For your own vaults, you need to grant access to the secrets.
Get the key vault's resource ID
To use the key vault secrets in your deployment, you need the resource ID of the vault. Run the following command to retrieve the key vault's resource ID:
az keyvault show --name $keyVaultName --query id --output tsv
(Get-AzKeyVault -Name $keyVaultName).ResourceId
The resource ID will look something like this example:
/subscriptions/aaaa0a0a-bb1b-cc2c-dd3d-eeeeee4e4e4e/resourceGroups/PlatformResources/providers/Microsoft.KeyVault/vaults/toysecrets
Copy the resource ID. You'll use it in the next step.
Add a key vault reference to a parameters file
In the main.parameters.dev.json file, append the following code after the
sqlDatabaseSkuparameter's closing brace. Make sure that you replaceYOUR-KEY-VAULT-RESOURCE-IDwith the value of the key vault resource ID you copied in the previous step. After you're finished, your parameters file should look like this example:{ "$schema": "https://schema.management.azure.com/schemas/2019-04-01/deploymentParameters.json#", "contentVersion": "1.0.0.0", "parameters": { "appServicePlanSku": { "value": { "name": "F1", "tier": "Free" } }, "sqlDatabaseSku": { "value": { "name": "Standard", "tier": "Standard" } }, "sqlServerAdministratorLogin": { "reference": { "keyVault": { "id": "YOUR-KEY-VAULT-RESOURCE-ID" }, "secretName": "sqlServerAdministratorLogin" } }, "sqlServerAdministratorPassword": { "reference": { "keyVault": { "id": "YOUR-KEY-VAULT-RESOURCE-ID" }, "secretName": "sqlServerAdministratorPassword" } } } }Save the changes to the file.
Deploy the Bicep template with parameters file and Azure Key Vault references
Run the following Azure CLI command in the terminal. You're providing a parameters file along with a Bicep file.
az deployment group create \
  --name main \
  --template-file main.bicep \
  --parameters main.parameters.dev.json
Run the following Azure PowerShell command in the terminal. You're providing a parameters file along with a Bicep file.
New-AzResourceGroupDeployment `
  -Name main `
  -TemplateFile main.bicep `
  -TemplateParameterFile main.parameters.dev.json
You aren't prompted to enter the values for sqlServerAdministratorLogin and sqlServerAdministratorPassword parameters when you execute the deployment this time. Azure retrieves the values from your key vault instead.
The deployment completes more quickly this time because the Azure resources already exist.
Check your deployment
In your browser, go back to the Azure portal. Go to your resource group. You'll still see one successful deployment, because the deployment used the same name as the first deployment.
Select the 1 Succeeded link.
Select the deployment called main.
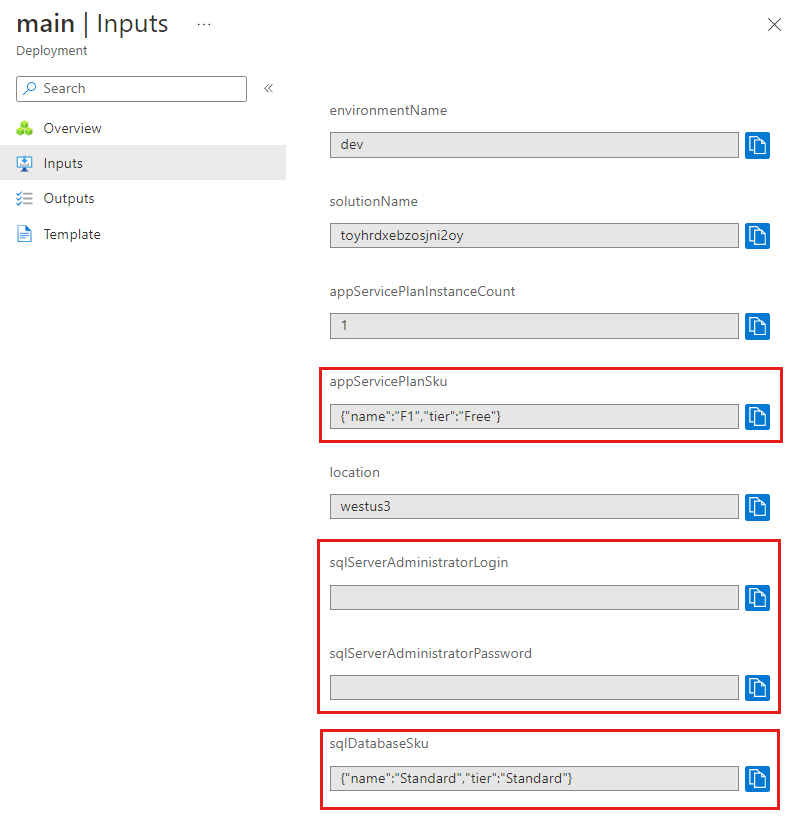
On the left menu, select Inputs.
Notice that the
appServicePlanSkuand thesqlDatabaseSkuparameter values have both been set to the values in the parameters file. Also, notice that thesqlServerAdministratorLoginandsqlServerAdministratorPasswordparameter values aren't displayed, because you applied the@secure()decorator to them.