Exercise - Add a controller
A controller is a public class with one or more public methods known as actions. By convention, a controller is placed in the project root's Controllers directory. The actions are exposed as HTTP endpoints inside the web API controller.
Create a controller
Select the Controllers folder in Visual Studio Code and add a new file called PizzaController.cs.
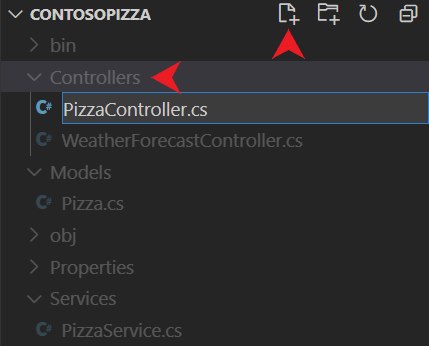
An empty class file named PizzaController.cs is created in the Controllers directory. The Controllers directory name is a convention. The directory name comes from the model-view-controller architecture that the web API uses.
Note
By convention, controller class names are suffixed with Controller.
Add the following code to Controllers/PizzaController.cs. Save your changes.
using ContosoPizza.Models;
using ContosoPizza.Services;
using Microsoft.AspNetCore.Mvc;

namespace ContosoPizza.Controllers;

[ApiController]
[Route("[controller]")]
public class PizzaController : ControllerBase
{
    public PizzaController()
    {
    }

    // GET all action

    // GET by Id action

    // POST action

    // PUT action

    // DELETE action
}
As you learned previously, this class derives from
ControllerBase, the base class for working with HTTP requests in ASP.NET Core. It also includes the two standard attributes you learned about:[ApiController]and[Route]. As before, the[Route]attribute defines a mapping to the[controller]token. Because this controller class is namedPizzaController, this controller handles requests tohttps://localhost:{PORT}/pizza.
Get all pizzas
The first REST verb that you need to implement is GET, where a client can get all pizzas from the API. You can use the built-in [HttpGet] attribute to define a method that returns the pizzas from our service.
Replace the // GET all action comment in Controllers/PizzaController.cs with the following code:
[HttpGet]
public ActionResult<List<Pizza>> GetAll() =>
    PizzaService.GetAll();
The preceding action:
- Responds only to the HTTP
GETverb, as denoted by the[HttpGet]attribute. - Returns an
ActionResultinstance of typeList<Pizza>. TheActionResulttype is the base class for all action results in ASP.NET Core. - Queries the service for all pizza and automatically returns data with a
Content-Typevalue ofapplication/json.
Retrieve a single pizza
The client might also want to request information about a specific pizza instead of the entire list. You can implement another GET action that requires an id parameter. You can use the built-in [HttpGet("{id}")] attribute to define a method that returns the pizzas from our service. The routing logic registers [HttpGet] (without id) and [HttpGet("{id}")] (with id) as two different routes. You can then write a separate action to retrieve a single item.
Replace the // GET by Id action comment in Controllers/PizzaController.cs with the following code:
[HttpGet("{id}")]
public ActionResult<Pizza> Get(int id)
{
    var pizza = PizzaService.Get(id);

    if(pizza == null)
        return NotFound();

    return pizza;
}
The preceding action:
- Responds only to the HTTP
GETverb, as denoted by the[HttpGet]attribute. - Requires that the
idparameter's value is included in the URL segment afterpizza/. Remember, the controller-level[Route]attribute defined the/pizzapattern. - Queries the database for a pizza that matches the provided
idparameter.
Each ActionResult instance used in the preceding action is mapped to the corresponding HTTP status code in the following table:
| ASP.NET Core action result |
HTTP status code | Description |
|---|---|---|
Ok is implied |
200 | A product that matches the provided id parameter exists in the in-memory cache.The product is included in the response body in the media type, as defined in the accept HTTP request header (JSON by default). |
NotFound |
404 | A product that matches the provided id parameter doesn't exist in the in-memory cache. |
Build and run the new controller
Build and start the web API by running the following command:
dotnet run
Test the controller with an Http file
Open ContosoPizza.http
Add a new GET to call the
Pizzaendpoint under the ### seperator:GET {{ContosoPizza_HostAddress}}/pizza/ Accept: application/json ###Select the Send Request command above this new GET call.
The preceding command returns a list of all pizzas in JSON:
HTTP/1.1 200 OK
Connection: close
Content-Type: application/json; charset=utf-8
Date: Wed, 17 Jan 2024 16:57:09 GMT
Server: Kestrel
Transfer-Encoding: chunked

[
    {
        "id": 1,
        "name": "Classic Italian",
        "isGlutenFree": false
    },
    {
        "id": 2,
        "name": "Veggie",
        "isGlutenFree": true
    }
]
To query for a single pizza, you can make another
GETrequest, but pass in anidparameter by using the following command:GET {{ContosoPizza_HostAddress}}/pizza/1 Accept: application/json ###The preceding command returns
Classic Italianwith the following output:HTTP/1.1 200 OK Content-Type: application/json; charset=utf-8 Date: Fri, 02 Apr 2021 21:57:57 GMT Server: Kestrel Transfer-Encoding: chunked { "id": 1, "name": "Classic Italian", "isGlutenFree": false }Our API also handles situations where the item doesn't exist. Call the API again, but pass in an invalid pizza
idparameter by using the following command:GET {{ContosoPizza_HostAddress}}/pizza/5 Accept: application/json ###The preceding command returns a
404 Not Founderror with the following output:HTTP/1.1 404 Not Found Content-Type: application/problem+json; charset=utf-8 Date: Fri, 02 Apr 2021 22:03:06 GMT Server: Kestrel Transfer-Encoding: chunked { "type": "https://tools.ietf.org/html/rfc7231#section-6.5.4", "title": "Not Found", "status": 404, "traceId": "00-ec263e401ec554b6a2f3e216a1d1fac5-4b40b8023d56762c-00" }
Now that you finished implementing the GET verbs. In the next unit, you can add more actions to PizzaController to support CRUD operations on pizza data.
Optional: Test the controller with Command Line HTTP Read-Eval-Print Loop (REPL)
Open the existing
httpreplterminal, or open a new integrated terminal from Visual Studio Code by selecting Terminal > New Terminal from the main menu.Connect to our web API by running the following command:
httprepl https://localhost:{PORT}Alternatively, run the following command at any time while
HttpReplis running:connect https://localhost:{PORT}To see the newly available
Pizzaendpoint, run the following command:lsThe preceding command detects all APIs available on the connected endpoint. It should display the following code:
 https://localhost:{PORT}/> ls
 .                 []
 Pizza             [GET]
 WeatherForecast   [GET]
Go to the
Pizzaendpoint by running the following command:cd PizzaThe preceding command shows an output of available APIs for the
Pizzaendpoint:https://localhost:{PORT}/> cd Pizza /Pizza [GET]Make a
GETrequest inHttpReplby using the following command:getThe preceding command returns a list of all pizzas in JSON:
  HTTP/1.1 200 OK
  Content-Type: application/json; charset=utf-8
  Date: Fri, 02 Apr 2021 21:55:53 GMT
  Server: Kestrel
  Transfer-Encoding: chunked

  [
      {
          "id": 1,
          "name": "Classic Italian",
          "isGlutenFree": false
      },
      {
          "id": 2,
          "name": "Veggie",
          "isGlutenFree": true
      }
  ]
To query for a single pizza, you can make another
GETrequest, but pass in anidparameter by using the following command:get 1The preceding command returns
Classic Italianwith the following output:HTTP/1.1 200 OK Content-Type: application/json; charset=utf-8 Date: Fri, 02 Apr 2021 21:57:57 GMT Server: Kestrel Transfer-Encoding: chunked { "id": 1, "name": "Classic Italian", "isGlutenFree": false }Our API also handles situations where the item doesn't exist. Call the API again, but pass in an invalid pizza
idparameter by using the following command:get 5The preceding command returns a
404 Not Founderror with the following output:HTTP/1.1 404 Not Found Content-Type: application/problem+json; charset=utf-8 Date: Fri, 02 Apr 2021 22:03:06 GMT Server: Kestrel Transfer-Encoding: chunked { "type": "https://tools.ietf.org/html/rfc7231#section-6.5.4", "title": "Not Found", "status": 404, "traceId": "00-ec263e401ec554b6a2f3e216a1d1fac5-4b40b8023d56762c-00" }Return to the
dotnetterminal in the drop-down list in Visual Studio Code and shut down the web API by selecting CTRL+C on your keyboard.
Now that you finished implementing the GET verbs. In the next unit, you can add more actions to PizzaController to support CRUD operations on pizza data.