Troubleshoot recovery issues with Microsoft Azure
When you have created a backup, you may need to recover the data as part of a planned migration, or in case of data loss. In this unit, you will learn how to troubleshoot data recovery for different scenarios.
Troubleshoot file recovery for an Azure VM backup
When you recover data from an Azure VM backup you have three options to restore the data:
File Recovery
Restore VM
Disk restore. Only the disks are restored, which can then be used to create a new VM or replace a disk on an existing VM.
To recover files, select the File Recovery option. It is then a three-step process to recover the files:
Select a recovery point. This is the date when your files were available.
Download a script. The script will mount the drives storing your files. The drives will remain mounted for 12 hours for you to restore the files you need.
Unmount the drives and close the connection.
The following sections provide troubleshooting information when common error messages appear:
Error message: Exception caught while connecting to target
This may appear if the script is unable to access the recovery point. To resolve this issue:
Check that the machine running the script has access to the recovery vault.
Verify the connection to the Azure target IP addresses. To check, run the following from an elevated command prompt: nslookup download.microsoft.com or ping download.microsoft.com
Ensure access to iSCSI outbound port 3260.
Check for a firewall or NSG blocking traffic to Azure target IPs or recovery service URLs.
Check that antivirus software isn't preventing the script from running.
Also check the following common error messages:
Error message: The target has already been logged in via an iSCSI session
This might be caused by the script already running on the same machine, and the drives are already attached. Browse the available volumes using File Explorer to find the mounted drives.
Error message: This script is invalid because the disks have been dismounted via portal/exceeded the 12-hr limit. Download a new script from the portal
This message appears if you attempt to run the script more than 12 hours after you downloaded it. You need to download another script from the portal.
Error message: ExtensionSnapshotFailedCOM
The backup operation failed due to an issue with the Windows service COM+ System application. To resolve this issue, follow these steps:
Try starting/restarting Windows service COM+ System Application (from an elevated command prompt – net start COMSysApp).
Ensure Distributed Transaction Coordinator service is running as Network Service account. If not, change it to run as Network Service account and restart COM+ System Application.
If unable to restart the service, then reinstall Distributed Transaction Coordinator service by following the steps below:
Stop the MSDTC service
Open a command prompt (cmd)
Run the command msdtc -uninstall
Run the command msdtc -install
Start the MSDTC service
Start the Windows service COM+ System Application. After the COM+ System Application starts, trigger a backup job from the Azure portal.
For an up-to-date list of common error messages and recommended action, see Troubleshoot Azure VM file recovery - Azure Backup | Microsoft Learn.
Troubleshoot restoring using Microsoft Azure Recovery Services (MARS) backup agent
To restore data that has been backed up using Microsoft Azure Recovery Services (MARS):
From the MARS agent home screen, select Recover Data. The Recover Data Wizard is displayed.
Specify where you want to restore the data.
Select the data to restore, and the date and time it was backed up. These selections determine the data recovery point.
Select Mount to mount the disk containing the recovery point then select the location where you want to recover the data.
Confirm your selections before starting the data recovery.
When you installed the MARS agent, an encryption passphrase was generated. This is stored in a text file and should be kept somewhere safe. If the passphrase is lost, you cannot recover any data backed up by the MARS backup agent.
When the MARS agent is configured, you specify how long the backup data should be retained. Data will not be kept after this period of time.
Troubleshoot restore issues when using Azure backup agent
When you recover an Azure Virtual Machine from a backup, a process server is used to handle the data. If you encounter problems with restoring data, use a step-by-step methodology:
Step 1: Monitor process server health
It is good practice to proactively monitor the process server when restoring data. This allows you to monitor alerts, and handle issues as they occur.
The following graphic summarizes the steps to troubleshoot a backup recovery:
Are all services running?
Is the CPU state OK?
Is the memory state OK?
Is cache free space OK?
Does the process server have a heartbeat?
Troubleshoot connection/replication issues.

Troubleshoot restore issues from Microsoft Azure Backup Server (MABS)
Azure Backup Server is designed to back up and restore workloads such as Hyper-V VMs, Microsoft SQL Server, SharePoint Server, Microsoft Exchange, and Windows clients.
If you have problems restoring from MABS, try the following troubleshooting checklist:
Check the installation folder
The default installation folders for DPM are as follows:
C:\Program Files\Microsoft Azure Backup Server\DPM\DPM
You can also run the following command to find the install folder path:
Reg query "HKLM\SOFTWARE\Microsoft\Microsoft Data Protection Manager\Setup"
Invalid vault credentials
When you register to a vault, if you get an error message saying invalid vault credentials have been provided, either you have a corrupt file, or you provided incorrect credentials. Try the following:
Download the latest credentials file from the vault and try again.
Try downloading the credentials to a different local directory or create a new vault.
Try updating the date and time settings as described in this article.
Check to see if c:\windows\temp has more than 65000 files. Move stale files to another location or delete the items in the Temp folder.
Check the status of certificates.
In Control Panel, open Manage Computer Certificates.
Expand the Personal node and its child node Certificates.
Remove the certificate Windows Azure Tools.
Retry the registration in the Azure Backup client.
Check to see if a group policy is in place.
Replica is inconsistent
In the Protection Group Wizard, verify that the automatic consistency check option is turned on.
In the case of System State/BMR backup, verify that Windows Server Backup is installed on the protected server.
Check for space-related issues in the DPM storage pool on the DPM/Microsoft Azure Backup Server and allocate storage as required.
Check the state of the Volume Shadow Copy Service on the protected server. If it's in a disabled state, set it to start manually. Start the service on the server then go back to the DPM/Microsoft Azure Backup Server console, and start the sync with the consistency check job.
Online recovery point creation failed
If you get an error message saying “the Windows Azure Backup Agent was unable to create a snapshot of the selected volume”, try increasing the available space in the recovery point volume.
If you get an error message saying “the Windows Azure Backup Agent cannot connect to the OBEngine service”, try verifying that the OBEngine exists in the list of running services on the computer. If the OBEngine service is not running, use the "net start OBEngine" command to start it.
If you get an error message saying that “the encryption passphrase for this server is not set. Please configure an encryption passphrase”, try configuring an encryption passphrase. If that fails, take the following steps:
Verify that the scratch location exists. This is the location that's mentioned in the registry HKEY_LOCAL_MACHINE\Software\Microsoft\Windows Azure Backup\Config, where the name ScratchLocation should exist.
If the scratch location exists, try re-registering by using the old passphrase.
Note
When you configure an encryption passphrase, always save it in a secure location.
Troubleshoot hybrid scenarios
Troubleshoot site recovery with Hyper-V
When recovering an on-premises Hyper-V VM to Azure, use Azure Site Recovery. If you experience issues, use the following checklist to troubleshoot the problem:
Do all your Hyper-V hosts and VMs meet the requirements and prerequisites for recovery?
Check the “Support for disaster recovery of on-premises Hyper-V VMs to Azure” link at the end of this module.
If Hyper-V hosts are managed by Virtual Machine Manager (VMM), the VMM server must have at least one cloud and one or more host groups. The Hyper-V hosts running the VMs should be in the cloud with network mapping between on-premises VMM VM networks, and Azure virtual networks. See links in the Summary of this module.
Check the log located in Applications and Services Logs > Microsoft > Windows.
On the guest VM, verify that WMI is enabled and accessible.
Troubleshoot WMI.
Troubleshoot problems with WMI scripts and services.
On the guest VM, ensure that you have the latest version of Integration Services and it is running. Microsoft recommends keeping integration services up-to-date.
Also, check common error messages:
Cannot enable protection as the virtual machine is not highly available
Try restarting the VMM service on the VMM machine. If that doesn't work, try removing the virtual machine from the cluster and adding it again.
The VSS writer NTDS failed with status 11 and writer specific failure code 0x800423F4
To resolve this issue, upgrade to Windows Server R2 with 4072650 applied. Also, check that the Hyper-V host has Windows 2016 or later installed.
Troubleshoot site recovery with VMware
Before you restore a VMware VM, ensure it meets Azure requirements.
Verify properties as follows:
In Protected Items, select Replicated Items, and then select the VM you want to verify.
In the Replicated item pane, there's a summary of VM information, health status, and the latest available recovery points. Select Properties.
In Compute and Network, you can modify these properties as needed:
Azure name
Resource group
Target size
Managed disk settings
You can view and modify network settings, including:
The network and subnet in which the Azure VM will be located after failover.
The IP address that will be assigned to it.
In Disks, review operating system information, and data disks on the VM.
To run a failover to Azure, in Settings, select Replicated items, select the VM to fail over, and then select Failover.
In Failover, select a Recovery Point to fail over to. You can use one of the following options:
Latest: This option first processes all the data sent to Site Recovery. It provides the lowest Recovery Point Objective (RPO) because the Azure VM that's created after failover has all the data that was replicated to Site Recovery when the failover was triggered.
Latest processed: This option fails the VM over to the latest recovery point processed by Site Recovery. This option provides a low RTO (Recovery Time Objective) because no time is spent processing unprocessed data.
Latest app-consistent: This option fails the VM over to the latest app-consistent recovery point processed by Site Recovery.
Custom: This option lets you specify a recovery point.
You then select Shut down machine before beginning failover to attempt to shut down source VMs before triggering the failover. Failover continues even if the shutdown fails. You can follow the failover progress on the Jobs page.
In some scenarios, failover requires additional processing that takes around 8 to 10 minutes to complete. You might notice longer test failover times for:
VMware VMs running a Mobility service version older than 9.8.
Physical servers.
VMware Linux VMs.
Hyper-V VMs protected as physical servers.
VMware VMs that don't have the DHCP service enabled.
VMware VMs that don't have the following boot drivers: storvsc, vmbus, storflt, intelide, atapi.
Note
Don't cancel a failover in progress. If you cancel a failover in progress, the VM won't replicate again.
If you have problems, try the following troubleshooting steps:
Monitor process server health. In the Azure portal, monitor the process servers to verify they are connected and working.
Check connectivity between the source server and the process server, and between the process server and Azure.
Check that the source machine is available for replication, specifically:
- Check that two VMs don't have the same UUID. Refer to Azure Site Recovery VMware-to-Azure: How to clean up duplicate or stale entries.
Ensure the vCenter credentials are correct when you set up the configuration server, by using the OVF template or unified setup. To verify the credentials, see Modify credentials for automatic discovery.
If insufficient permissions are provided to access vCenter, failure to discover virtual machines might occur. Ensure that the permissions described in Prepare an account for automatic discovery are added to the vCenter user account.
Management servers cannot be replicated. If the VM is used as one or more of the following roles—Configuration server / scale-out process server / Master target server—then you will not be able to choose the virtual machine from the portal.
If the virtual machine is already protected or failed over through Site Recovery, it will not be available to select for protection in the portal. Ensure that the virtual machine isn't already protected by any other user, or under a different subscription.
Check if vCenter is in connected state. To verify, go to Recovery Services vault > Site Recovery Infrastructure > Configuration Servers > Click on respective configuration server. A pane opens on the right with details of associ/rvers. Check if vCenter is connected. If it's in a "Not Connected" state, resolve the issue and then refresh the configuration server on the portal. After this, virtual machine will be listed on the portal.
If the ESXi host under which the VM resides is in powered off state, then virtual machine will not be listed or will not be selectable on the Azure portal. Power on the ESXi host, and refresh the configuration server on the portal. After this, virtual machine will be listed on the portal.
If there is a pending reboot, you will not be able to select the VM on the Azure portal. Complete the pending reboot and refresh the configuration server. They should then be listed on the portal.
If the virtual machine doesn't have a valid IP address associated with it, you will not be able to select the machine on the Azure portal. Assign a valid IP address to the virtual machine, and refresh the configuration server. This could also be caused by the machine not having a valid IP address associated with one of its NICs. Either assign a valid IP address to all NICs or remove the NIC that's missing the IP.
Troubleshoot site recovery with SCCM
A System Center Configuration Manager (SCCM) site recovery is needed if a site fails, or you lose data in the site database. Site recovery includes repairing and resynchronizing the data.
If you experience problems, try the following troubleshooting issues:
Check that previous configurations are not on the site server, as this can cause conflicts. Remove previous configurations before restoring Configuration Manager by using one of the following methods:
Restoring to a new server.
Formatting the disks and reinstalling the operating system.
Cleaning an existing server, including deleting registry entries starting with SMS from HKLM\System\CurrentControlSet\Services.
For site database recovery only before restoring Configuration Manager:
Back up the site database, including supporting databases such as WSUS.
Note the SQL Server name and instance name.
Delete the site database from the SQL Server.
Restart the SQL Server.
Clean an existing server for full recovery before restoring Configuration Manager:
Back up the site database, including supporting databases such as WSUS.
Make a copy of the content library.
Uninstall the Configuration Manager site.
Manually delete the site database from the SQL Server.
Manually delete the Configuration Manager installation folder, and any other Configuration Manager folders.
Restart the server.
Restore the content library and other databases like WSUS.
Use a supported version and the same edition of SQL Server:
Check that the version of SQL Server is both supported, and the same edition as the original. Restoring to a newer version of SQL Server is supported, providing you don't change the edition—you can restore Standard to Standard and Enterprise to Enterprise.
Ensure SQL Server is not set to single-user mode.
Make sure the MDF and LDF files are valid. When you recover a site, there's no check for the state of the files.
SQL Server Always On availability groups:/
- If you use SQL Server Always On availability groups to host the site database, modify your recovery plans as described in Prepare to use SQL Server Always On.
Database replicas:
- After you restore a site database that you configured for database replicas, reconfigure each replica. Before you can use the database replicas, recreate both the publications and subscriptions.
Troubleshoot site-to-site recovery
Azure to Azure Site Recovery allows you to replicate Azure virtual machines (VMs) from one region to another. In case of problems, check the following:
High data change rate on the source virtual machine
Azure Site Recovery creates an event if the data change rate on the source virtual machine is higher than the supported limits. Go to Replicated items > VM > Events - last 72 hours. You should see the event Data change rate beyond supported limits:
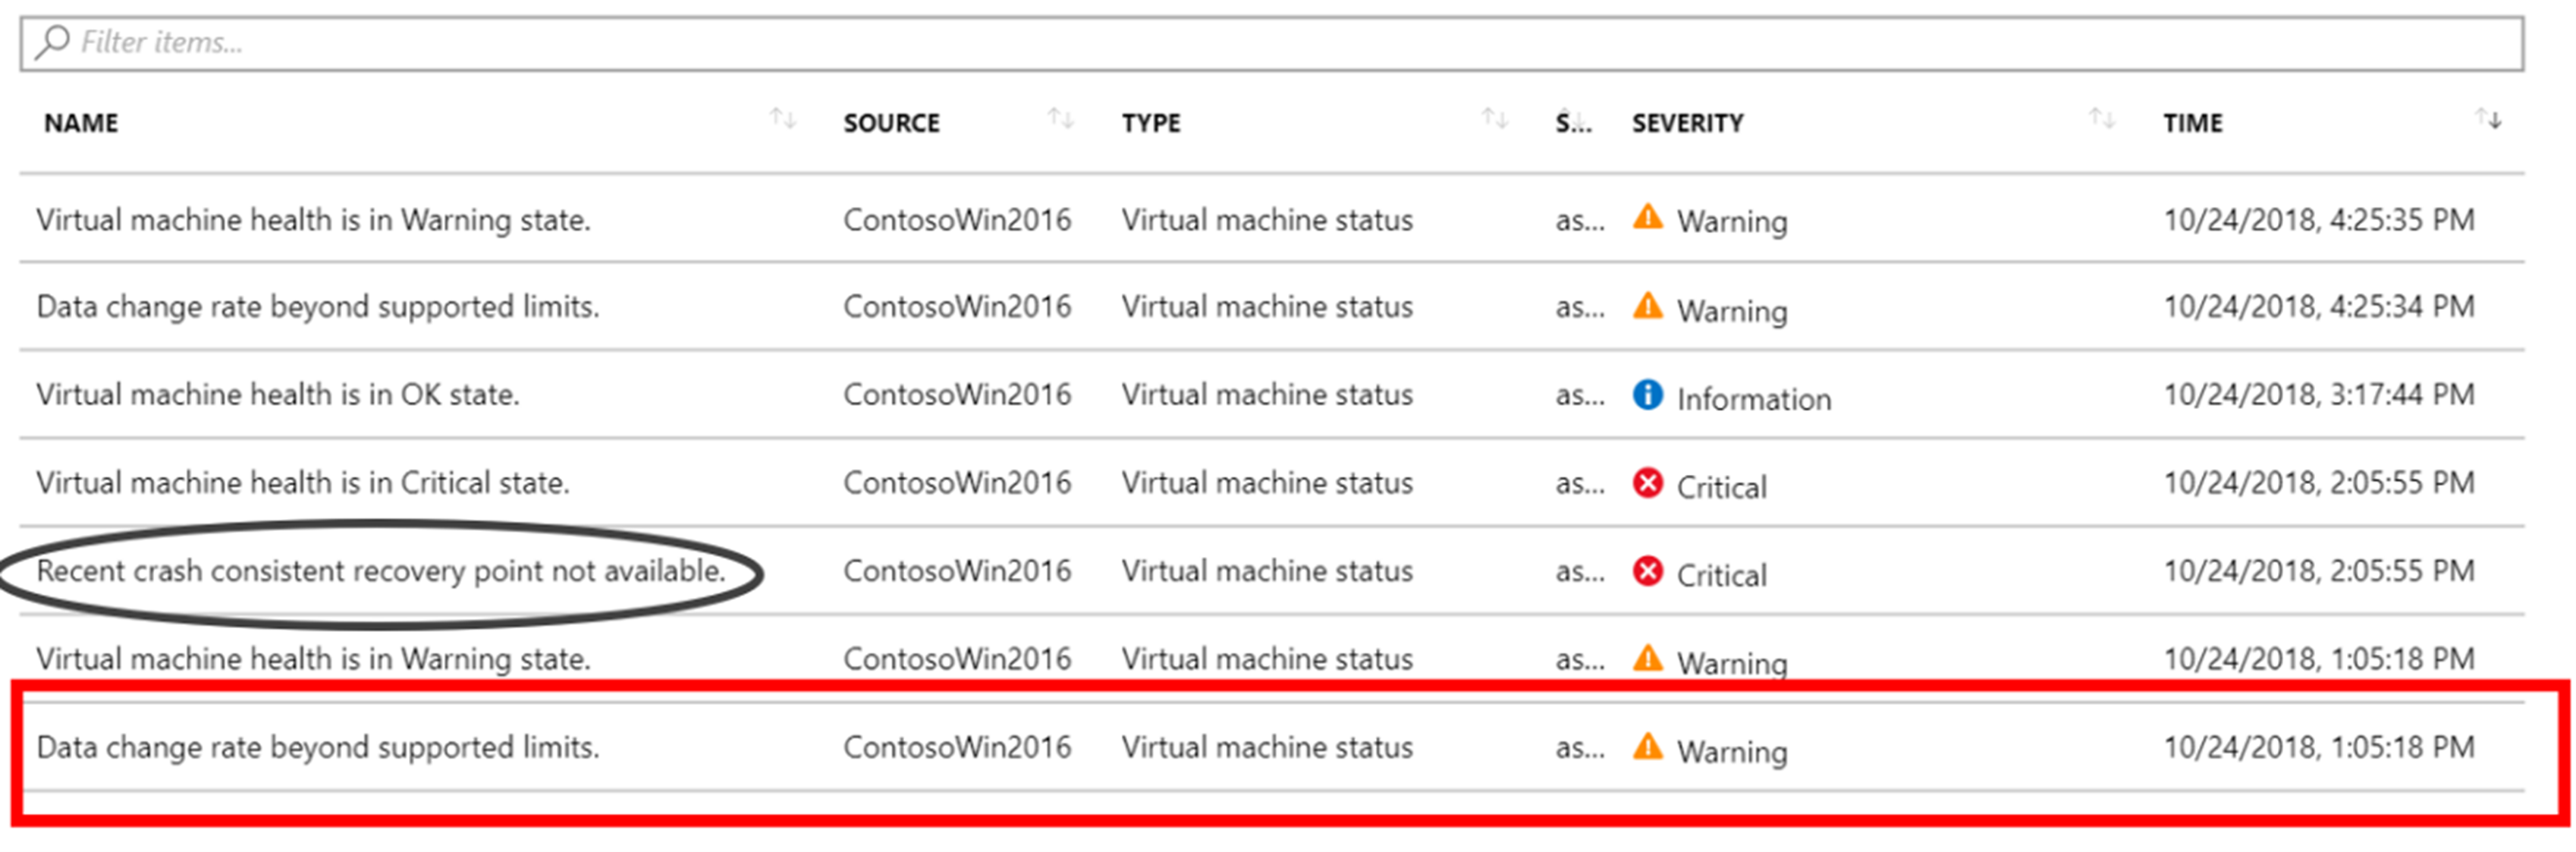
Select the event to display disk information:

Azure Site Recovery limits
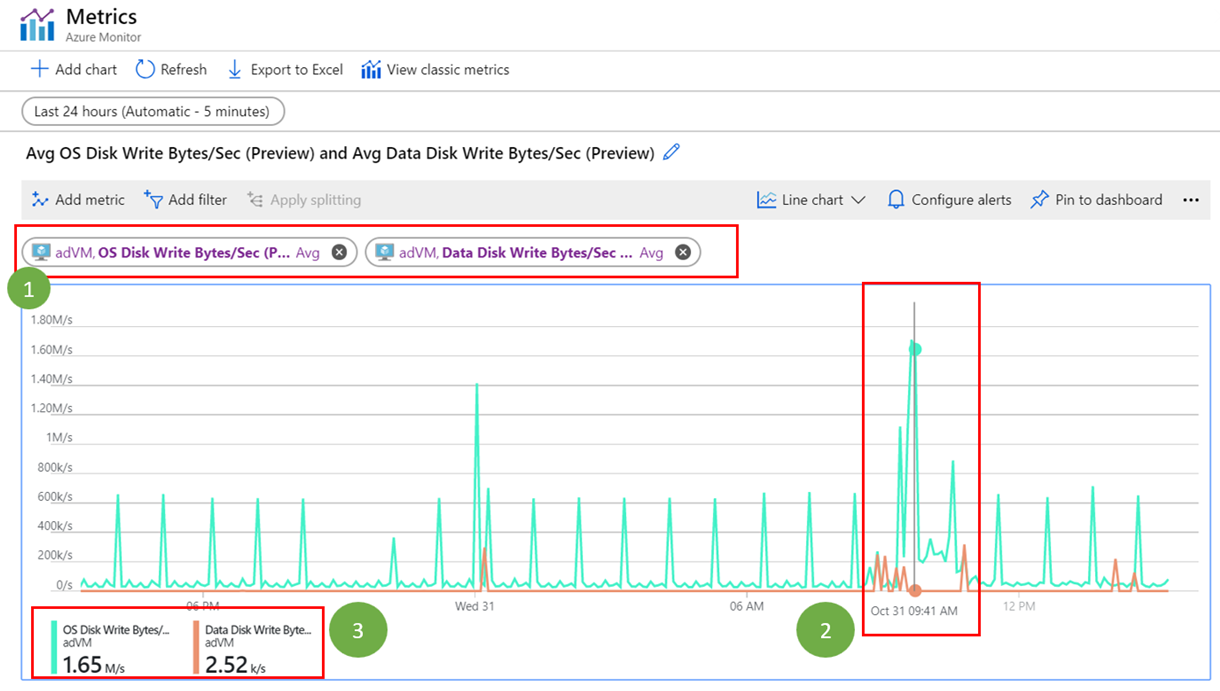
Azure Site Recovery limits are data churn per disk and data churn per virtual machine. The actual limits vary according to specific configurations. For example, a single VM Site Recovery can handle 5MB/s of churn per disk and a maximum of five disks. Site Recovery has a limit of 54MB/s of total churn per VM.
To find out whether this is a recurring problem, check the data change rate of the relevant virtual machine under Monitoring. You will need to add the metrics shown in the following screenshot:
Network connectivity problems
Site Recovery sends replicated data to the cache storage account. You might experience network errors if uploading the data from a virtual machine to the cache storage account is slower than 4MB in three seconds.
To check for latency problems, use the command-line utility AzCopy. This uploads data from the virtual machine to the cache storage account. If the latency is high, check whether you're using a network virtual appliance (NVA) to control outbound network traffic from VMs. The appliance might get throttled if all the replication traffic passes through the NVA.
Microsoft recommends creating a network service endpoint in your virtual network for "Storage" so that the replication traffic doesn't go to the NVA.
Network connectivity
Site Recovery needs the VM to provide outbound connectivity to specific URLs or IP ranges. You might have your VM behind a firewall or use network security group (NSG) rules to/l outbound connectivity. If so, you might experience issues. Make sure all the URLs are connected. For more information, see Outbound connectivity for URLs.
For an up-to-date list of common issues, see: Troubleshoot replication of Azure VMs with Azure Site Recovery - Azure Site Recovery | Microsoft Learn.