Exercise - Create data model and canvas app
Your first activity is to create Dataverse tables to store conversation history and user details. Given the nature of the project, you only have to store the translated texts and that doesn't need complex tables and relationship mapping. You'll validate your app against requirements, to check your work.
Let's dive deeper into the tasks to be carried out.
Specification
Create an app that meets the following basic functionalities and specifications.
Create a custom table to capture the conversation. Here are some recommendations for storing the speech recognition and translation data in Dataverse tables:
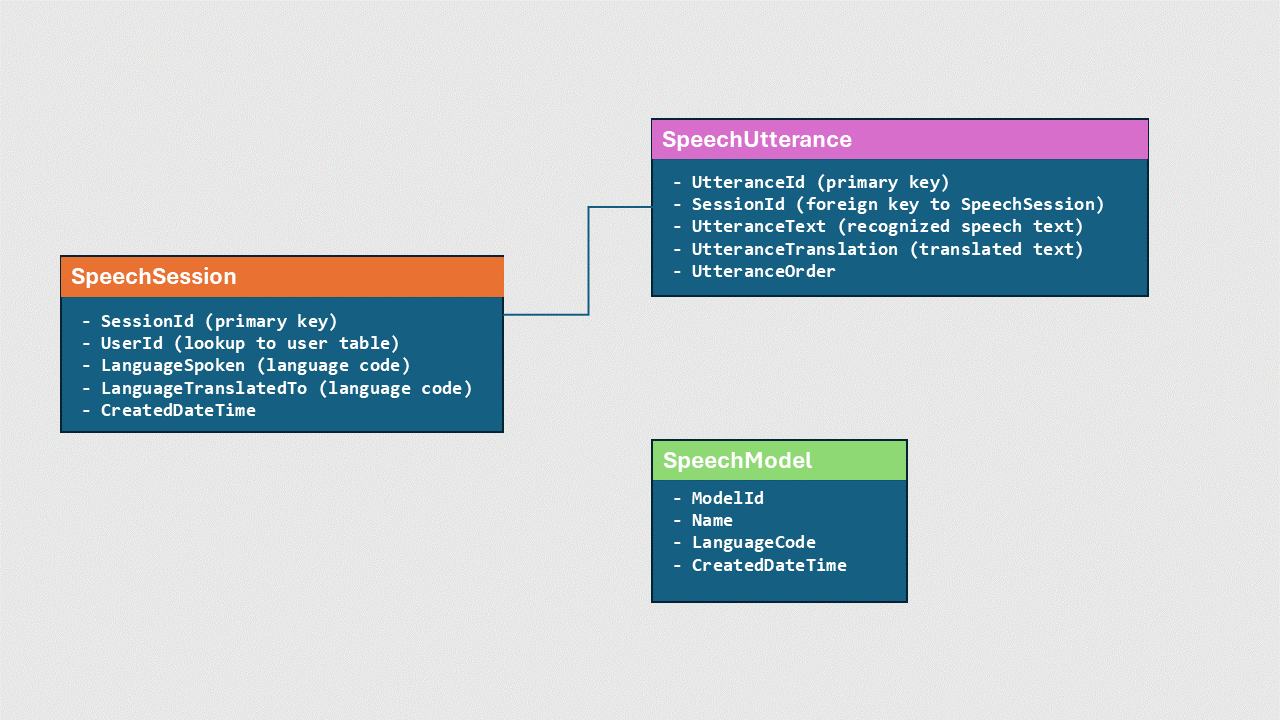
Create a SpeechSession table to store metadata for each speech interaction. Use these columns:
- SessionId (primary key)
- UserId (lookup to user table)
- LanguageSpoken (language code)
- LanguageTranslatedTo (language code)
- CreatedDateTime
Create a SpeechUtterance table to store each utterance in a session. Use these columns:
- UtteranceId (primary key)
- SessionId (foreign key to SpeechSession)
- UtteranceText (recognized speech text)
- UtteranceTranslation (translated text)
- UtteranceOrder
Create a SpeechModel table to track Speech API model used. Use these columns:
- ModelId
- Name
- LanguageCode
- CreatedDateTime
Use a one-to-many relationship between the SpeechSession and SpeechUtterance tables.
Tip
SpeechSessioncan have a lookup toSpeechModelto track the model used.- Maintain indexes on key columns like
SessionIdandUtteranceIdfor efficient querying. - Optionally, track user feedback per utterance to improve recognition accuracy.
This normalized structure allows efficient storage and querying of speech data. The session and utterance separation supports scenarios like analysis across sessions and aggregations per session.
Note
This model is intended as a guide. You can develop your own model for the tables if you prefer.
Create a Power Apps canvas app with the following input and output controls:
- A microphone control for speech input
- A text label to display recognized text
- A dropdown menu to select the target language
- A button to trigger translation
- A text label to display translated text
- A button to trigger text-to-speech
- A speaker control to play synthesized speech
Check your work
To validate that you've finished working on the requirements for this first exercise, test your app behavior by following these steps:
- Run your app and start a new translation.
- Press the microphone control to record a speech. You should see the control working.
- Use the dropdown menu to select the translation language.
- Press the button to trigger text-to-speech. No action is expected from this button.
Note
This part of the exercise is to work on the look and feel of your app. There is no integration with Microsoft Azure AI services yet because you haven't set up your Azure speech recognition API.
After validating the results of this exercise, go to the next exercise in this challenge.