Define child resources
It makes sense to deploy some resources only within the context of their parent. These resources are called child resources. There are many child resource types in Azure. Here are a few examples:
| Name | Resource type |
|---|---|
| Virtual network subnets | Microsoft.Network/virtualNetworks/subnets |
| App Service configuration | Microsoft.Web/sites/config |
| SQL databases | Microsoft.Sql/servers/databases |
| Virtual machine extensions | Microsoft.Compute/virtualMachines/extensions |
| Storage blob containers | Microsoft.Storage/storageAccounts/blobServices/containers |
| Azure Cosmos DB containers | Microsoft.DocumentDB/databaseAccounts/sqlDatabases/containers |
For example, consider a storage blob container. A blob container must be deployed into a storage account, and it doesn't make sense for a container to exist outside of a storage account.
Child resource types have longer names that are made up of multiple parts. A storage blob container has this fully qualified type name: Microsoft.Storage/storageAccounts/blobServices/containers. The resource ID for a blob container includes the name of the storage account that contains the container, and the container's name.
Note
Some child resources might have the same name as other child resource types from different parents. For example, containers is a child type of both storage accounts and Azure Cosmos DB databases. The names are the same, but they represent different resources, and their fully qualified type names are different.
How are child resources defined?
With Bicep, you can declare child resources in several ways. Each method has its own advantages, and each is suitable for some situations and not for others. The following sections describe each approach.
Tip
All the following approaches result in the same deployment activities in Azure. You can choose the approach that best fits your needs without having to worry about breaking anything. And you can update your template and change the approach you're using.
Nested resources
One approach to defining a child resource is to nest the child resource inside the parent. Here's an example of a Bicep template that deploys a virtual machine and a virtual machine extension. A virtual machine extension is a child resource that provides extra behavior for a virtual machine. In this case, the extension runs a custom script on the virtual machine after deployment.
resource vm 'Microsoft.Compute/virtualMachines@2024-07-01' = {
  name: vmName
  location: location
  properties: {
    // ...
  }

  resource installCustomScriptExtension 'extensions' = {
    name: 'InstallCustomScript'
    location: location
    properties: {
      // ...
    }
  }
}
Notice that the nested resource has a simpler resource type than normal. Even though the fully qualified type name is Microsoft.Compute/virtualMachines/extensions, the nested resource automatically inherits the parent's resource type, so you need to specify only the child resource type, extensions.
Also notice that there's no API version specified for the nested resource. Bicep assumes that you want to use the same API version as the parent resource, although you can override the API version if you want to.
You can refer to a nested resource by using the :: operator. For example, you can create an output that returns the full resource ID of the extension:
output childResourceId string = vm::installCustomScriptExtension.id
Nesting resources is a simple way to declare a child resource. Nesting resources also makes the parent-child relationship obvious to anyone reading the template. However, if you have lots of nested resources, or multiple layers of nesting, templates can become harder to read. Also, you can only nest resources up to five layers deep.
Parent property
A second approach is to declare the child resource without any nesting. Then, use the parent property to inform Bicep about the parent-child relationship:
resource vm 'Microsoft.Compute/virtualMachines@2024-07-01' = {
  name: vmName
  location: location
  properties: {
    // ...
  }
}

resource installCustomScriptExtension 'Microsoft.Compute/virtualMachines/extensions@2024-07-01' = {
  parent: vm
  name: 'InstallCustomScript'
  location: location
  properties: {
    // ...
  }
}
Notice that the child resource uses the parent property to refer to the symbolic name of its parent.
This approach to referencing the parent is another easy way to declare a child resource. Bicep understands the relationship between parent and child resources, so you don't need to specify the fully qualified resource name or set up a dependency between the resources. This approach also avoids having too much nesting, which can become difficult to read. However, you need to explicitly specify the full resource type and API version each time you define a child resource by using the parent property.
To refer to a child resource that's declared with the parent property, use its symbolic name as you would with a normal parent resource:
output childResourceId string = installCustomScriptExtension.id
Construct the resource name
There are some circumstances where you can't use nested resources or the parent keyword. Examples include when you declare child resources within a for loop, or when you need to use complex expressions to dynamically select a parent resource for a child. In these situations, you can deploy a child resource by manually constructing the child resource name so that it includes its parent resource name, as shown here:
resource vm 'Microsoft.Compute/virtualMachines@2024-07-01' = {
  name: vmName
  location: location
  properties: {
    // ...
  }
}

resource installCustomScriptExtension 'Microsoft.Compute/virtualMachines/extensions@2024-07-01' = {
  name: '${vm.name}/InstallCustomScript'
  location: location
  properties: {
    // ...
  }
}
Notice that this example uses string interpolation to append the virtual machine resource name property to the child resource name. Bicep understands that there's a dependency between your child and parent resources. You could declare the child resource name by using the vmName variable instead. If you do that, though, your deployment might fail because Bicep wouldn't understand that the parent resource needs to be deployed before the child resource.
To resolve this problem, you could manually inform Bicep about the dependency by using the dependsOn keyword, as shown here:
resource vm 'Microsoft.Compute/virtualMachines@2024-07-01' = {
  name: vmName
  location: location
  properties: {
    // ...
  }
}

resource installCustomScriptExtension 'Microsoft.Compute/virtualMachines/extensions@2024-07-01' = {
  name: '${vmName}/InstallCustomScript'
  dependsOn: [
    vm
  ]
  //...
}
Tip
It's generally best to avoid constructing resource names because when you do you lose a lot of the benefits that Bicep provides when it understands the relationships between your resources. Use this option only when you can't use one of the other approaches for declaring child resources.
Child resource IDs
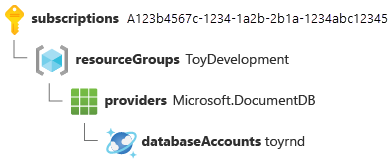
You start creating a child resource ID by including its parent's resource ID and then appending the child resource type and name. For example, consider an Azure Cosmos DB account named toyrnd. The Azure Cosmos DB resource provider exposes a type called databaseAccounts, which is the parent resource you deploy:
/subscriptions/aaaa0a0a-bb1b-cc2c-dd3d-eeeeee4e4e4e/resourceGroups/ToyDevelopment/providers/Microsoft.DocumentDB/databaseAccounts/toyrnd
Here's a visual depiction of the same resource ID:

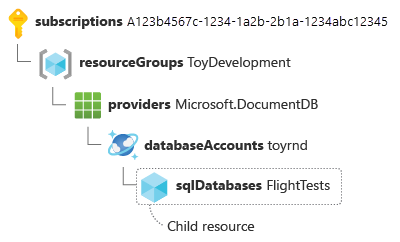
If you add a database to this account, you can use the sqlDatabases child resource type. Say you add a database named FlightTests to the Azure Cosmos DB account. Here's the child resource ID:
/subscriptions/aaaa0a0a-bb1b-cc2c-dd3d-eeeeee4e4e4e/resourceGroups/ToyDevelopment/providers/Microsoft.DocumentDB/databaseAccounts/toyrnd/sqlDatabases/FlightTests
Here's a visual representation:

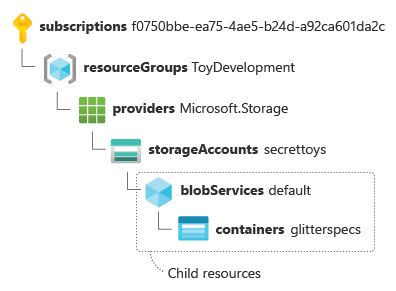
You can have multiple levels of child resources. Here's an example resource ID that shows a storage account with two levels of children:
/subscriptions/aaaa0a0a-bb1b-cc2c-dd3d-eeeeee4e4e4e/resourceGroups/ToyDevelopment/providers/Microsoft.Storage/storageAccounts/secrettoys/blobServices/default/containers/glitterspecs
Here's a visual representation of the same resource ID:

This resource ID has several components:
Everything up to
secrettoysis the parent resource ID.blobServicesindicates that the resource is within a child resource type calledblobServices.Note
You don't have to create
blobServicesresources yourself. TheMicrosoft.Storageresource provider automatically creates this resource when you create a storage account. This type of resource is sometimes called an implicit resource. They're fairly uncommon, but you can find them throughout Azure.defaultis the name of theblobServiceschild resource.Note
Sometimes only a single instance of a child resource is allowed. This type of instance is called a singleton, and it's often given the name
default.containersindicates that the resource is within a child resource type calledcontainers.glitterspecsis the name of the blob container.
When you work with child resources, resource IDs can get long and look complicated. However, if you break down a resource ID into its component parts, it's easier to understand how the resource is structured. A resource ID can also give you important clues about how the resource behaves.