Exercise - Deploy extension resources and use existing resources
Now that you finished creating the database for your R&D team to use, you need to ensure that access to the database is logged. You have an existing Log Analytics workspace that you want these logs to be sent to. You also need to send the logs from the R&D team's storage account to the same Log Analytics workspace. In this exercise, you update your Bicep file to meet these requirements.
During the process, you'll:
- Create a Log Analytics workspace.
- Update your Bicep file to add diagnostic settings to your Azure Cosmos DB account.
- Create a storage account.
- In your Bicep file, update the diagnostic settings for the storage account.
- Deploy your template and verify the result.
Create a Log Analytics workspace
Create a Log Analytics workspace to simulate having an existing one in your organization. Use the Azure CLI instead of Bicep.
In the terminal, run the following Azure CLI command:
az monitor log-analytics workspace create \
  --workspace-name ToyLogs \
  --location eastus
Create a Log Analytics workspace to simulate having an existing one in your organization. Use Azure PowerShell instead of Bicep.
In the terminal, run the following Azure PowerShell command:
New-AzOperationalInsightsWorkspace `
  -Name ToyLogs `
  -Location eastus
Note
In this example, you deploy the Log Analytics workspace into the same subscription and resource group as your other resources. In many situations, you'll store Log Analytics workspaces in resource groups that aren't the same as the ones your application resources are in. Bicep can still reference them.
Add diagnostics settings for Azure Cosmos DB
Your R&D team needs to log all requests to the Azure Cosmos DB account. You decide to use Azure Monitor integration for Azure Cosmos DB to collect the DataPlaneRequests log, which contains information about requests to Azure Cosmos DB.
Now that you created your simulated preexisting Log Analytics workspace, you can reference it from within your Bicep template as an existing resource. You can use it as the destination for the Azure Cosmos DB logs.
To add diagnostics settings, use the following steps:
In Visual Studio Code, open the main.bicep file in the editor. Below the existing variable definitions, add the following code:
var logAnalyticsWorkspaceName = 'ToyLogs'
var cosmosDBAccountDiagnosticSettingsName = 'route-logs-to-log-analytics'
At the bottom of the file, below the resource definitions, add the following code:
resource logAnalyticsWorkspace 'Microsoft.OperationalInsights/workspaces@2023-09-01' existing = {
  name: logAnalyticsWorkspaceName
}
Notice that this resource definition uses the
existingkeyword, and that you're intentionally omitting other properties that you'd normally specify if you were deploying the Log Analytics workspace through this Bicep template.Below the code you just added, add the following code:
resource cosmosDBAccountDiagnostics 'Microsoft.Insights/diagnosticSettings@2021-05-01-preview' = {
  scope: cosmosDBAccount
  name: cosmosDBAccountDiagnosticSettingsName
  properties: {
    workspaceId: logAnalyticsWorkspace.id
    logs: [
      {
        category: 'DataPlaneRequests'
        enabled: true
      }
    ]
  }
}
Notice that this code deploys an extension resource. It uses the
scopekeyword to inform Bicep that the resource should be attached to the Azure Cosmos DB account. The code also uses theidproperty of the existinglogAnalyticsWorkspaceresource so that Azure knows where to send the Azure Cosmos DB logs.
Create a storage account for toy design documents
Create an Azure storage account to simulate one that your R&D team already created in your organization. Use the Azure CLI instead of Bicep.
In the terminal, run the following Azure CLI command. Replace {storageaccountname} with a name that's likely to be unique. The name must be all lowercase, contain 24 or fewer characters, and have no spaces or special characters. Note the name. You'll need it later.
az storage account create \
  --name {storageaccountname} \
  --location eastus
Create an Azure storage account to simulate one that your R&D team already created in your organization. Use Azure PowerShell instead of Bicep.
In the terminal, run the following Azure PowerShell command. Replace {storageaccountname} with a name that's likely to be unique. The name must be all lowercase, contain 24 or fewer characters, and have no spaces or special characters.
New-AzStorageAccount `
  -Name {storageaccountname} `
  -Location eastus `
  -SkuName Standard_LRS
Add diagnostics settings for the storage account
Your R&D team wants you to log all successful requests to the storage account they created. You decide to use Azure Storage integration with Azure Monitor logs to achieve this goal. You decide to log all read, write, and delete activities in blob storage on the R&D team's storage account.
You need to update your Bicep template to reference the storage account that you created in the previous step.
Near the top of the main.bicep file, below the parameter definitions, add the following parameter definition:
param storageAccountName stringUnder the variable definitions, add the following variable definition:
var storageAccountBlobDiagnosticSettingsName = 'route-logs-to-log-analytics'At the bottom of the file, under the resource definitions, add the following definition:
resource storageAccount 'Microsoft.Storage/storageAccounts@2023-05-01' existing = {
  name: storageAccountName

  resource blobService 'blobServices' existing = {
    name: 'default'
  }
}
Notice that both of these resources use the
existingkeyword.At the bottom of the file, below the storage account definition that you added in the previous step, add the following code:
resource storageAccountBlobDiagnostics 'Microsoft.Insights/diagnosticSettings@2021-05-01-preview' = {
  scope: storageAccount::blobService
  name: storageAccountBlobDiagnosticSettingsName
  properties: {
    workspaceId: logAnalyticsWorkspace.id
    logs: [
      {
        category: 'StorageRead'
        enabled: true
      }
      {
        category: 'StorageWrite'
        enabled: true
      }
      {
        category: 'StorageDelete'
        enabled: true
      }
    ]
  }
}
Notice that this extension resource has its
scopeset to the nested existing resource. Bicep knows that it should attach the extension resource to theblobServiceschild resource.Save the changes to the file.
Verify your Bicep file
After you complete the preceding changes, your main.bicep file should look like this example:
param cosmosDBAccountName string = 'toyrnd-${uniqueString(resourceGroup().id)}'
param cosmosDBDatabaseThroughput int = 400
param location string = resourceGroup().location
param storageAccountName string

var cosmosDBDatabaseName = 'FlightTests'
var cosmosDBContainerName = 'FlightTests'
var cosmosDBContainerPartitionKey = '/droneId'
var logAnalyticsWorkspaceName = 'ToyLogs'
var cosmosDBAccountDiagnosticSettingsName = 'route-logs-to-log-analytics'
var storageAccountBlobDiagnosticSettingsName = 'route-logs-to-log-analytics'

resource cosmosDBAccount 'Microsoft.DocumentDB/databaseAccounts@2024-11-15' = {
  name: cosmosDBAccountName
  location: location
  properties: {
    databaseAccountOfferType: 'Standard'
    locations: [
      {
        locationName: location
      }
    ]
  }
}

resource cosmosDBDatabase 'Microsoft.DocumentDB/databaseAccounts/sqlDatabases@2024-11-15' = {
  parent: cosmosDBAccount
  name: cosmosDBDatabaseName
  properties: {
    resource: {
      id: cosmosDBDatabaseName
    }
    options: {
      throughput: cosmosDBDatabaseThroughput
    }
  }

  resource container 'containers' = {
    name: cosmosDBContainerName
    properties: {
      resource: {
        id: cosmosDBContainerName
        partitionKey: {
          kind: 'Hash'
          paths: [
            cosmosDBContainerPartitionKey
          ]
        }
      }
      options: {}
    }
  }
}

resource logAnalyticsWorkspace 'Microsoft.OperationalInsights/workspaces@2023-09-01' existing = {
  name: logAnalyticsWorkspaceName
}

resource cosmosDBAccountDiagnostics 'Microsoft.Insights/diagnosticSettings@2021-05-01-preview' = {
  scope: cosmosDBAccount
  name: cosmosDBAccountDiagnosticSettingsName
  properties: {
    workspaceId: logAnalyticsWorkspace.id
    logs: [
      {
        category: 'DataPlaneRequests'
        enabled: true
      }
    ]
  }
}

resource storageAccount 'Microsoft.Storage/storageAccounts@2023-05-01' existing = {
  name: storageAccountName

  resource blobService 'blobServices' existing = {
    name: 'default'
  }
}

resource storageAccountBlobDiagnostics 'Microsoft.Insights/diagnosticSettings@2021-05-01-preview' = {
  scope: storageAccount::blobService
  name: storageAccountBlobDiagnosticSettingsName
  properties: {
    workspaceId: logAnalyticsWorkspace.id
    logs: [
      {
        category: 'StorageRead'
        enabled: true
      }
      {
        category: 'StorageWrite'
        enabled: true
      }
      {
        category: 'StorageDelete'
        enabled: true
      }
    ]
  }
}
If it doesn't look the same, either copy the example or adjust your template to match the example.
Deploy the template to Azure
In the terminal, run the following Azure CLI command. Replace {storageaccountname} with the name of the storage account that you created earlier in this exercise.
az deployment group create \
  --name main \
  --template-file main.bicep \
  --parameters storageAccountName={storageaccountname}
In the terminal, run the following Azure PowerShell command. Replace {storageaccountname} with the name of the storage account that you created earlier in this exercise.
New-AzResourceGroupDeployment `
  -Name main `
  -TemplateFile main.bicep `
  -storageAccountName {storageaccountname}
Check your deployment
In your browser, go back to the Azure portal. Go to your resource group. Because the deployment used the same name as the first deployment, you still see one successful deployment.
Select the 1 Succeeded link.
Select the deployment called main, and then select Deployment details to expand the list of deployed resources.
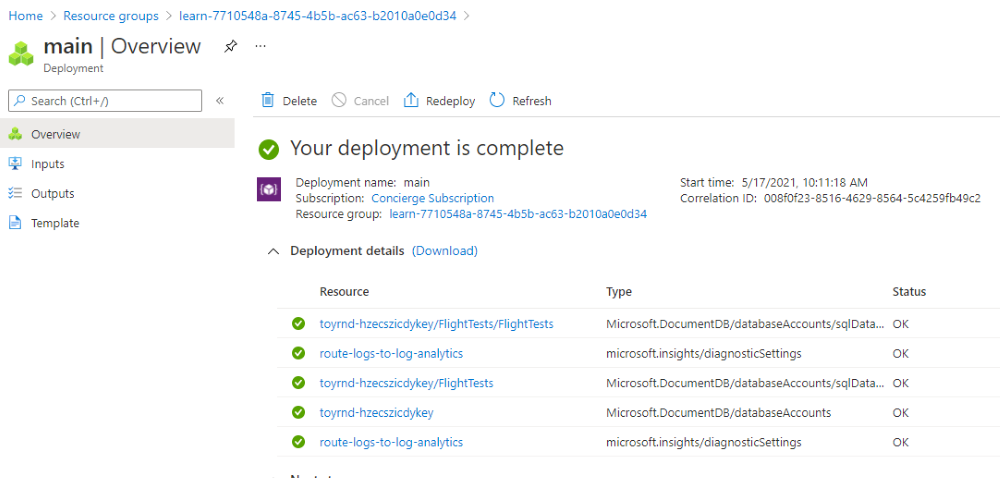
Notice that there are two resources listed that have a type of
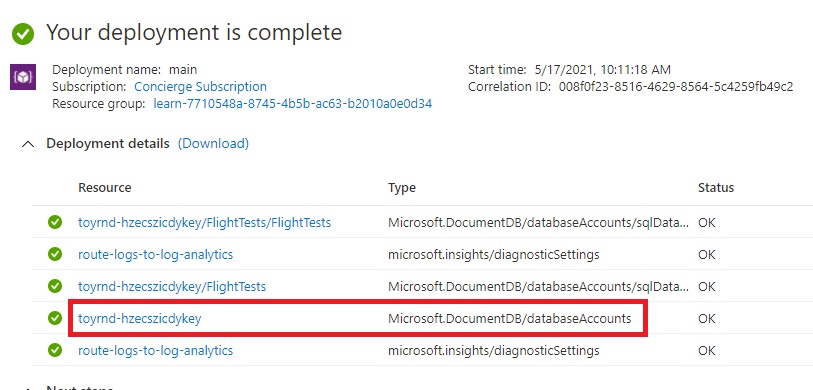
Microsoft.Insights/diagnosticSettings. These resources are the extension resources you deployed. One of the resources is attached to the storage account and the other is attached to the Azure Cosmos DB account. You can now verify that the Azure Cosmos DB diagnostic settings are configured correctly.Select the Azure Cosmos DB account resource. The portal displays the Azure Cosmos DB account.
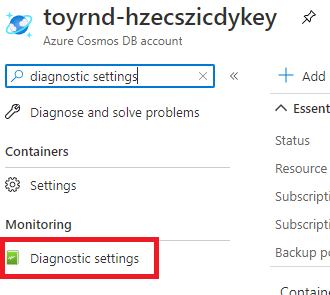
In the Search box at the top left, enter Diagnostic settings, and then select Diagnostic settings.
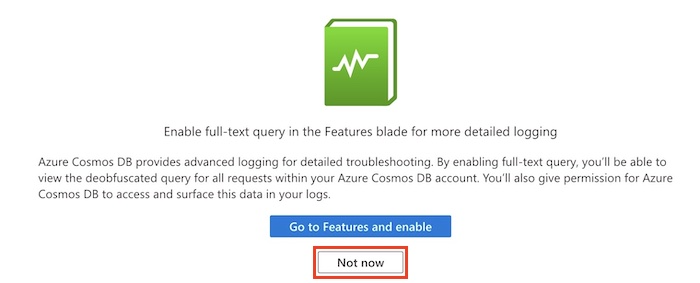
The Azure portal might prompt you to enable full-text query support for logging. You don't need it for this exercise, so select Not now.
Notice that there's a diagnostic setting named route-logs-to-log-analytics that's configured to route the logs to the ToyLogs workspace.

If you want, you can also verify that the storage account has a similar diagnostic setting enabled for blob storage.