Exercise - Send messages to Azure Service Bus
In this unit, you create a Spring Boot application that sends messages to an Azure Service Bus queue. Complete the following steps locally.
Create a Spring Boot project
To create our Spring Boot project, we use Spring Initializr with the following command line:
curl https://start.spring.io/starter.tgz -d type=maven-project -d dependencies=web -d baseDir=spring-sender-application -d bootVersion=3.3.0.RELEASE -d javaVersion=1.8 | tar -xzvf -
Send messages to a Service Bus queue
Now, let's send some messages to a Service Bus queue.
Add the maven dependency for Service Bus Spring Boot Starter
In the pom.xml file in your spring-sender-application, add the following command under dependencies:
		<!-- https://mvnrepository.com/artifact/com.azure.spring/spring-cloud-azure-starter-servicebus-jms -->
		<dependency>
		    <groupId>com.azure.spring</groupId>
		    <artifactId>spring-cloud-azure-starter-servicebus-jms</artifactId>
		    <version>5.18.0</version>
		</dependency>
Add the configuration parameters
In the
spring-sender-application\src\main\resourcesfolder, edit theapplication.propertiesfile, add the following parameters:spring.jms.servicebus.connection-string=<xxxxx> spring.jms.servicebus.idle-timeout=20000 spring.jms.servicebus.pricing-tier=premiumSet the
spring.jms.servicebus.connection-stringproperty to the connection string to your Service Bus namespace, which you saved earlier.
Add code to send messages to Service Bus
Next, we add the business logic to send messages to a Service Bus queue.
In the directory src/main/java/com/example/demo, create a SendController.java file that has the following content:
package com.example.demo;

import org.springframework.beans.factory.annotation.Autowired;
import org.springframework.jms.core.JmsTemplate;
import org.springframework.web.bind.annotation.GetMapping;
import org.springframework.web.bind.annotation.RequestParam;
import org.springframework.web.bind.annotation.RestController;

@RestController
public class SendController {

    private static final String queue = "test-queue-jms";

    @Autowired
    private JmsTemplate jmsTemplate;

    @GetMapping("/messages")
    public String postMessage(@RequestParam String message) {
        jmsTemplate.send(queue, s -> s.createTextMessage(message));
        return message;
    }
}
Run the application locally
Switch back to the root of the sample
spring-sender-applicationfolder where thepom.xmlfile is located, and run the following command to start your Spring Boot application. This step assumes that you havemvninstalled on your Windows computer, and it's in thePATH.mvn spring-boot:runAfter the application startup completes, you can select the following links to send messages to the Service Bus queue.
http://localhost:8080/messages?message=Hellohttp://localhost:8080/messages?message=HelloAgainhttp://localhost:8080/messages?message=HelloOnceAgainYou can change the string value in the message query parameter and send any text to the Service Bus queue.
The browser displays whatever is passed as the message query string parameter, which implies that the Service Bus is accepting the message.
See the messages on the Service Bus queue
Note
Although viewing the messages helps to understand the send side of the messages, this step is optional.
These messages will be received in the next step of this tutorial.
You can proceed to view the messages in the Service Bus explorer in the Azure portal:
Back in the Azure portal, select Queues on the left menu under Entities.
Select the appropriate queue. For example, the queue for this demo is test-queue-jms.
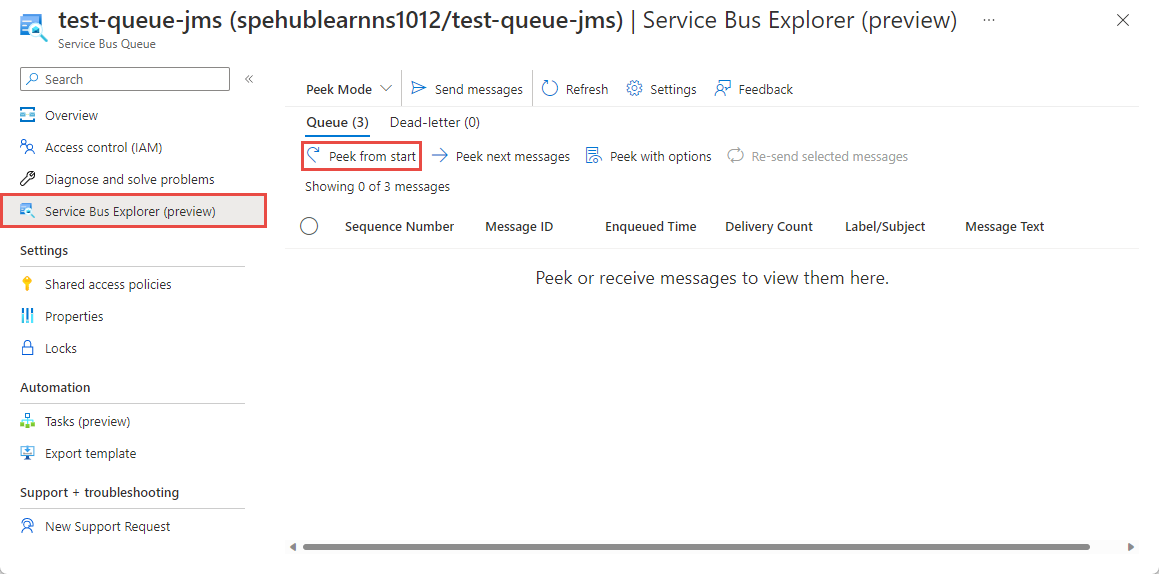
In the left pane, select Service Bus explorer.
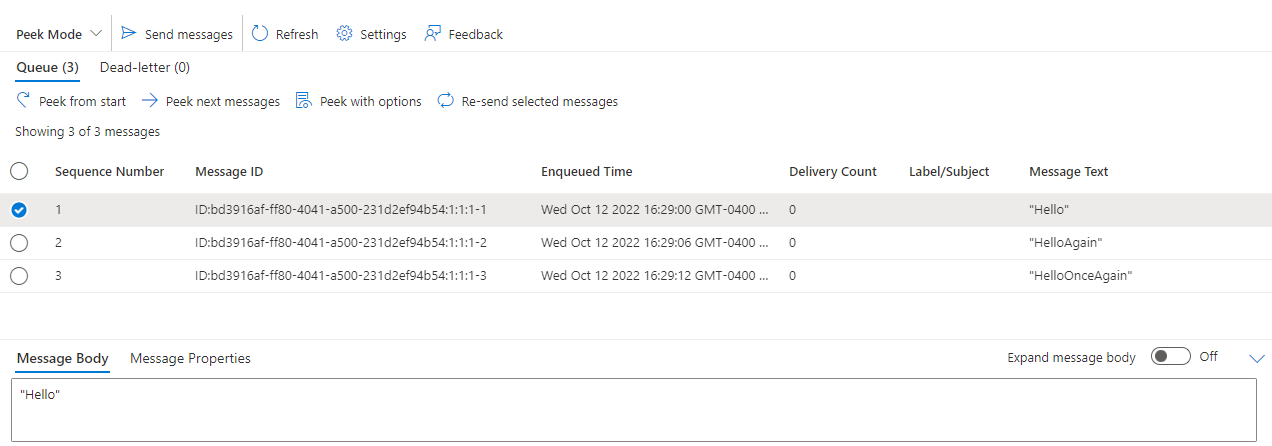
Select Peek from start. You should see all three messages that you sent using HTTP commands.
Select a message to see the message body in the bottom pane.