Run CodeQL in a database
With your code extracted to a database, you can now analyze it by using CodeQL queries. GitHub experts, security researchers, and community contributors write and maintain the default CodeQL queries. You can also write your own queries.
You can use CodeQL queries in code scanning analysis to find problems in your source code and identify potential security vulnerabilities. You can also write custom queries to identify problems for each language that you're using in your source code.
There are two important types of queries:
- Alert queries highlight problems in specific locations of your code.
- Path queries describe the flow of information between a source and a sink in your code.
Simple CodeQL query
The basic CodeQL query structure has the file extension .ql and contains a select clause. Here's an example query structure:
/**
 *
 * Query metadata
 *
 */
import /* ... CodeQL libraries or modules ... */

/* ... Optional, define CodeQL classes and predicates ... */

from /* ... variable declarations ... */
where /* ... logical formula ... */
select /* ... expressions ... */
Query customization
CodeQL analysis is driven by queries. While you can use the standard queries provided by GitHub, you can also customize analysis by writing your own queries and organizing them into query packs.
Queries are typically grouped into query packs, which are directories that contain queries, shared libraries, and configuration files. A query pack allows you to define a reusable set of analysis rules for your projects. Within a pack, you might include individual .ql files, helper libraries that define reusable logic, and query suites that group multiple queries together.
A query suite (.qls file) is used to control which queries run during analysis. Instead of running queries one by one, you define a suite that lists all the queries you want to execute. For example:
- description: Custom security queries
- queries:
  - ./queries/hardcoded-credentials.ql
  - ./queries/insecure-config.ql
This suite groups multiple queries so they can run together as part of a single analysis.
You can create your own queries by writing .ql files. A query describes a pattern in your code that you want to detect. It typically imports a language library, defines conditions, and returns results using a select statement.
For example, the following query looks for string literals that might contain hardcoded credentials:
/**
 * @name Hardcoded credential detection
 * @description Finds string literals that may contain passwords
 * @kind problem
 * @id example/hardcoded-credentials
 * @severity warning
 */

import javascript

from Literal l
where l.getValue().toString().matches("%password%")
select l, "Possible hardcoded credential"
In this query:
- The
importstatement loads the language model for JavaScript. - The
fromclause defines the data being analyzed. - The
whereclause filters for matching patterns. - The
selectstatement defines what results are returned.
You can build custom queries by starting from standard queries and modifying their conditions or output.
To use a query with GitHub code scanning, you must include query metadata. Metadata is defined in a comment block at the top of the file and controls how results are interpreted and displayed.
At a minimum, metadata should include:
- A unique identifier (
@id) - A name (
@name) - A description (
@description) - A result type (
@kind, such asproblemorpath-problem)
Additional properties such as @severity and @precision help determine how alerts appear in GitHub.
Metadata is required for integration with code scanning. When metadata is present, results are displayed as alerts in the repository. If metadata is missing, CodeQL still runs the query, but results are shown only as raw output and are not surfaced as code scanning alerts.
Once you have defined your queries or query suite, you can include them in your analysis configuration. In GitHub Actions, you specify the queries during the initialization step:
- name: Initialize CodeQL
  uses: github/codeql-action/init@v3
  with:
    queries: ./path/to/query-suite.qls
During the workflow:
- CodeQL creates the database.
- Runs the selected queries.
- Generates results in SARIF format.
- Uploads the results to GitHub.
Custom query results appear alongside standard CodeQL results in the Security tab. This allows you to extend the default analysis with checks that are specific to your codebase while still benefiting from GitHub's maintained query sets.
Query metadata
In the previous section, you added metadata to a query so it could be used in code scanning. This section explains how metadata is used and how it affects query results.
Query metadata is defined in a comment block at the top of a .ql file. It provides information about the query and controls how results are interpreted and displayed.
Metadata is used by CodeQL and GitHub code scanning to:
- Identify the query and its purpose.
- Determine how results are classified (for example,
problemorpath). - Assign severity and precision levels.
- Format results for display in the repository.
For example, a query might include metadata like this:
/**
 * @name Hardcoded credential detection
 * @description Finds string literals that may contain passwords
 * @kind problem
 * @id example/hardcoded-credentials
 * @severity warning
 */
When this metadata is present:
- Results are converted into SARIF format.
- Alerts are displayed in GitHub code scanning.
- Findings include context such as severity and description.
When metadata is missing:
- The query still runs.
- Results are not displayed as alerts.
- Output is shown only as raw tables.
Metadata also determines how results are grouped and tracked across scans. For example, the query @id is used to match alerts between runs.
GitHub has a recommended style guide for query metadata. You can find it in the CodeQL documentation.
This example shows metadata for one of the standard Java queries:
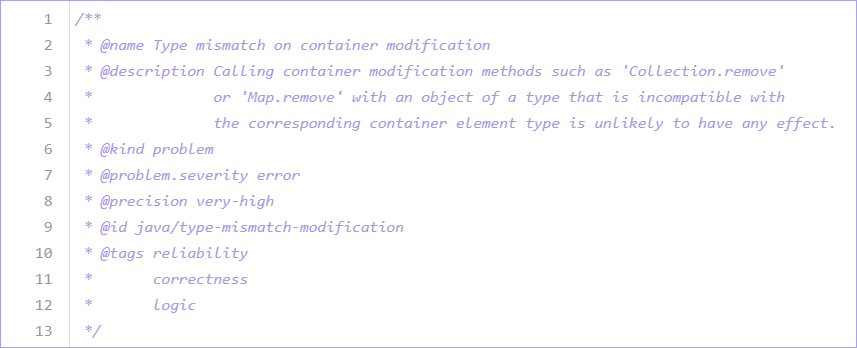
CodeQL doesn't interpret queries that don't have metadata. It shows those results as a table and doesn't display them in the source code.
Writing, testing, and running queries
After you create custom queries, the next step is to test them, run them in your workflows, and maintain them over time.
When you write a query, you are defining a pattern that CodeQL should detect in your codebase. The most effective way to develop queries is to iterate locally before adding them to your repository.
Test queries locally
You can test queries using the CodeQL CLI or the Visual Studio Code extension.
With the CodeQL CLI, you run queries against a database that you have already created:
codeql database analyze <database> <query.ql>
This command runs the query and produces results that you can review in SARIF or another output format.
You can also run:
codeql query run <query.ql> --database=<database>
Testing locally allows you to:
- Verify that the query returns the expected results.
- Refine the query logic.
- Identify false positives or missing cases.
The Visual Studio Code extension provides a more interactive experience. You can:
- Open a database.
- Run queries directly from the editor.
- View results alongside source code.
This makes it easier to understand how your query behaves and adjust it quickly.
Run queries in GitHub code scanning
Once your query produces the expected results, you can include it in your code scanning workflow.
In GitHub Actions, queries are configured in the initialization step:
- name: Initialize CodeQL
  uses: github/codeql-action/init@v3
  with:
    queries: ./path/to/query-suite.qls
When the workflow runs:
- CodeQL creates a database for the repository.
- Executes the selected queries.
- Converts results to SARIF.
- Uploads results to GitHub.
The results appear as alerts in the Security tab, alongside standard CodeQL findings.
Running queries in workflows ensures that:
- Analysis runs automatically on pull requests and branches.
- New issues are detected as code changes.
- Results are visible to the team.
Maintain and update queries
After you add a custom query to your workflow, you might notice that the results are not always what you expect.
For example:
- A query might return too many results (false positives).
- It might miss cases that you expected it to detect.
- New code patterns in your repository might not be covered.
In these cases, you update the query to improve its accuracy.
Start by running the query locally and reviewing the results. Look at the code locations that were flagged and decide whether they represent real issues. If not, refine the conditions in the where clause to narrow the results.
For example, you might:
- Add additional conditions to exclude safe patterns.
- Adjust string matching or data-flow logic.
- Reuse predicates from existing libraries to improve accuracy.
After updating the query, run it again against your database to confirm that the results have improved.
When you commit the updated query, it runs automatically in your code scanning workflow. This means:
- Existing alerts may be updated or removed.
- New alerts may appear based on the updated logic.
Over time, you repeat this process as your codebase evolves. Maintaining queries is an ongoing task that helps ensure your analysis remains accurate and relevant.
QL syntax
QL is a declarative, object-oriented query language. It's optimized to enable efficient analysis of hierarchical data structures, and in particular, databases that represent software artifacts.
The syntax of QL is similar to SQL, but the semantics of QL are based on Datalog. Datalog is a declarative logic programming language, which is often used as a query language. Because QL is primarily a logic language, all operations in QL are logical operations. QL also inherits recursive predicates from Datalog. QL adds support for aggregates to make even complex queries concise and simple.
The QL language consists of logical formulas. It uses common logical connectives such as and, or, and not, along with quantifiers such as forall and exists. Because QL inherits recursive predicates, you can also write complex recursive queries by using basic QL syntax and aggregates like count, sum, and average.
For more information on the QL language, see the CodeQL documentation.
Path queries
The way information flows through a program is important. Data that seems benign can flow in unexpected ways that allow it to be used maliciously.
Creating path queries can help you visualize the flow of information through a codebase. A query can track the path that data takes from its possible starting points (source) to its possible endpoints (sink). To model paths, your query must provide information about the source, the sink, and the data-flow steps that link them.
The easiest way to start writing your own path query is to use one of the existing queries as a template. To get these queries for supported languages, see the CodeQL documentation.
Your path query requires certain metadata, query predicates, and select statement structures. Many of the built-in path queries in CodeQL follow a basic structure. The structure depends on how CodeQL models the language that you're analyzing.
Here's an example template for a path query:
/**
 * ...
 * @kind path-problem
 * ...
 */

import <language>

// For some languages (Java/C++/Python/Swift), you need to explicitly
// import the data-flow library, such as:
// import semmle.code.java.dataflow.DataFlow
// import codeql.swift.dataflow.DataFlow

...

module Flow = DataFlow::Global<MyConfiguration>;
import Flow::PathGraph

from Flow::PathNode source, Flow::PathNode sink
where Flow::flowPath(source, sink)
select sink.getNode(), source, sink, "<message>"
In that template:
MyConfigurationis a module that contains the predicates that define how data flows between source and sink.Flowis the result of the data-flow computation based onMyConfiguration.Flow::PathGraphis the resulting data-flow graph module that you need to import in order to include path explanations in the query.sourceandsinkare nodes in the graph as defined in the configuration, andFlow::PathNodeis their type.DataFlow::Global<..>is an invocation of data flow. You can useTaintTracking::Global<..>instead to include a default set of taint steps.
How to write a path query
Your query needs to compute a path graph in order to generate path explanations. To do so, define a query predicate called edges. A query predicate is a nonmember predicate with a query annotation. The query annotation returns all the tuples that the predicate evaluates.
The edges predicate defines the edge relations of the graph that you're computing. It's used to compute the paths related to each result that your query generates. You can also import a predefined edges predicate from a path graph module in one of the standard data-flow libraries.
The data-flow libraries contain the other classes, predicates, and modules that are commonly used in data-flow analysis, in addition to the path graph module. The CodeQL data-flow libraries function by modeling the data-flow graph or implementing data-flow analysis. Normal data-flow libraries are used to analyze the information flow in which data values are preserved at each step.
Here's an example statement that imports the PathGraph module from the data-flow library (DataFlow.qll), in which edges is defined:
import DataFlow::PathGraph
You can import many other libraries included with CodeQL. You can also import libraries that are designed specifically to implement data-flow analysis in various common frameworks and environments.
The class PathNode is designed to implement data-flow analysis. It's Node augmented with a call context (except for sinks), an access path, and a configuration. Only PathNode values that are reachable from a source are generated.
Here's an example of the import path:
import semmle.code.cpp.ir.dataflow.internal.DataFlowImpl
You can optionally define a nodes query predicate, which specifies the nodes of the path graph for all languages. When you define nodes, the selected nodes define only edges with endpoints. When you don't define nodes, you need to select all possible endpoints of edges.
Database analysis
When you use queries to analyze a CodeQL database, you receive meaningful results in the context of the source code. The results are styled as alerts or paths in SARIF or another interpreted format.
Here's an example of a CodeQL database command that analyzes the database by running selected queries against it and interpreting the results:
codeql database analyze \
  --format=<format> \
  --output=<output> \
  [--threads=<num>] \
  [--ram=<MB>] \
  <options>... \
  -- <database> <query|dir|suite>...
This command combines the effect of the codeql database run-queries and codeql database interpret-results plumbing commands.
Alternatively, you can run queries that don't meet the requirements for being interpreted as source-code alerts. To do so, use:
codeql database run-queriescodeql query run
Then use:
codeql bqrs decode
to convert the raw results to a readable notation.
You can get a full list of available CodeQL CLI commands in the CodeQL CLI manual.
Use a SARIF file with categories
CodeQL supports SARIF for sharing static analysis results. SARIF is designed to represent the output of a broad range of static analysis tools.
You need to specify a category when using SARIF output for CodeQL analysis. Categories can distinguish multiple analyses performed on the same commit repository and on different languages or different parts of the code. However, SARIF files with the same category overwrite each other.
You can scan each SARIF output file by using CodeQL to analyze different languages within the same code base when the category value is consistent between the analysis runs. We recommend that you use the language being scanned as an identifier for the category.
For example, the category value appears (with a trailing slash appended if it's not already present) as:
<run>.automationIdin SARIF v1<run>.automationLogicalIdin SARIF v2<run>.automationDetails.idin SARIF v2.1.0
Post the SARIF results to GitHub
After the database is ready, you can query it interactively. Or you can run a suite of queries to generate a set of results in SARIF format and upload the results to a target repository on GitHub.com:
codeql github upload-results \
  --sarif=<file> \
  [--github-auth-stdin] \
  [--github-url=<url>] \
  [--repository=<repository-name>] \
  [--ref=<ref>] \
  [--commit=<commit>] \
  [--checkout-path=<path>] \
  <options>...
To upload results to GitHub, make sure that each continuous integration (CI) server has a GitHub App or personal access token for the CodeQL CLI to use. You must use an access token or a GitHub App with the security_events write permission.
You could potentially allow the CodeQL CLI to use the same token if CI servers already use a token with this scope to check out repositories from GitHub. Otherwise, create a new token with the security_events write permission and add this token to the CI system's secret store.
As a security best practice, use the --github-auth-stdin flag and pass the token to the command through standard input.
Upload SARIF results
For code scanning to display results from a non-Microsoft static analysis tool in your GitHub repository, your results must be stored in a SARIF file that supports a specific subset of the SARIF 2.1.0 JSON schema. You can upload the results by using either the code scanning API or the CodeQL CLI.
Each time you upload the results of a new code scan, CodeQL processes the results and adds alerts to the repository. To prevent duplicate alerts for the same problem, code scanning uses the SARIF partialFingerprints property to match results across runs so that they appear only once in the latest run for the selected branch.
Eliminating duplicates makes it possible to match alerts to the correct line of code when files are edited.
The rule ID for a result has to be the same across analyses. Fingerprint data is automatically included in SARIF files created through the CodeQL analysis workflow or the CodeQL runner.
SARIF specifications use the JSON property name partialFingerprints, a dictionary from named fingerprint types to the fingerprint. This property contains, at a minimum, a value for primaryLocationLineHash, which provides a fingerprint based on the context of the primary location.
GitHub tries to populate the partialFingerprints field from the source files if you upload a SARIF file by using the upload-sarif action and this data is missing.
Additionally, if you upload a SARIF file without fingerprint data by using the /code-scanning/sarifs API endpoint, users might see duplicate alerts when code scanning alerts are processed and displayed.
To avoid duplicate alerts while working with static analysis tools, calculate fingerprint data and populate the partialFingerprints property before uploading the SARIF file. A helpful starting point is to use the same script as the upload-sarif action.