Understand CodeQL results
In previous units, you created a database and scanned the extracted file from your code. Now you can view the results and determine if there are security vulnerabilities to address.
Interpreted query results are automatically displayed in the source code in the CodeQL extension for Visual Studio Code. Output results that the CodeQL CLI generates can be in many formats for use with various tools.
You can control how analysis results are displayed in source code by modifying a query's select statement. You can make the results clear and easy for other users to understand while developing the query. When you write your own queries in the query console or in the CodeQL extension for Visual Studio Code, there are no constraints on what can be selected.
If you want to use a query to create alerts in GitHub code scanning or generate valid analysis results by using the CodeQL CLI, you need to make the select statement report results in the required format.
Remediation workflows with Copilot Autofix
After CodeQL identifies an issue, the most important step is resolving it. GitHub integrates detection with remediation by allowing you to move directly from an alert to a proposed fix.
Fixing alerts with Copilot Autofix
When you open a CodeQL alert in the Security tab, GitHub shows details about the issue, including the affected code, severity, and how the problem was introduced.
For supported alerts, you also see Copilot Autofix.
Copilot Autofix analyzes the alert and generates a proposed fix. This includes:
- A code change that resolves the issue
- An explanation of why the issue occurs
- Guidance on how the fix addresses the problem
Instead of manually writing a fix from scratch, you start from a suggested change.
A typical workflow looks like this:
- CodeQL runs in your workflow and creates an alert.
- You open the alert and review the affected code.
- Copilot Autofix generates a suggested fix.
- You review the explanation and proposed changes.
- You apply the fix, which creates a pull request.
- The pull request runs checks and is reviewed before merging.
This workflow connects detection directly to remediation without leaving the GitHub interface.
Copilot Autofix does not apply changes automatically. You are responsible for reviewing and approving the fix. This ensures that:
- The fix aligns with your codebase.
- You can adjust the implementation if needed.
- Changes go through your existing review process.
Autofix is most effective for:
- Common vulnerability patterns, such as injection risks or unsafe API usage.
- Issues that can be resolved with a clear, localized code change.
For more complex issues, Autofix might provide guidance, but you might need to modify the fix or implement a custom solution.
Suggested fixes in alerts
Even when Autofix is not available, some alerts include suggested fixes.
These suggestions:
- Highlight the part of the code that should change.
- Provide guidance on how to resolve the issue.
You can use these suggestions as a starting point when writing your fix.
Remediating dependencies with Dependabot
Not all vulnerabilities come from your code. Some are introduced through dependencies.
Dependabot helps address these issues automatically by:
- Detecting vulnerable dependencies.
- Creating pull requests with updated versions.
- Allowing you to review and merge fixes.
These pull requests follow the same workflow as Autofix:
- A change is proposed.
- Checks are run.
- The update is reviewed and merged.
This makes dependency remediation consistent with how you fix application code issues.
Automating remediation workflows
You can use GitHub Actions to automate how fixes are handled.
For example, workflows can:
- Run tests on Autofix or Dependabot pull requests.
- Apply labels based on severity.
- Require approvals for high-risk changes.
- Automatically merge low-risk updates.
These workflows ensure that remediation is:
- Consistent across the team.
- Validated before merging.
- Integrated into your development process.
From detection to resolution
In a complete workflow:
- CodeQL detects a vulnerability.
- Copilot Autofix suggests a fix.
- A pull request is created.
- GitHub Actions validate the change.
- The fix is reviewed and merged.
By combining CodeQL analysis with Copilot Autofix, Dependabot, and workflow automation, you create a system that not only finds issues but also helps resolve them efficiently.
Act on code scanning alerts
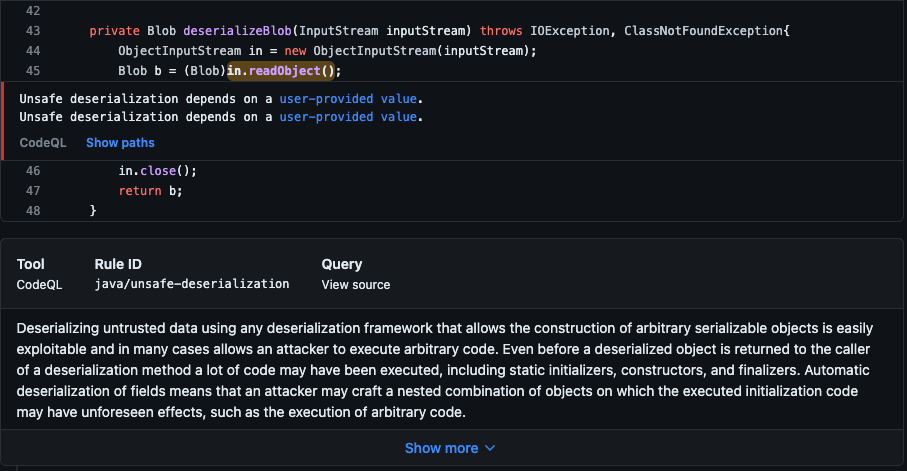
You can set up code scanning to check the code in a repository. You can use the default CodeQL analysis, a non-Microsoft analysis, or other types of analysis. The resulting alerts are displayed alongside each other in the repository.
GitHub's default CodeQL analysis might include more properties for alerts than results from non-Microsoft tools or from custom queries. In a default workflow, code scanning analyzes your code periodically on the default branch and during pull requests.
Each alert includes the following information:
- The problem with the code and the name of the tool that identified it.
- The line of code that triggered the alert.
- The properties of the alert, such as the severity.
- The security severity.
- The point when the problem was introduced.
- The nature of the problem.
Information also includes how to fix the problem when CodeQL analysis identifies an alert. Additionally, code scanning through CodeQL can detect data-flow problems in your code.
In addition to manually fixing vulnerabilities, you can automate dependency remediation using Dependabot security updates.
When Dependabot detects a vulnerable dependency, it creates a pull request to update the dependency. These pull requests can be integrated into automated workflows to streamline remediation.
Automating dependency remediation with Dependabot
A typical automation workflow follows this pattern:
- Dependabot creates a pull request to update a vulnerable dependency.
- A GitHub Actions workflow is triggered on the
pull_requestevent. - The workflow checks whether the pull request was created by
dependabot[bot]. - Metadata about the update (such as dependency type or version change) can be used to determine the next action.
- The workflow runs validation checks, applies labels, or enables auto-merge for low-risk updates.
The following example shows a simple GitHub Actions workflow that runs only for Dependabot pull requests. It validates the update and can enable auto-merge after checks pass.
name: Dependabot remediation

on:
  pull_request:
    branches:
      - main

permissions:
  pull-requests: write

jobs:
  dependabot:
    if: github.event.pull_request.user.login == 'dependabot[bot]'
    runs-on: ubuntu-latest

    steps:
      - uses: actions/checkout@v4

      - name: Run tests
        run: npm test

      - name: Enable auto-merge for approved updates
        if: ${{ success() }}
        env:
          GH_TOKEN: ${{ secrets.GITHUB_TOKEN }}
          PR_URL: ${{ github.event.pull_request.html_url }}
        run: gh pr merge --auto --merge "$PR_URL"
This approach helps teams reduce manual effort while ensuring that dependency updates are validated before being merged.
In production scenarios, auto-merge is typically limited to low-risk updates, such as patch releases, and combined with branch protection rules, required status checks, and review policies.
Notifying teams about remediation activity
To improve visibility into dependency updates, teams often integrate Dependabot with external notification systems.
In addition to GitHub notifications, you can use:
- Slack or Microsoft Teams integrations for team awareness.
- GitHub webhooks for custom integrations and automation pipelines.
For example, a workflow or webhook can notify a team when:
- A Dependabot pull request is opened.
- Validation checks fail.
- A security update is merged.
These notifications help teams respond quickly when remediation requires attention.
Data-flow alerts
Data-flow analysis finds potential security issues in code, including:
- Using data in a way that compromises security.
- Passing dangerous arguments to functions.
- Leaking sensitive information.
GitHub shows you how data moves through the code when code scanning reports data-flow alerts. You can use these data-flow alerts to identify the areas of your code that leak sensitive information. This knowledge can help you identify the entry point for attacks by malicious users.
Severity levels
Any code scanning results that have a severity of Error cause check failure by default.
Alert severity levels are:
- Error
- Warning
- Note
You can specify the severity level at which pull requests that trigger code scanning alerts should fail.
Security severity levels
Security queries that code scanning generates display security severity levels for alerts.
Security severity levels are:
- Critical
- High
- Medium
- Low
GitHub uses Common Vulnerability Scoring System (CVSS) data to calculate the security severity of an alert.
Any code scanning results that have a security severity of Critical or High cause a check failure by default. You can specify which security severity level should cause a check failure for code scanning results.
Close a code scanning alert
You have two ways to close an alert:
- Fix the problem in the code.
- Dismiss or delete the alert.
Dismiss a code scanning alert
Dismissing an alert is a way of closing an alert that you don't think needs to be fixed. For example, you might dismiss an alert for an error in code used only for testing. You might also dismiss an alert if the effort required to fix the error is greater than the potential benefit of improving the code.
You can dismiss alerts from code scanning annotations in the code or from the summary list on the Security tab. To dismiss an alert from the list, select the Dismiss alert menu, select a reason for dismissal, and then select the Dismiss alert button.
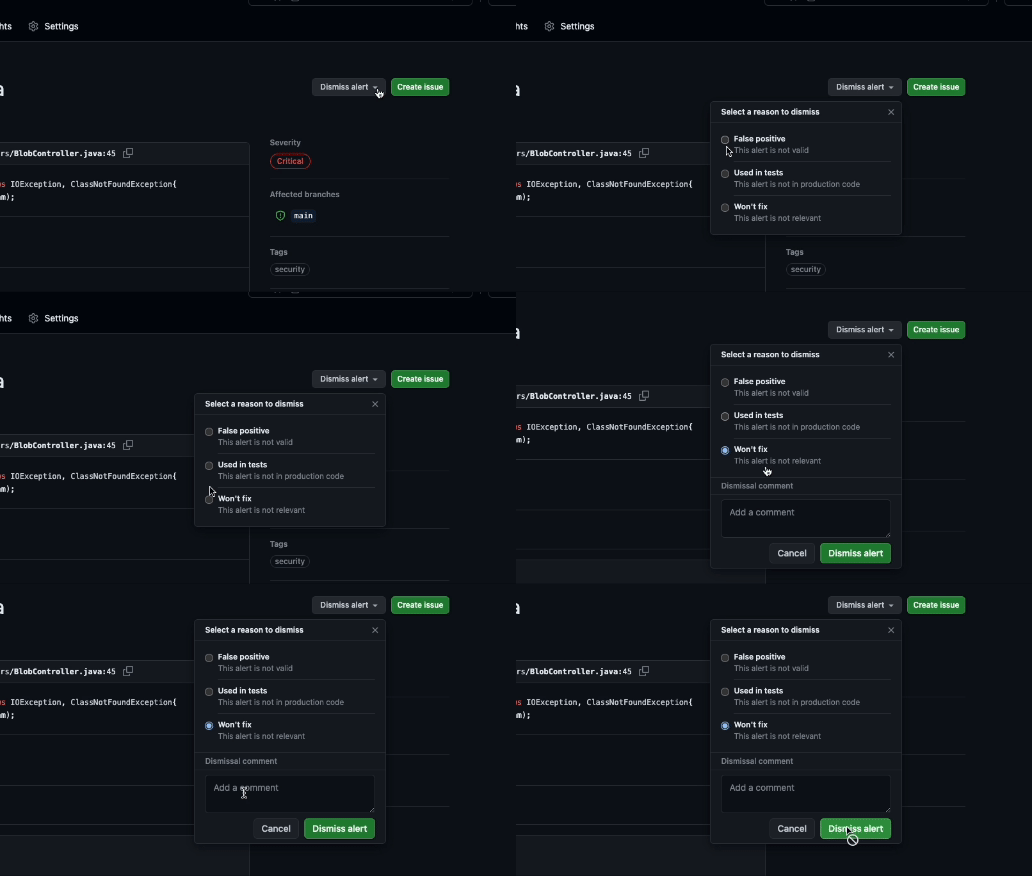
When you dismiss an alert:
- The alert is dismissed in all branches.
- The alert is removed from the number of current alerts for your project.
- The alert is moved to the Closed list in the summary of alerts. You can reopen it from there if necessary.
- The reason why you closed the alert is recorded.
- The next time code scanning runs, the same code won't generate an alert.