Create channels
Think of channels as a place for large bodies of work or specific needs or topics.
The department chair has designed channels on their Anyone Team for specific work to be accomplished, including department projects, academic advisement, institutional resources, courses, scheduling, and meetings.
General channel
Each Team starts with a general channel by default. Every channel comes with its own conversations tab, files tab, and apps. The general channel in a Staff Members Team will also have a Staff Notebook.
Work with channels
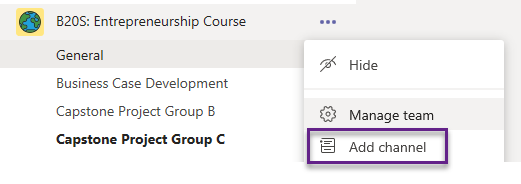
More channels can be added to the Team as needed. Select the ellipses next to the team name and choose Add channel. Then, name the new channel(s). Notice that the additional channel automatically comes with a conversations tab, files tab, notes tab and + (to add additional apps or tabs). Perhaps a department is developing a new track or course of study for a particular college. A channel is a great way to keep this work separate from other department endeavors.
Hide a channel
While working in the team, the list of channels may grow over time, or there may be a channel that is used less often. Hiding the channel allows educators to retain the information and recall the channel as needed for work. To hide a channel, select the ellipses at the end of the channel name and choose Hide. There will now be a prompt after the last channel in the team that reads 1 (or 2 or more) hidden channel(s). To unhide a channel, select the arrow next to the hidden channel(s), navigate to the channel to unhide, and select Show.
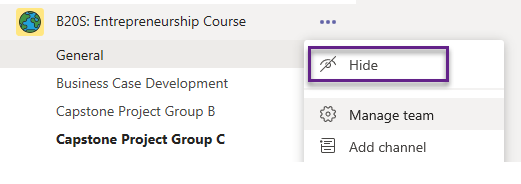
When a channel is unhidden, @channel notifications will be received (covered in next unit).