Exercise - Add Voice Calling code
In this unit, you add more code to the web app created in the previous unit. This app enables you to make voice calls by using Azure Communication Services.
Add input HTML elements
To make a call, you need two important pieces of information:
- An Azure Communication Services user access token for the user making the call. This token identifies and authorizes the user to contact the service and initiate voice calling.
- Who the user wants to call (represented by an Azure Communication Services user ID).
To get this information from the user, you use some standard HTML form inputs. Add these inputs to our index.html file:
Open the index.html file in a text editor.
Add the following HTML into the body of the HTML file, after the
<!-- Calling HTML here -->comment:<input id="token-input" type="text" placeholder="Your User access token" /> <button id="token-submit" type="button"> Submit </button> <br /><br /> <input id="callee-id-input" type="text" placeholder="Who would you like to call?" style="margin-bottom:1em; width: 200px; display: block;" />
The first input element is for the token of the user making the call. The submit button is used to instantiate some Azure Communication Services objects after the token is provided. The second input is for entering the user ID of the person we want to call.
Add basic call action buttons
You also need buttons for some basic call actions that allow the user to control the call:
- Start Call
- Hang Up
So let's also add these buttons underneath the inputs from the previous step:
<button id="call-button" type="button" disabled="true">
Start Call
</button>
<button id="hang-up-button" type="button" disabled="true">
Hang Up
</button>
Test the HTML
Now that the HTML is entered, you completed most of the code for this app. If you run the app by entering the same command from the previous unit (npx parcel index.html) and then open the app, you should see the following app in your browser.
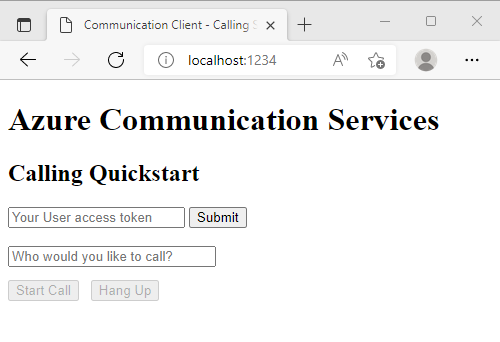
This app doesn't look like a lot, but it contains all the visual elements you need to create a voice calling app. You're now done entering the HTML code for your app. The rest of the code is JavaScript.
Import some dependencies
The first step within the app.js file is to import the dependencies for making Azure Communication Services calls. These dependencies come from the SDKs you installed earlier by using npm. To import them, add the following lines to the app.js file:
import { CallClient } from "@azure/communication-calling";
import { AzureCommunicationTokenCredential } from '@azure/communication-common';
The first import is a CallClient to be used later to actually make our calls. It handles microphones, audio, and more for you. The second import, AzureCommunicationTokenCredential, is used to handle the authentication requirements for Azure Communication Services. Authentication ensures you know who a user is when they place a call.
Get references to the HTML code
Earlier, you created HTML elements for users to use to control the app. To listen to the user interacting with them, you need to get references to the elements in your JavaScript.
You also need a couple of variables to hold some items, which are used throughout our code. Add the following code to app.js after the import statements:
const userToken = document.getElementById("token-input");
const submitToken = document.getElementById("token-submit");

const calleeInput = document.getElementById("callee-id-input");

const callButton = document.getElementById("call-button");
const hangUpButton = document.getElementById("hang-up-button");

let call;
let callAgent;
let tokenCredential;
Handle authentication
Now that you completed some basic setup, you can start creating some functionality. The first thing you need functionally is to handle authentication. Authentication is handled by the user entering a user token into the token input element that you created and then clicking your "submit token." To handle this process within your code, register a click handler to that submit token button, which processes the user token. You can add this code after your variable definitions from the previous section:
submitToken.addEventListener("click", async () => {
  const callClient = new CallClient();
  const userTokenCredential = userToken.value;

  try {
    tokenCredential = new AzureCommunicationTokenCredential(userTokenCredential);
    callAgent = await callClient.createCallAgent(tokenCredential);
    callAgent.on('incomingCall', incomingCallHandler);

    callButton.disabled = false;
    submitToken.disabled = true;
  } catch(error) {
    window.alert("Please submit a valid token!");
  }
});
This code takes the following actions:
- Creates an Azure Communication Services call client.
- Retrieves the user token from the token input element, and creates an
AzureCommunicationTokenCredentialfrom it. This credential is used to make and handle all calls. - Creates a
CallAgent, which you use to make and receive calls. - Registers an incoming call handler, which you'll write shortly.
- Updates some of our buttons so the user can proceed.
Make calls
Now that authentication is out of the way, you can start on some real functionality. Let's start by allowing the user to make a call:
callButton.addEventListener("click", () => {
  // start a call
  const userToCall = calleeInput.value;
  call = callAgent.startCall(
    [{ id: userToCall }],
    {}
  );

  // toggle button states
  hangUpButton.disabled = false;
  callButton.disabled = true;
});
This code registers a click handler on the Start Call button. It retrieves the callee ID from the matching input element and then uses the Call Agent to make a call.
Hang up
After a call is opened, you need to allow the user to hang up:
hangUpButton.addEventListener("click", () => {
  // end the current call
  call.hangUp({ forEveryone: true });

  // toggle button states
  hangUpButton.disabled = true;
  callButton.disabled = false;
});
This code registers a click handler on the Hang Up button and then just instructs the call to hang up.
Receive a call
Now that you can make a call, you also need to handle receiving a call. To handle receiving a call, you create the incoming call handler, which was mentioned earlier:
const incomingCallHandler = async (args) => {
  const incomingCall = args.incomingCall;

  // Accept the call
  await incomingCall.accept();

  // Subscribe to callEnded event and get the call end reason
  incomingCall.on('callEnded', args => {
      console.log(args.callEndReason);
  });
};
Test the completed app
The JavaScript code is also done now. Run the app by using the same command as the previous unit (npx parcel index.html) and then open the app in your browser. You now have a functional basic calling app!
Get test credentials
To test actually making a call, you need some credentials. You can obtain credentials from the Azure portal. Open your Azure Communication Services resource within the Azure portal, and then select Settings > Identities & User Access Tokens within the communication service menu:

On the page that appears, you can generate test credentials. For this app, you just need the Voice and video calling (VOIP) permission, so check that option, and then select Generate:

You get a single Azure Communication Services identity that's suitable for testing. Make sure to copy the Identity and the User Access token values to somewhere safe for testing, such as a text document.

If you want to try calling another user, generate an extra set of credentials by selecting Generate again. New values are created in the Identity and the User Access token fields.
The first set of credentials is used for the calling user, and the second set is used for the receiving user.
In a real world app, you should use the identity systems and client libraries to create and store these credentials. This way, a real-world user doesn't need to manually copy and enter these items. For more info on this concept, open the links at the end of this module.
Call the Echo Bot
Azure Communication Services has an Echo Bot, which you can call to test your microphone. Echo Bot is compatible with this app. To call the Echo Bot:
- Open the app in your browser.
- Paste a saved token into the user token input element.
- Select the Submit button.
- Enter the Echo Bot's user ID (
8:echo123). - Select Start Call.
Your browser might prompt you in some microphone permission dialogs, so make sure you accept them. If everything works out correctly, you should be on a call with the Echo Bot. The bot enables you to record a short message, which it then plays back to you.
Call another user
You can also call another user by using this app. This action requires a second set of credentials, which you generated earlier. Follow these steps:
- Open two copies of the app. Use multiple tabs or windows to simulate calling another user.
- In the first copy, enter the first user token saved from the credential generator, and then select Submit.
- In the second copy, enter the second user token saved from the credential generator, and then select Submit.
- Return to the first copy, and then enter the second user ID into the Who would you like to call? input element.
- Again in the first copy, select Start Call.
If both tabs or windows are on the same device, the call might have echoes, but it does show the process and the calls working between two browser tabs. If you deploy your app to a web server that multiple machines can access, you can have a true voice call without echo.