Create and configure experience profiles
An experience profile is a configuration container that determines what a service representative sees and can do when they sign in to the Copilot Service workspace. It controls which channels are available, which productivity tools appear in the pane, which Copilot features are enabled, and whether the inbox is turned on. Every representative is assigned to exactly one experience profile, and when they sign in, that profile loads automatically.
Default experience profiles
Dynamics 365 Contact Center includes the following default experience profiles out of the box. When a representative signs in without a custom profile assignment, the system assigns one of these automatically. You can't delete or modify default profiles.
- Omnichannel for Customer Service – default profile: Used when the representative accesses the Copilot Service workspace with Omnichannel capabilities.
- Customer Service workspace – default profile: Used when the representative accesses the Customer Service workspace without Omnichannel capabilities.
- Customer Service workspace + channels – default profile: Used when Omnichannel capabilities are deployed alongside the Customer Service workspace.
- Customer Service workspace + inbox – default profile: Used when the Inbox capabilities are deployed alongside the Customer Service workspace.
- Customer Service workspace + channels + inbox – default profile: Used when Omnichannel capabilities and the inbox are deployed alongside the Customer Service workspace.
When your representatives need a workspace tailored to their specific role, you create a custom profile.
Create a new experience profile
You create and manage experience profiles in Copilot Service admin center under Support experience > Workspaces > Experience profiles.
- In Copilot Service admin center, navigate to Support experience > Workspaces.
- Next to Experience profiles, select Manage.
- Select New.
- Enter the following details:
- Name: A descriptive name for the profile, such as "Voice specialists" or "Digital messaging representatives."
- Unique name: A unique identifier in
<prefix>_<name>format. The prefix must be three to eight alphanumeric characters, followed by an underscore (for example,contoso_voiceagent). - Description (optional): Extra context about the profile's purpose.
- Select Create.
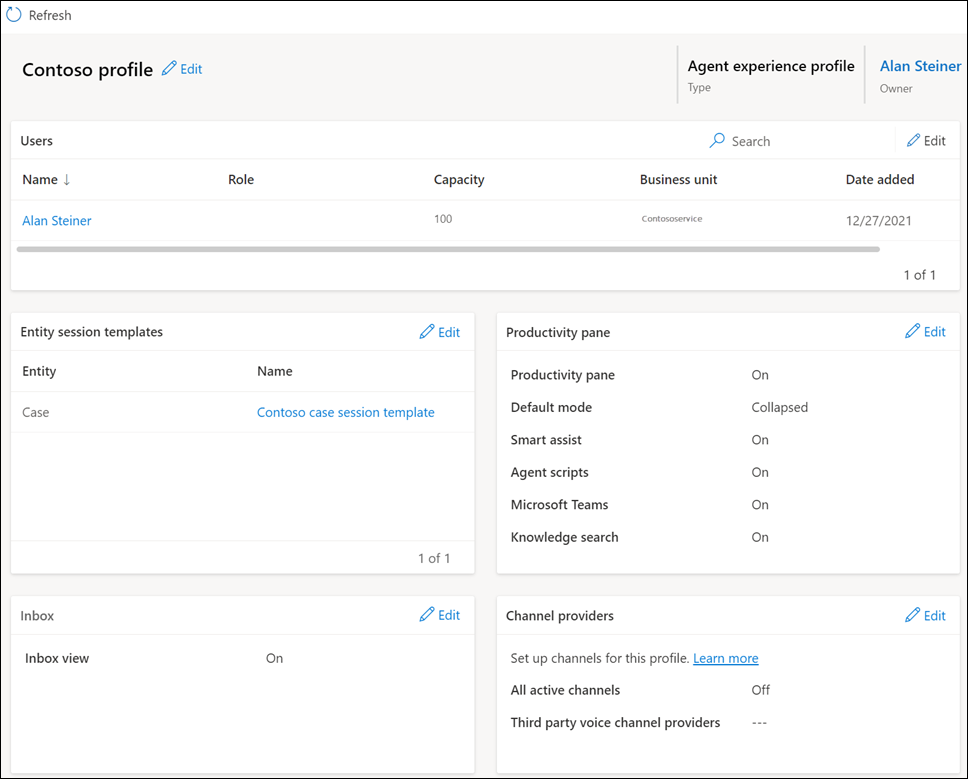
The profile opens with several configuration sections you can now fill in.
Configure the productivity pane
The productivity pane is the side panel in the workspace that gives representatives access to tools during active conversations. Within the experience profile, you control which tools appear and whether the pane is expanded or collapsed by default.
The following productivity pane tools are available to configure per profile:
| Tool | Description |
|---|---|
| Copilot help pane | AI-powered help pane for answering questions, suggesting responses, drafting emails, and summarizing cases and conversations. |
| Scripts | Step-by-step guidance for representatives during interactions. Useful for onboarding or regulated workflows. |
| Knowledge search | Lets representatives search published knowledge articles directly in the workspace. |
| Smart assist | Surfaces intelligent recommendations for knowledge articles, similar cases, and related actions based on conversation context. |
| Teams chat | Lets representatives collaborate with colleagues over Microsoft Teams without leaving the workspace. Requires Teams Collaboration to be enabled in the environment. |
| Join a Teams call | Allows representatives to invite customers to a Teams meeting. |
| Case handling time | Tracks the time representatives spend actively working on a case. |
| Timeout rules | Configures automatic timeout behavior for sessions. |
To configure the productivity pane, open the profile and expand the Productivity pane section. Set the default mode (Collapsed, or Expanded), then toggle each tool on or off.
Enable Copilot features per profile
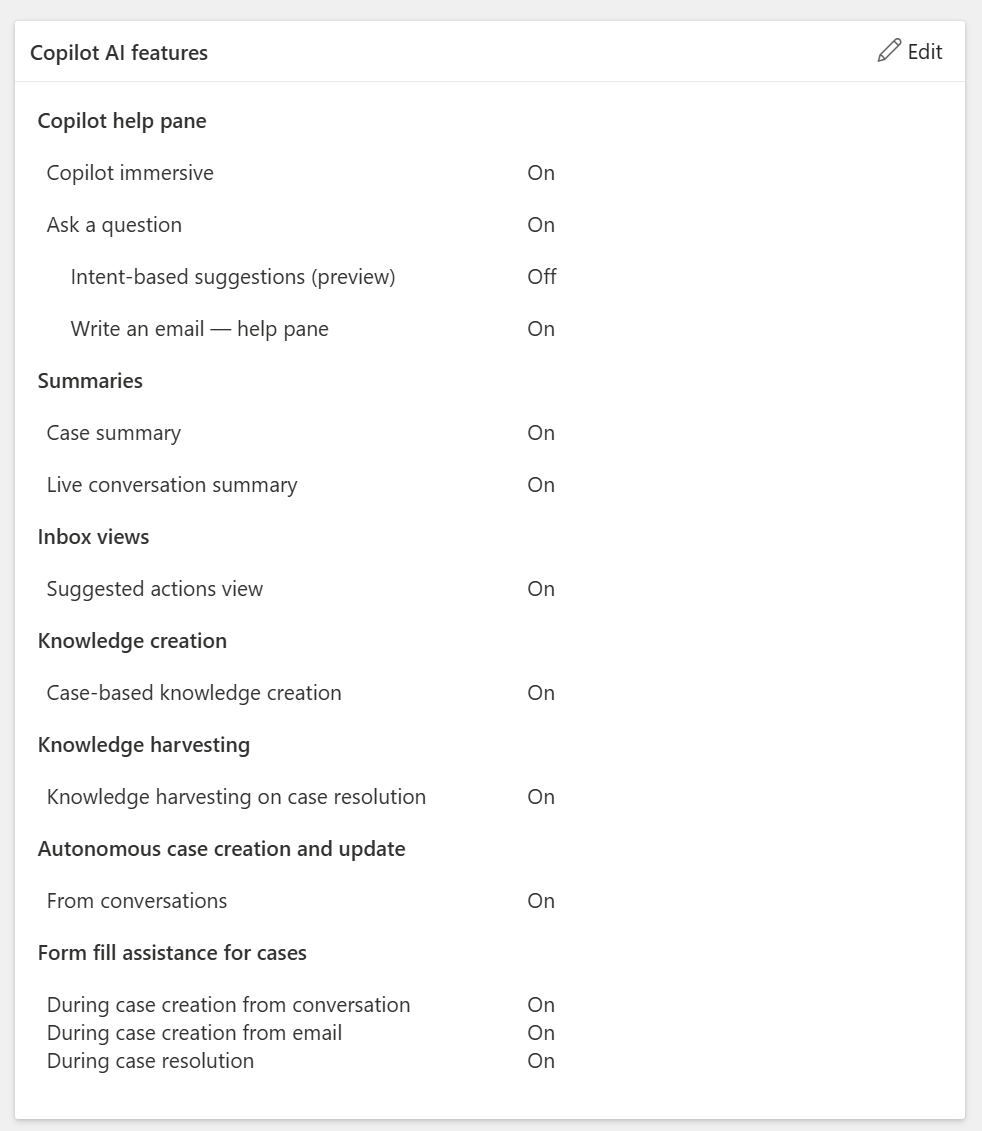
Copilot features are enabled globally in Copilot Service admin center, but you can control which features are available to a specific set of representatives through the experience profile. This lets you, for example, turn off email drafting assistance for representatives who don't handle email, or limit response suggestions on profiles where representatives are experienced enough to not need them.
The following Copilot features can be turned on or off at the profile level:
| Category | Feature | Description |
|---|---|---|
| Copilot help pane | Ask a question | Lets representatives query the knowledge base in natural language. |
| Copilot help pane | Intent-based suggestions | Copilot proposes replies based on the conversation context. |
| Copilot help pane | Write an email | Assists with drafting contextual outbound emails. |
| Summaries | Case summary | Displays an AI-generated summary of the case history. |
| Summaries | Live conversation summary | Generates a real-time summary of the active conversation. |
| Inbox view | Suggested actions view | Surfaces recommended actions in the inbox. |
| Knowledge creation | Case-based knowledge creation | Automatically creates a knowledge article draft when a representative resolves a case. |
To configure Copilot features, open the profile and expand the Copilot AI features section. Toggle each feature on or off based on the representative role.
Assign channels to a profile
The Channels section of the profile controls which engagement channels are available to representatives assigned to this profile. For example, a voice-only profile would include the voice channel but not digital messaging channels. Representatives only see the channels that are active in their profile.
Assign users to a profile
After you configure the profile settings, assign the representatives who should use it.
- Open the profile and expand the Users section.
- Select Add Users.
- Search for and select the users to add.
- Select Add.
Important
A representative can only belong to one experience profile at a time. To move a representative to a different profile, you must first remove them from their current one.
Map security roles to experience profiles
When you have multiple user groups with different roles and privileges, you can assign experience profiles to a security role to provide customized app experiences for each group. The application assigns the experience profile to all the users with the specified security role. However, assignment of experience profiles based on team membership isn't allowed.
If users have multiple security roles, the application links the profile with the higher rank to the user.
For example, your organization has both Customer Service Representative and Omnichannel agent roles to which users are assigned. The table summarizes the mapping of experience profiles to the corresponding roles.
| Experience profile | Rank | Security Role |
|---|---|---|
| Contoso Representative profile | 1 | Customer Service Representative |
| Datum Representative profile | 2 | Omnichannel agent |
All the service representatives with the Customer Service Representative role get the options enabled in the Contoso Representative profile. Users with Omnichannel agent role see the options set in the Datum Representative profile.
The user, John Doe, has both the Customer Service Representative and Omnichannel agent roles assigned. The application assigns the Contoso Representative profile to John Doe, as the rank of the profile is higher.
To add a security role and rank to an experience profile, perform the following steps:
- In Copilot Service admin center select Workspaces in Support experience.
- On Experience profiles select a custom experience profile, and then select Set rank and roles. You can't set security roles and rank to the out-of-the-box profiles.
- In Profile rank and roles assignment specify the following details:
- Rank: Used to determine the custom experience profile that must be mapped to a user when multiple roles are assigned to a user.
- Roles: The user roles that the custom experience profile can be mapped to.
Note
When you set a custom profile as the default, you can no longer set security roles and rank on the out-of-the-box profiles, assign security roles to the default profile, or keep existing security role assignments — they're removed automatically.
In the next unit, you learn how to configure application tab, session, and notification templates, the building blocks that control what opens when a representative accepts a conversation and how incoming work notifications appear.