Add Copilot Studio workflows as tools to agents
Copilot Studio has a tools registry where you can create a tool once and reuse it across multiple agents. You can add existing Copilot Studio workflow tools to an agent, or create a new workflow tool while editing your agent.
Tools added to an agent are available for automatic orchestration throughout your agent's conversations, helping you scale actions in a controlled way.
Add Copilot Studio workflow tool to a Copilot Studio agent
To add an existing Copilot Studio workflow tool from the tools registry to your agent:
Open your agent by choosing Agents in the left-hand navigation pane and selecting your agent from the list.
Go to the Tools tab for the agent.
Select + Add a tool.
Select the Flow icon to display the list of workflow tools.
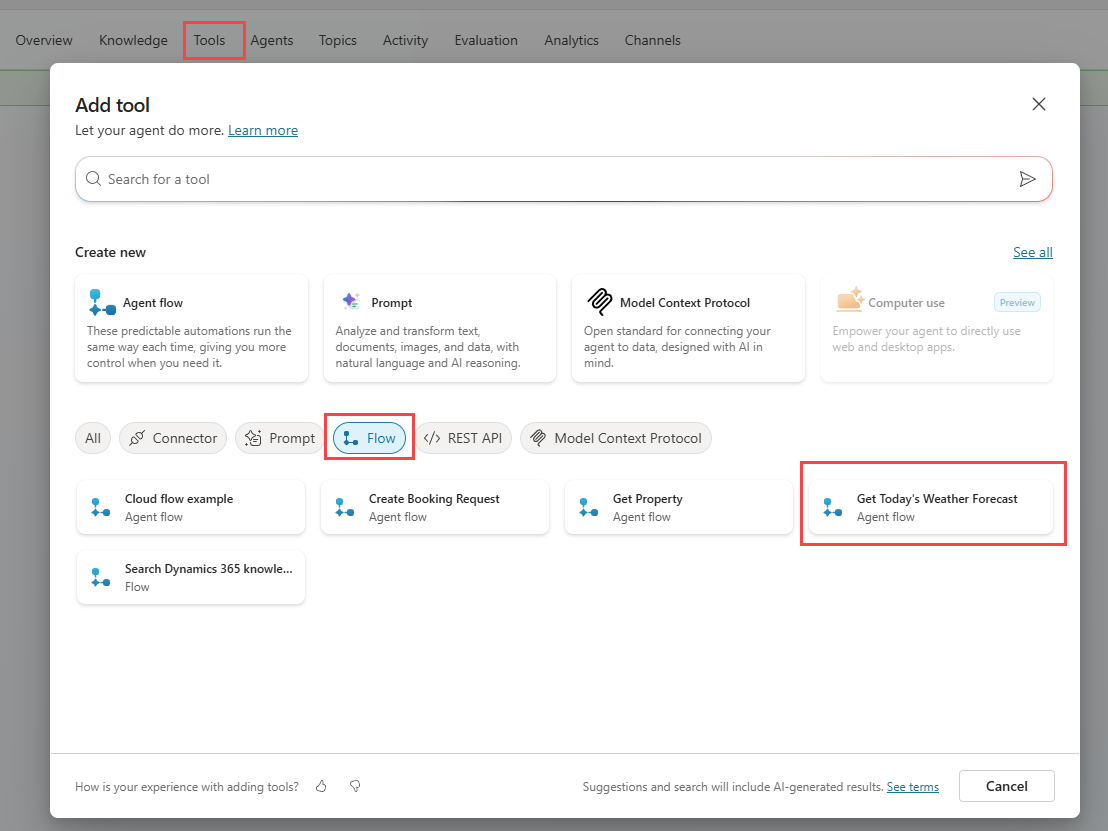
Select the tile of the workflow you want to add to your agent.
Select Add and configure.
A configuration pane opens with three tabs:

- Details: The Details section lets you configure basic details about your tool.
- Inputs: The Inputs section defines how information is gathered to fill the required inputs for the tool.
- Completions: The Completion section defines what you want the agent to do after it finishes using the tool.
Details
The Details section lets you configure basic details about your tool.
Here, you can view and update:
Name: The name of the tool. This name appears in the list of tools for your agent. The name is inherited from the workflow name. Edit the name so that it clearly indicates the tool's function.
Description: A description of the tool. Generative orchestration uses this description to determine when your agent should use the tool. In a few words, provide clear, specific descriptions that explain what the tool does and when it should be used.
Agent flow: A link to the workflow for the tool.
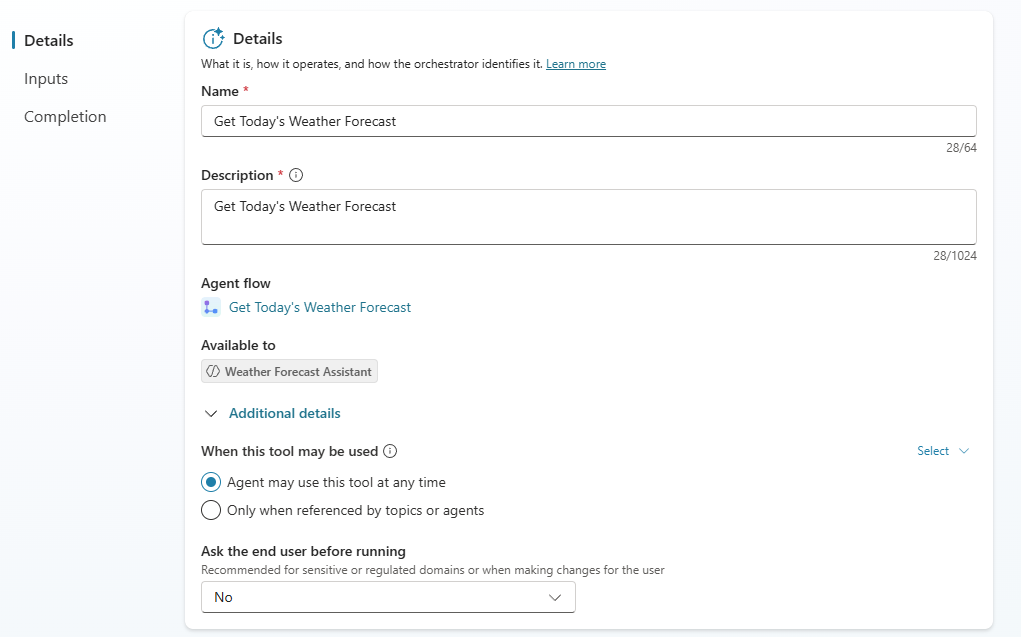

There's an Additional details section that you can expand and configure:
- When this tool may be used: Indicates whether the tool may be used by the agent or only when called directly by a topic or agent. When Agent may use this tool at any time (default), the agent can use generative orchestration to determine when to use the tool. Generative orchestration lets the agent automatically decide when to use a tool based on the user's message. If this option isn't selected, the agent only uses the tool when it's explicitly called from a topic.
- Ask the end user before running: In the end user chat experience, ask the agent for confirmation before running the tool. This option is set to No by default. If you select Yes, you can specify the message to be displayed to the user as text or as an adaptive card.
Important
When this tool may be used should be set to Agent may use this tool at any time in order for the tool's use to be determined by generative orchestration.
Note
Ask the end user before running is recommended for sensitive or regulated domains, or when making changes on behalf of the user.
Inputs
The input parameters added to the When an agent calls the flow trigger in the workflow are listed in the Inputs section.

Important
Copilot Studio agents only support the following types of input parameters for Copilot Studio workflows:
- Number
- String
- Boolean
For each input you can define how the agent populates the values to pass to the workflow by setting Fill using to one of:
- Dynamically fill with AI (default)
- Custom value
If you select Dynamically fill with AI, the agent tries to extract the value from available context, for example, from the user's message. If no appropriate value is found, it generates a question to ask the user for a value. You can further select the Customize icon to access more detailed options for dynamically filling the value:
- Display name: How the name of input appears to the user.
- Description: How the prompt appears to the user.
- Identify as: How the user's response is interpreted, for example as the user's entire response as text or mapped to an entity.
- Copilot prompts user for input: How the user should be prompted if the input value isn't available from the context. Can be either a custom message or AI-generated. If not selected, the agent defaults to AI-generated.
- Copilot doesn't identify entity: If the agent doesn't identify an entity in the user's statement, how many times can the agent ask the question again.
- Additional entity validation: Additional validation behavior on the user's input beyond the default for the entity type including the message to send to the user and what to do if no entity is found.
- No valid entity found: The topic to call or variable to set if the user's input doesn't match an entity.
If you select Custom value for Fill using, you can set the input to an explicit value instead of letting the agent extract it. You can then enter a fixed value, select a variable, or use a Power Fx formula.
You can change the order of the inputs using the ellipses (...) next to the input name and selecting Move up or Move down or you can select the six dots and drag the inputs above or beneath each other.

Note
An agent can only receive up to 1 MB of data from a workflow in a single action. However, there's no limit on how many variables or the amount of data an agent can send.
Completion
This section defines what will happen when the tool has finished.

Response
The tool doesn't respond by default, but you can configure After running to one of these options:
- Don't respond (default): The agent incorporates the tool output into its response.
- Write the response with generative AI: The agent automatically generates a contextual response for a user, based on their query and the result of the tool.
- Send specific response: Create a specific, formatted response for your tool to return. You can insert references to output variables from the tool using the variable picker. You can also use Power Fx formulas to format the response.
- Send an adaptive card: Create rich, interactive responses with buttons and actions
Outputs
The output parameters from the Respond to agent action are listed. If the tool provides output variables, you can edit the display name and description of each variable by selecting the settings icon to the right of the output.
You can configure which output variables to make available to the agent and other tools. By default, all output variables are available.
Workflow tools added to an agent
After you save the workflow tool, it displays under the Tools tab on the agent.

Agent instructions
When a user sends a message, your agent selects one or more tools, topics, other agents, or knowledge sources to prepare its response. Multiple factors determine the selection. The most important factor is the description of the topics, tools, agents, and knowledge sources. Other factors include the name of a topic, tool, agent, or knowledge source, any input or output parameters, and their names and descriptions.
Descriptions make it possible for your agent to be more accurate when it associates user intent with tools, other agents, and topics. You don't need to predict all ways a user might indicate what they need.
You don't need to define workflow tools in the agent's instructions, because this information is already available to the agent. You can, however, help the agent determine when to call the workflow by adding hints in the agent's instructions.
For inputs, the agent uses the conversation history and previous calls to tools and knowledge sources to determine what the inputs should be. You can add detail to the agent's instructions to assist the agent in determining where to extract the input value from.

If your agent needs to call a specific agent tool, you can name that tool in your agent instructions.
In the Overview tab, edit Instructions.
Enter
/, and then select the tool from the menu that appears.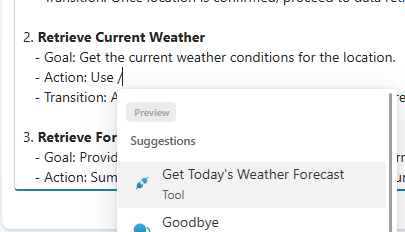
Tip
You can also start typing the name of the object to see matching suggestions.
In the instructions, add natural language around the tool object to describe when to use the tool for example,
Action: Use the [Get Today's weather forecast] tool to retrieve the forecast summary for today.Select Save.


For more information on using instructions with tools, see Configure high-quality instructions for generative orchestration.
Create a new workflow tool for your agent
So far, you saw how to add an existing workflow as a tool to your agent. You can also create a new workflow tool directly while editing your agent—without leaving the agent editor.
Open your agent by choosing Agents in the left-hand navigation pane and selecting your agent from the list.
Go to the Tools tab for the agent.
Select + Add a tool.
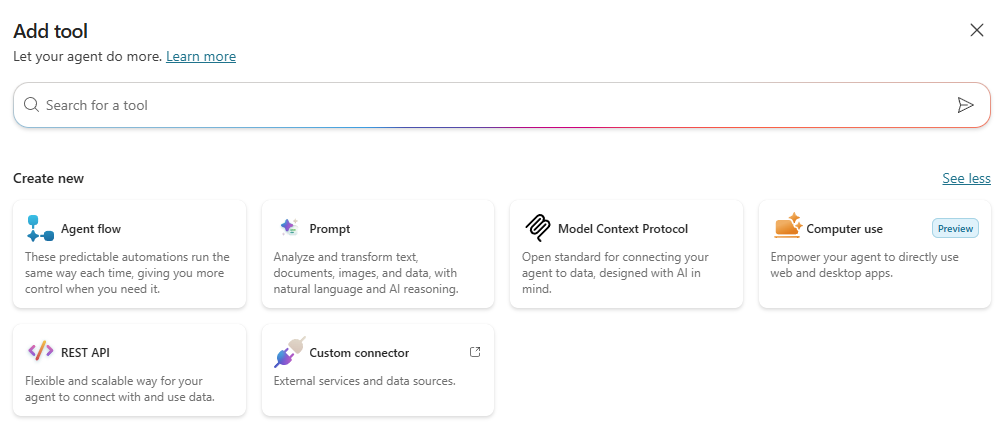
Select the Agent flow tile.
Follow the steps in the wizard and pages displayed and configure the tool as described above.

Tip
Both the workflow and tool are named Untitled by default. Ensure that you name the workflow and tool correctly and add an appropriate description to the tool.
Next, we’ll explore how to use Copilot Studio workflows as tools within a topic.