Create and configure agent topics
You create a topic by selecting the Topics tab and then selecting Add a topic at the top of the page. There are two options for creating topics:
- From blank: Opens a new blank topic. You create everything from the triggers to conversation flow, etc.
- Create from description with Copilot: Uses Copilot to assist you in creating your topic. You provide some basic details about what you want and the topic is created.
Note
In this unit, we will create topics with Generative AI orchestration enabled and then describe what is different for classic orchestration.
Topic designer
You edit topics by using the visual designer in Microsoft Copilot Studio. It is a canvas where you can edit the conversation's path.

The topic designer contains the flowing features:
Visual canvas
- You can see your entire topic's conversation laid out as a diagram.
- Zoom in/out, fit the view or use a minimap to navigate large conversations using the Visual display controls.
Copilot pane
- You can open the Copilot pane to assist you in making modifications to your conversation nodes.
Variables pane
- You can open the Variables pane to view and edit the variables used in any topic.
Error checking
- The Topic Checker highlights any errors that may prevent your topic from working correctly.
- All errors will need to be resolved prior to publishing your agent.
Details pane
- You can open the Details pane to view and edit the topic's details.
Analytics
- You can open the Analytics pane to view the performance of the topic and how it can be improved.
Code editor
- You can open the Code editor. The code editor shows the topic in YAML, a markup language that's easy to read and understand. Use the code editor to copy and paste topics from other agents.
Add and remove nodes
- Click the add (+) button to add a new node such as sending a message or asking a question.
- If you determine that you don't need a node, select it in your topic, and then select More actions (...) and then select Delete.
Rename nodes
- Click on any node and then select More actions (...) and then select Rename to change the node's title.
- You should rename nodes to make them easier to identify.
Node properties
- Click on any node and then select More actions (...) and then select Properties to view and edit its settings.
Create a topic with Copilot
You can easily create a topic by conversing with Copilot using natural language to describe what you want to use the topic for.
Copilot interprets your intent and generates a topic based on your scenario with a trigger and conversation nodes.
Copilot understands what you want to do, then automatically creates a topic with different node types and conversational responses.
Navigate to the Topics tab in your agent.
Select Add a topic and select Create from description with Copilot.
In the Add from description with Copilot dialog, enter a name for your topic in Name your topic.
In the Create a topic ... field, describe the purpose of the topic and the details of the desired behavior of the topic in simple, natural language. You can include questions you want the agent to ask, messages it should show, etc.
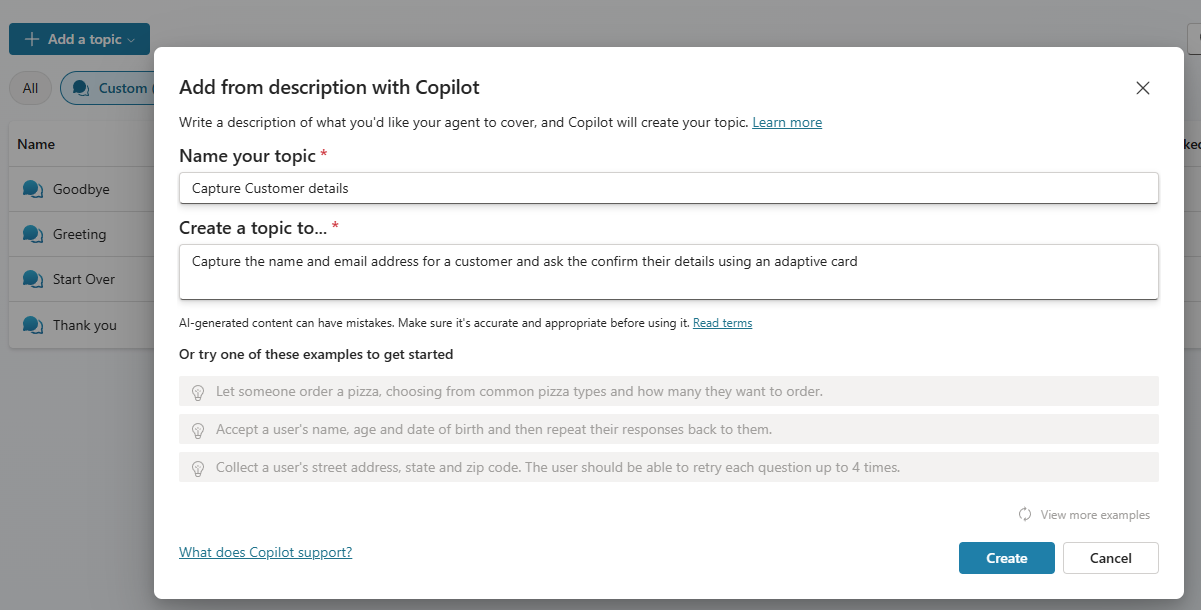
Select Create.
The new topic's authoring canvas appears. The topic includes the trigger step and one or more nodes, based on your prompt.

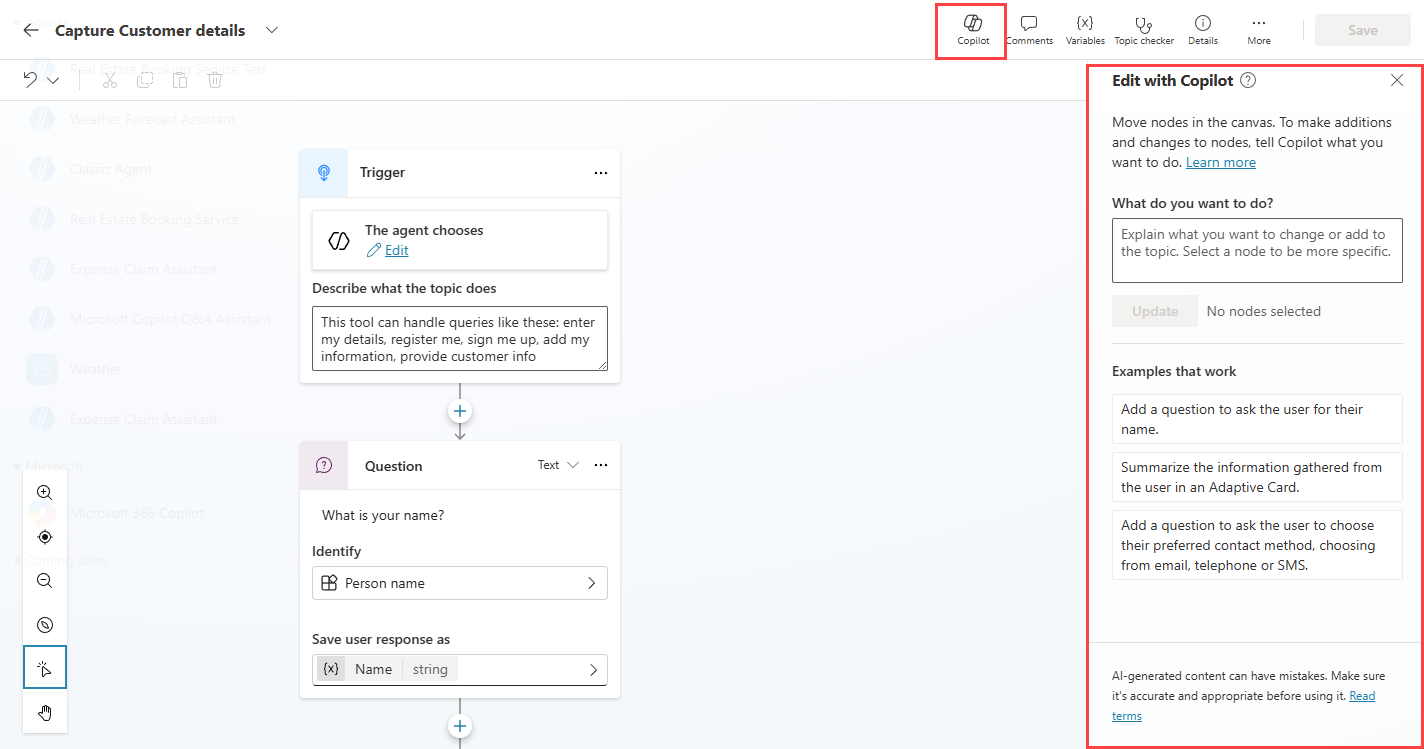
Edit a topic with Copilot
You can use Copilot after creating the topic to further customize the conversation nodes in the authoring canvas.
Tip
For better visibility, close the test panel.
You can describe how you want to change or expand the topic in the Copilot pane.

Create a topic from blank
You can create a topic from blank.
Navigate to the Topics tab in your agent.
Select Add a topic and select From blank.
The new topic's authoring canvas appears. The topic includes an empty trigger step with nodes.
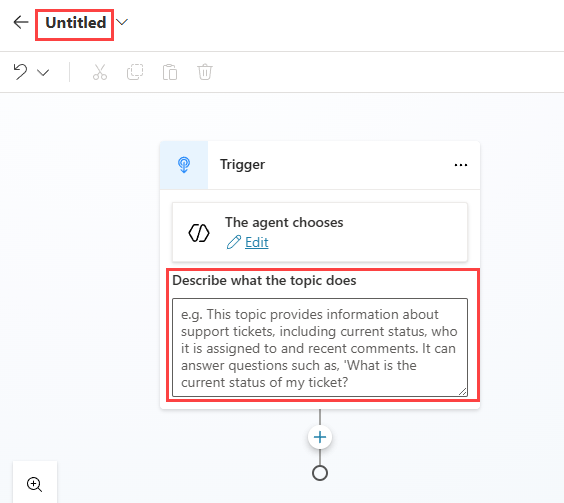
The name of the topic will be Untitled. In the upper-left, select Untitled and enter the topic's name.
In the Describe what the topic does field, describe the purpose of the topic and the details of the desired behavior of the topic in natural language.
Select Save

Topic details
The Topic details contains key information that the agent uses to select the topic.
Select Details on the toolbar to open the Topic details panel.
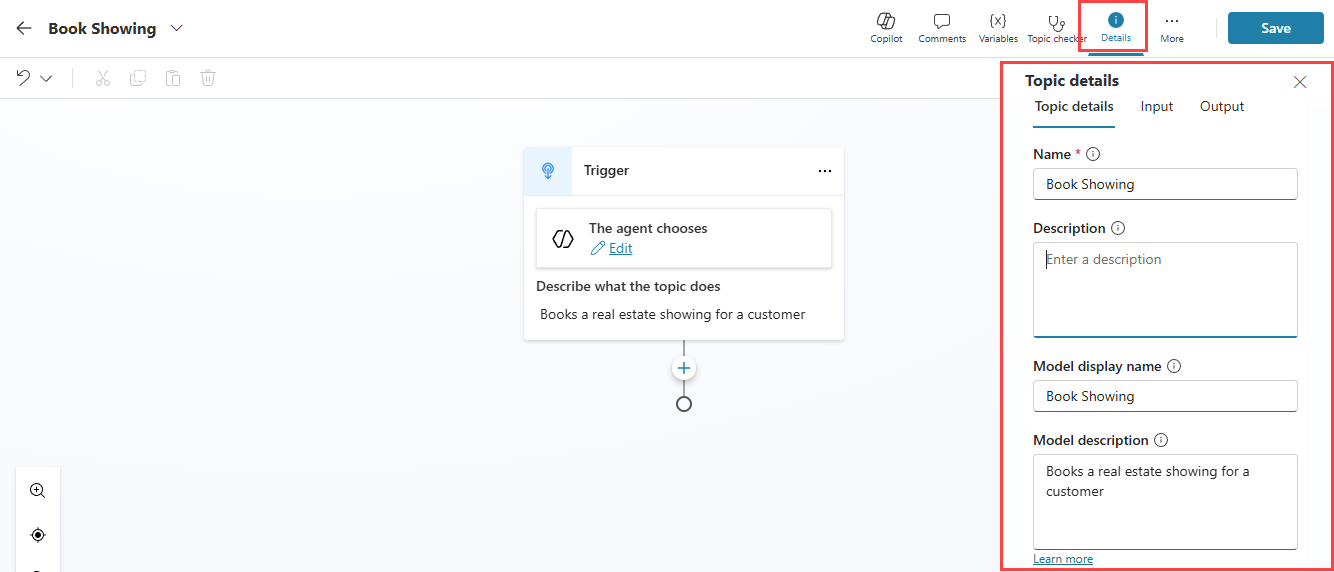

The topic details pane shows the following:
- Name - the name of the topic used internally in Copilot Studio. This is the same name entered in the upper-left of the topic.
- Description - the description of the topic used internally in Copilot Studio.
- Model display name - the name of the topic used by the agent to select the topic. This helps generative AI determine when to use this topic. This defaults to the same value as the Name.
- Model description - the description of the topic used by the agent to select the topic. This helps generative AI determine when to use this topic. This is what you entered in Describe what the topic does.
- Ask the user before running this tool - whether the user is prompted to confirm the use of this topic. This is off by default. You should enable this for sensitive or regulated domains or when making changes on behalf of the user.
- Topic status - enabled by default, you turn off the topic and prevent the topic from being used or triggered in an agent conversation.
You can edit these details in this panel.
Trigger phrases for classic orchestration
If you create a topic from blank with classic orchestration enabled, you will need to manually add trigger phrases. Trigger phrases are a set of phrases, keywords, or questions that reflect how a user might express a specific need. The agent uses these trigger phrases to determine which topic best matches the user's intent.
Trigger phrases are added by selecting Edit under to User says a phrase. The Phrases panel appears.
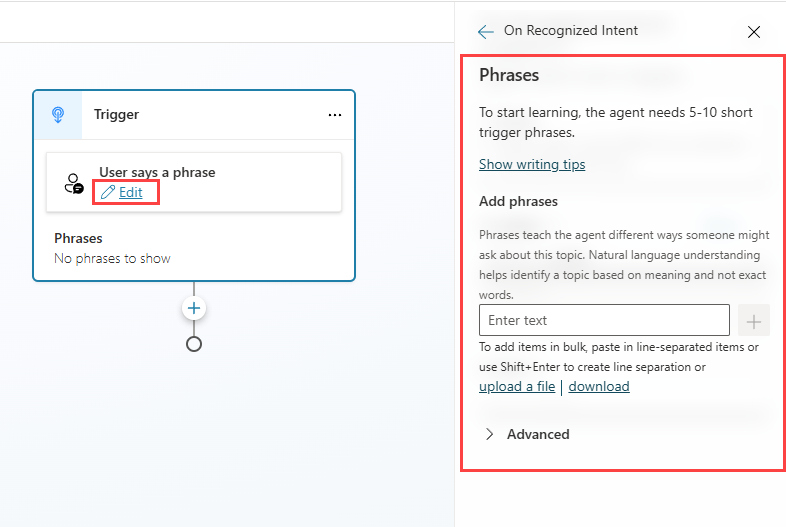
Note
You can also access the Phrases panel by selecting the three dots (…) on the Trigger node, then select Properties and then selecting the Phrases tile.
Under Add phrases, add trigger phrases. You can either:
- Enter the desired phrase and select the Add icon.
- Enter the desired phrase and select Enter.
- Paste a set of trigger phrases, each one on a separate line, and select Enter.
- Type a set of trigger phrases, pressing Shift+Enter after each one to place it on a separate line, and select Enter.
- Upload a text file containing trigger phrases.
Tip
Writing tips for trigger phrases:
- Focus on how a customer is likely to phrase their request.
- Short sentences (5-15 words) work best.
- Focus on one issue and use different words to describe it.
- Vary the parts of speech you use (nouns, verbs).
- Don't worry about capitalizing words, making them plural, or spelling.
- You can include punctuation in a trigger phrase, but it's best to use short phrases rather than long sentences.
Important
Your agent needs a minimum of 5 to 10 trigger phrases to train the AI to understand your user's intent.

Topic triggers
For agents that use generative AI orchestration, the default topic trigger is The agent chooses. It activates when the agent determines that the topic's model name and the model description specified on the Trigger node match the incoming message from the user.
For agents that use classic orchestration, the default topic trigger is User says a phrase. It activates when one or more of the specified trigger phrases closely match an incoming message from a user.
You can configure agents to perform actions or call topics in response to something happening using event triggers. Unlike topic triggers, which require input from a user, event triggers allow your agent to act autonomously in response to the defined event occurring.
The trigger types determine when a topic should be executed.
Trigger types
Triggers make it possible for your agent to intercept and handle different events or incoming activities of different types. The following trigger types determine when a topic should be triggered.
- The agent chooses (generative AI orchestration only) - Fires when the agent determines that the topic's model name and description specified matches with the incoming message from the user.
- User says a phrase (classic orchestration only). Fires when a trigger phrase matches with the incoming message from a user.
- A message is received - Fires when a message activity—the most common type of activity—is received. Received when a user types or says something to the agent.
- A custom client event occurs - Fires when an event activity is received. By default, all event activities are responded to. Use the Event name property within the trigger properties to filter for a specific event.
- An activity occurs - Fires when an activity of any type is received. You can optionally set the Activity type property in the trigger properties to filter for a specific activity type.
- The conversation changes - Fires when a conversation update activity is received. For example, Teams sends an activity of this type when a user joins a conversation.
- It's invoked - Fires when an invoke activity is received. Most commonly received from the Teams channel—for example, when the user interacts with a message or search extension in Teams.
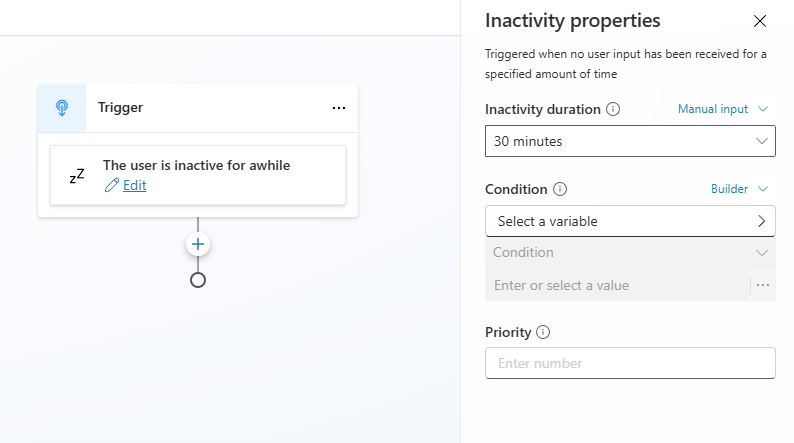
- It's redirected to - Fires when the topic is called explicitly by another topic. Set the desired inactivity time using the Inactivity duration property in the trigger properties.
- The user is inactive for a while - Fires when the user hasn't interacted with the agent after a configured period of time.
- A plan completes (generative AI orchestration only) - Fires when the agent finishes executing all planned steps to respond to a user query or autonomous trigger.
- An AI-generated response is about to be sent (generative AI orchestration only) - Fires when the agent generates a response for a user after calling one or more topics, tools, or knowledge sources. Use the Response.FormattedText system variable to see the generated response. Set the ContinueResponse variable to false if you want to prevent the orchestration response being sent i.e., if you modify the message and send your own using a Send a Message node.
Change the topic trigger
To change the trigger type.
Navigate to the Topics tab in your agent.
Hover over the Trigger node and select the Change trigger icon.
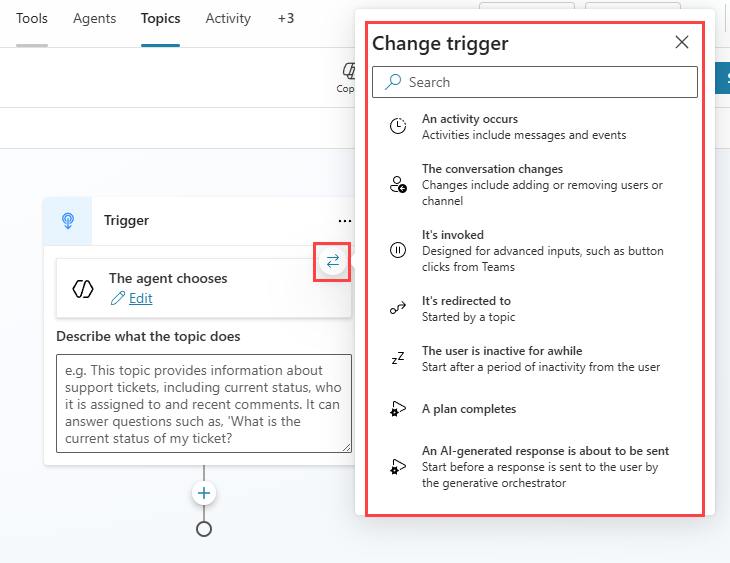
Select the appropriate type of trigger for your topic.
Select Edit.
Set the relevant properties for the trigger in the Properties pane such as:
- Activity type
- Condition
- Priority


Now that we have created the topic and configured its trigger, we'll add conversation nodes.