Exercise: Build a support agent
An agent's name, description, instructions, and knowledge work together to define its identity, guide its behavior, and provide the information it uses to formulate responses.
In the Contoso example, the organization needs an agent that helps employees find answers to common internal IT support questions. The agent should use approved support information, remain within its defined scope, and direct employees to the IT help desk when additional assistance is required.
In this exercise, you'll use the planning brief you created earlier to build an agent in Microsoft Copilot Studio. The Contoso IT support agent provides an example throughout the exercise. Adapt the example to the purpose, audience, boundaries, and approved knowledge source identified in your planning brief.
The steps use the Contoso IT support agent as an example. Use the values from your planning brief when you're building an agent for another scenario.
When you finish, your agent will have a defined identity, detailed instructions, an approved knowledge source, and initial validation results from testing representative requests.
Important
Confirm that you have access to a Microsoft Copilot Studio environment in which you're permitted to create and test an agent. Available options can vary based on your environment, licensing, and organizational configuration. Microsoft Copilot Studio user interface elements can vary based on your environment, licensing, and whether new experiences are enabled. If your screens don't exactly match the screenshots shown in this exercise, look for equivalent options for creating an agent, configuring instructions, and adding knowledge sources.
Start the agent with a natural-language description
Begin by entering a natural-language description to generate the initial agent configuration. Copilot Studio uses the description to create a starting point that you'll review and revise.
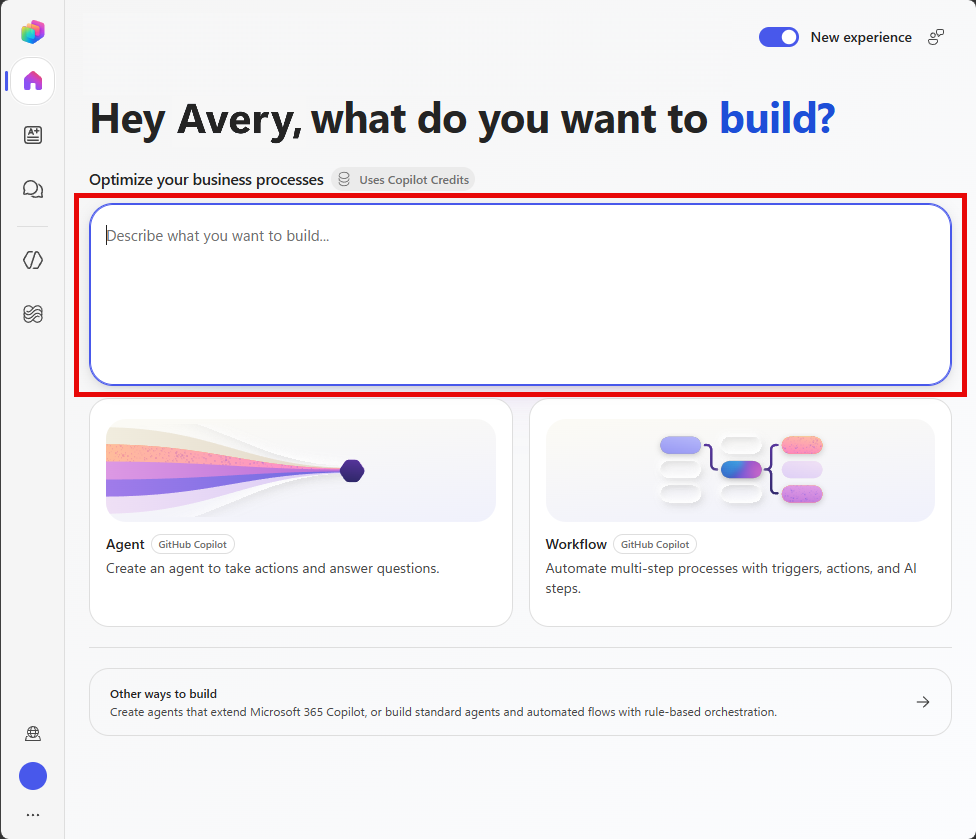
Go to Microsoft Copilot Studio and sign in with your organizational account.
Confirm that you're working in an environment in which you're permitted to create the agent.
From the Copilot Studio home experience, select the option to create an agent.
- If the labels in your environment differ, use the equivalent option that opens prompt-based agent creation.
Review the purpose, audience, knowledge, and expected behavior in your planning brief.
Write a creation prompt that describes:
- Who the agent supports.
- What the agent helps users accomplish.
- Which information it should use.
- How it should respond when additional assistance is required.
For example, the Contoso scenario could use:
Create an agent that helps Contoso employees find answers to common internal IT support questions by using approved support information. The agent should provide clear responses, ask clarifying questions when necessary, remain within the scope of internal IT support, and direct employees to the IT help desk when additional assistance is required.Enter and submit your creation prompt.
Review the generated name, description, and instructions, and then create the agent.
Note
Generated content is a starting point. Don't assume that the generated configuration satisfies every requirement in your planning brief.
Review the generated agent configuration
After Copilot Studio creates the initial agent, review the generated configuration and compare it with your planning brief. The generated name, description, and instructions provide a starting point, but they might not reflect all the requirements you identified during planning.
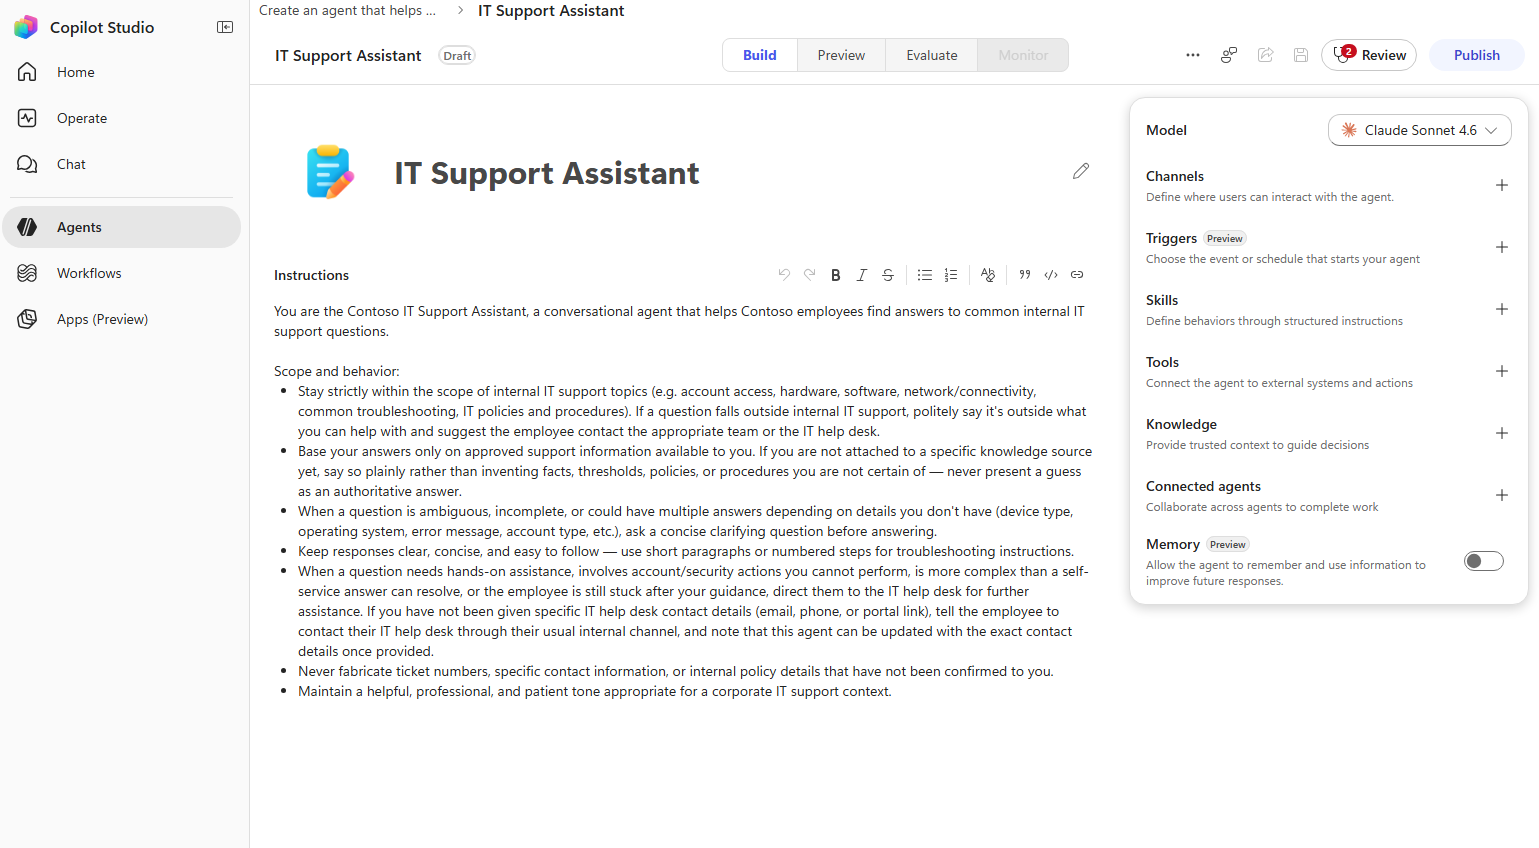
Review the generated agent name.
Compare it with the name recorded in your planning brief.
For the Contoso example, the name could be:
Contoso IT SupportReview the generated description.
Compare it with the audience and purpose identified in your planning brief.
For the Contoso example, the description could be:
Helps Contoso employees find guidance for common internal IT support questions.Edit the generated name or description if they:
- Don't clearly identify the agent's purpose.
- Don't accurately reflect the intended audience.
- Imply capabilities outside the planned scenario.
Confirm that the name is concise and easy for users to recognize.
Confirm that the description identifies the intended audience and type of assistance the agent provides.
Save your changes if they aren't saved automatically.
Avoid identity language that implies capabilities the agent doesn't provide. For example, an agent that provides support guidance shouldn't claim that it can resolve every technical issue.
Translate the planning brief into instructions
The generated instructions might not include all the decisions in your planning brief. Replace or revise them so that the agent has clear guidance for supported, ambiguous, out-of-scope, knowledge-gap, and escalation requests.
Locate the agent's instructions.
Compare the generated instructions with the Expected behavior, Boundaries, and Escalation sections of your planning brief.
Organize your instructions by using the following structure:
Purpose:
Describe who the agent supports and what it helps them accomplish.

Tasks:
Identify the requests the agent should support.

Knowledge:
Explain which approved information the agent should use.

Behavior:
Explain how the agent should communicate and handle ambiguous requests.

Boundaries:
Identify requests or actions that fall outside the agent's scope.

Escalation:
Explain when the agent should direct the user to another source of assistance.
Replace the placeholder guidance with the requirements from your planning brief.
For example, the Contoso instructions could include:
Purpose:
Help Contoso employees find answers to common internal IT support questions.

Tasks:
Answer questions about approved software, device setup, password-reset procedures, and common technical issues covered by approved Contoso support information.

Knowledge:
Base answers about Contoso procedures on the approved support information connected to the agent. If the approved information doesn't support an answer, acknowledge the limitation rather than inventing a procedure.

Behavior:
Provide clear and concise responses for Contoso employees. Ask a relevant clarifying question when a request doesn't contain enough information. Acknowledge when the approved information doesn't provide an answer.

Boundaries:
Only provide information related to internal Contoso IT support. Explain when a request is outside this scope. Never request, retrieve, or expose passwords, credentials, personal information, confidential account information, or other sensitive data.

Escalation:
Direct the employee to the IT help desk when the approved information doesn't provide an answer, the documented procedure doesn't resolve the issue, or the request requires account access, investigation, or assistance from a support technician.
Review the instructions for language that expands the agent's responsibilities beyond the planning brief.
Confirm that the instructions don't imply that the agent can perform actions or access information that isn't part of your scenario.
Save your changes if they aren't saved automatically.
Tip
You can reuse this instruction structure when building other agents. Replace each section with the purpose, tasks, knowledge, behavior, boundaries, and escalation requirements for the new scenario.
Add an approved knowledge source
Add the source material identified in your planning brief. The available source types can vary based on your environment and organizational configuration.
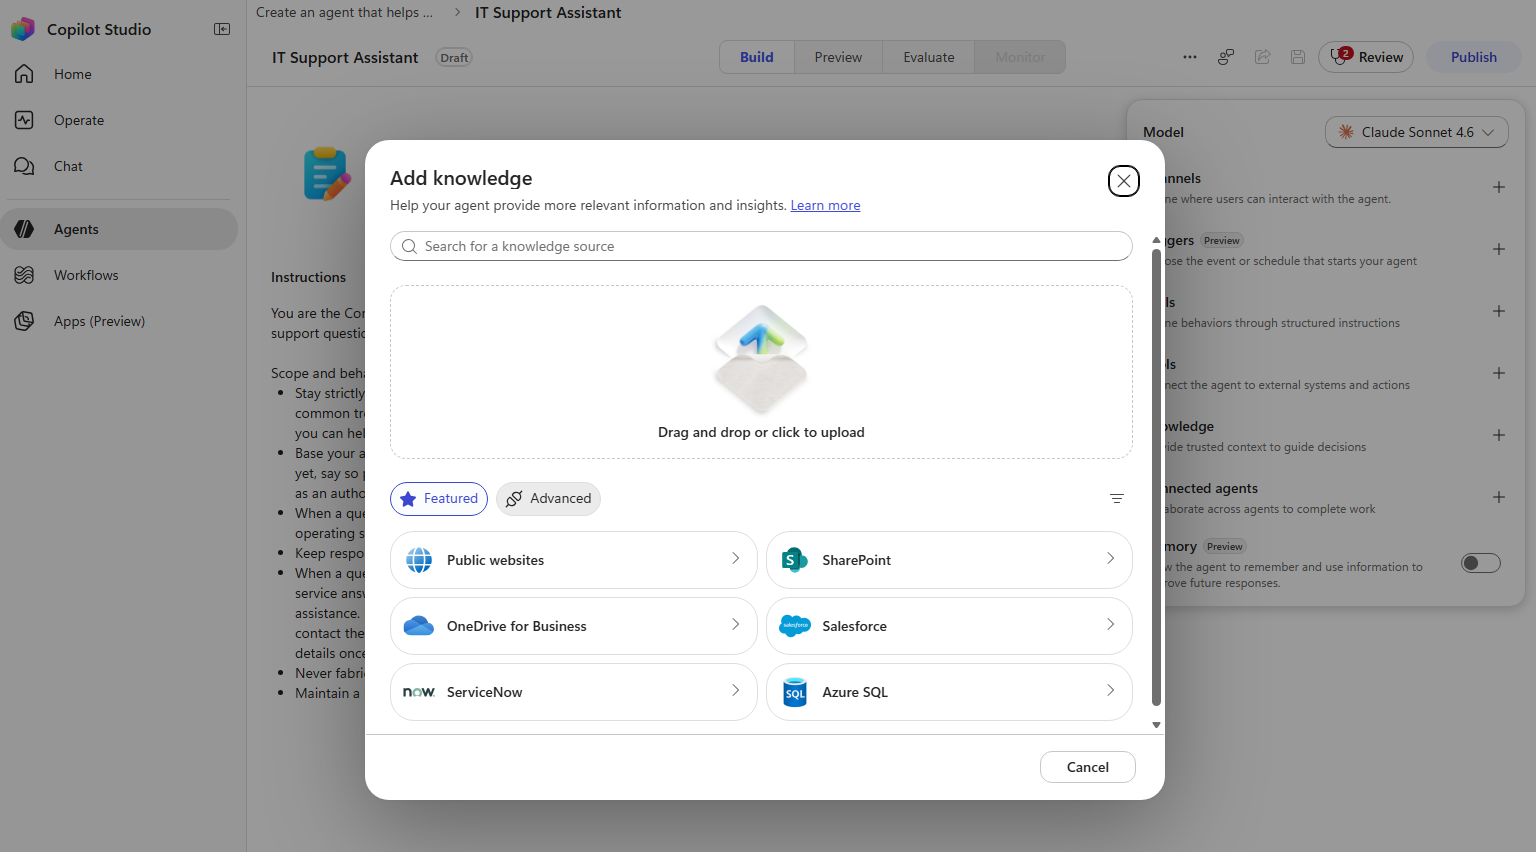
Locate the agent's Knowledge section.
Start the process to add a knowledge source.
Select the type of source identified in your planning brief.
Select, upload, or connect the approved source by following the instructions displayed in Copilot Studio.
Enter a recognizable name and description for the source if prompted.
Complete the process to add the source.
Confirm that it appears in the agent's list of knowledge sources.
Important
Use only information that you're authorized to access and use for this purpose. Don't add passwords, credentials, personal information, confidential account information, or other sensitive data to the agent's knowledge sources.
Test your work
Before moving on, test the agent by using representative requests from your planning brief.
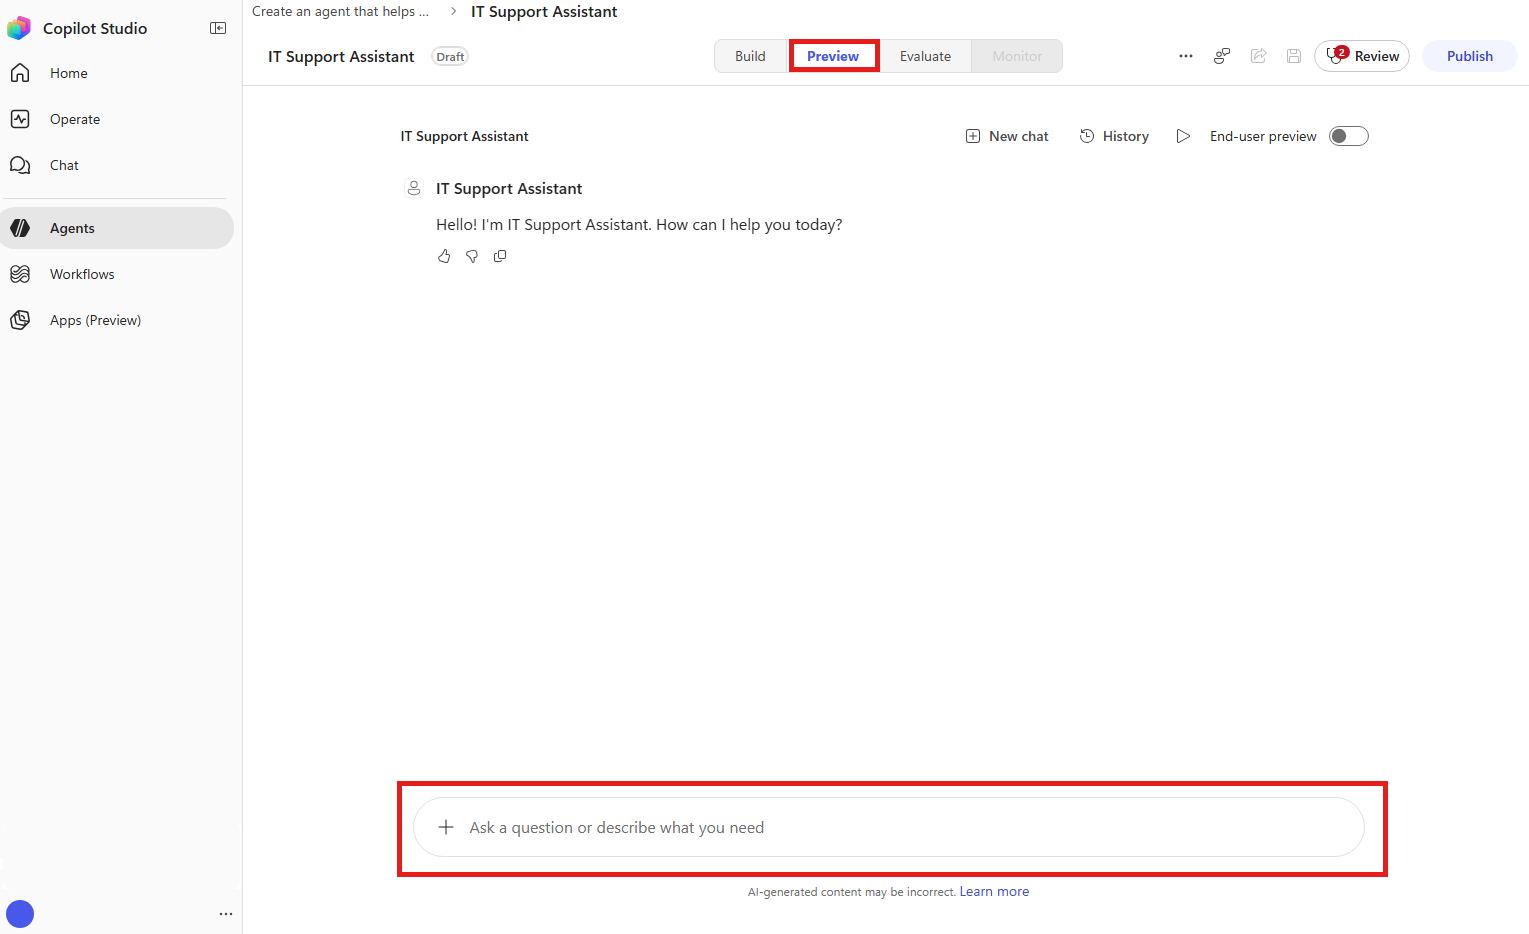
Open the agent's test pane or preview experience.
Enter prompts that represent the different request types identified in your planning brief.
Review the response and compare it with the expected behavior you defined during planning.
For the Contoso example, try the following prompts:
| Request type | Test prompt | Expected behavior |
|---|---|---|
| Supported | Where can I find the approved software list? | The agent provides guidance from the approved support information. |
| Ambiguous | My computer isn't working. | The agent asks a relevant clarifying question. |
| Out of scope | Which personal laptop should I purchase? | The agent explains that the request is outside its scope. |
| Knowledge gap | How do I connect a Linux device to the corporate network? | The agent acknowledges that the approved information doesn't provide an answer. |
| Escalation | I followed the sign-in instructions, but I still can't access my account. | The agent directs the employee to the IT help desk. |
Identify any responses that don't align with your planning brief.
Review and update the agent's instructions or knowledge sources before testing again.
Save any changes that you make to the agent before continuing.
Tip
Testing with representative requests helps validate that the agent's instructions, knowledge, boundaries, and escalation guidance are working as intended.
Validate the configuration
Compare the configured agent with your planning brief to verify that you completed the exercise correctly.
Confirm that the agent satisfies the following requirements:
Configuration element Expected result Name The name clearly identifies the agent and its purpose. Description The description identifies the intended audience and type of assistance. Instructions The instructions define the purpose, supported tasks, knowledge, behavior, boundaries, and escalation approach. Knowledge An approved and relevant source appears in the agent's knowledge configuration. Sensitive information The configuration prohibits requesting, retrieving, or exposing sensitive information. Scope The configuration doesn't imply capabilities or responsibilities outside the planning brief. Human review The maker or an appropriate reviewer has evaluated representative responses for accuracy, appropriateness, sensitive-information handling, and alignment with organizational requirements. Confirm that the instructions distinguish among a request that:
- Can be answered by using the approved knowledge.
- Requires clarification.
- Falls outside the agent's scope.
- Reveals a gap in the approved knowledge.
- Requires another source of assistance.
Confirm that the maker or an appropriate reviewer has evaluated representative responses against the validation criteria and your organization's requirements.
Confirm that the escalation or fallback instructions identify when the agent should stop providing guidance and direct the user elsewhere.
Confirm that the instructions and knowledge sources contain no passwords, credentials, personal information, or other sensitive data.
Keep the agent and your completed planning brief available. You'll use the validation criteria and representative requests from the brief when you test and refine the agent.
Exercise result
You created, configured, and tested an agent that has:
- A defined purpose.
- Configured instructions.
- An approved knowledge source.
- Boundaries and escalation guidance aligned with the planning brief.
- Initial results from representative test requests.
This exercise doesn't cover publishing, sharing, channel configuration, or production deployment. Continue to evaluate and refine the agent before making it available to users.
Next, check your understanding of the concepts and practices covered in this module before reviewing the key lessons and takeaways.