Create a custom GitHub action
GitHub Actions is a powerful feature that helps you to go from code to cloud, all from the comfort and convenience of your own repository. Here, you'll learn about the different types of GitHub actions and the metadata, syntax, and workflow commands to create custom GitHub actions.
Types of GitHub actions
Actions are individual tasks that you can use to customize your development workflows. You can create your own actions by writing custom code that interacts with your repository to perform custom tasks, or by using actions the GitHub community shares. Navigating through various actions, you'll notice that there are three different types of actions: Docker container actions, JavaScript actions, and composite run steps actions. Let's take a closer look at each action type.
Docker container actions
Docker containers package the environment with the GitHub Actions code. This means that the action runs in a consistent and reliable environment because all of its dependencies are within that container. If the action needs to run in a specific environment configuration, Docker containers are a good way to go because you can customize the operating system and tools. The downside is that because the job has to build and retrieve the container, Docker container actions are often slower than JavaScript actions.
Before building a Docker container action, you should have some basic understanding of how to use environment variables and the Docker container filesystem. The steps to take to build a Docker container action are then minimal and straightforward:
- Create a
Dockerfileto define the commands to assemble the Docker image. - Create an
action.ymlmetadata file to define the inputs and outputs of the action. Set theruns: using:value todockerand theruns: image:value toDockerfilein the file. - Create an
entrypoint.shfile to describe the docker image. - Commit and push your action to GitHub with the following files:
action.yml,entrypoint.sh,Dockerfile, andREADME.md.
JavaScript actions
JavaScript actions can run directly on the runner machine, and separate the action code from the environment that's used to run the action. Because of this, the action code is simplified and can execute faster than actions within a Docker container.
As a prerequisite for creating and using packaged JavaScript actions, you need to download Node.js, which includes npm. As an optional step (but one that we recommend) is to use GitHub Actions Toolkit Node.js, which is a collection of Node.js packages that allows you to quickly build JavaScript actions with more consistency.
The steps to build a JavaScript action are minimal and straightforward:
- Create an
action.ymlmetadata file to define the inputs and outputs of the action, as well as tell the action runner how to start running this JavaScript action. - Create an
index.jsfile with context information about the Toolkit packages, routing, and other functions of the action. - Commit and push your action to GitHub with the following files:
action.yml,index.js,node_modules,package.json,package-lock.json, andREADME.md.
Composite run steps actions
Composite run steps actions allow you to reuse actions by using shell scripts. You can even mix multiple shell languages within the same action. If you have many shell scripts to automate several tasks, you can now easily turn them into an action and reuse them for different workflows. Sometimes it's easier to just write a shell script than using JavaScript or wrapping your code in a Docker container.
Packaged composite action
Packaged composite actions bundle multiple steps into a reusable unit. These actions are defined in a repository and can be referenced in workflows across different repositories. Packaging a composite action simplifies workflows, reduces duplication, and improves maintainability.
When creating a packaged composite action, the steps are defined in a single action.yml file. This file specifies the inputs, outputs, and the sequence of commands or actions to execute. Packaged composite actions are particularly useful for automating repetitive tasks or combining multiple shell commands into a single reusable action.
Create a composite qction
1. Set Up a directory for the composite action
You must place your composite action in its own directory inside the repository.
Example directory structure:
.github/actions/my-composite-action/
├── action.yml
└── scripts/
    └── my-script.sh
2. Define the action.yml file
Inside the my-composite-action directory, create an action.yml file.
name: "My Composite Action"
description: "A reusable composite action that checks out code and sets up Node.js"

inputs:
  node-version:
    description: "The Node.js version to use"
    required: true

runs:
  using: "composite"
  steps:
    - name: Checkout repository
      uses: actions/checkout@v4

    - name: Set up Node.js
      uses: actions/setup-node@v4
      with:
        node-version: ${{ inputs.node-version }}
Note: The using: "composite" field indicates that this action is a composite action.
3. Use the composite action in a workflow
Once the composite action is created, it can be referenced in a GitHub Actions workflow.
jobs:
  build:
    runs-on: ubuntu-latest
    steps:
      - name: Use my composite action
        uses: ./.github/actions/my-composite-action
        with:
          node-version: '18'
If your composite action is shared from another repository, reference it like this:
uses: owner/repository/.github/actions/my-composite-action@v1

Add outputs to a composite action
Composite actions can define outputs that workflows can use to pass data between steps or jobs. Outputs are particularly useful for sharing results or computed values from one action to another.
The following example demonstrates how to define and use an output in a composite action:
Define an output in action.yml
The action.yml file specifies an output named script-result. This output retrieves its value from the result output of the run-script step. The run-script step runs a Bash command to set the output value.
outputs:
  script-result:
    description: "Result from the script"
    value: ${{ steps.run-script.outputs.result }}

runs:
  using: "composite"
  steps:
    - id: run-script
      run: echo "result=Success" >> $GITHUB_OUTPUT
      shell: bash

Use the output in a workflow
Once the composite action is created, its output can be accessed in a workflow. Here's an example:
jobs:
  test:
    runs-on: ubuntu-latest
    steps:
      - name: Run composite action
        id: my-action
        uses: ./.github/actions/my-composite-action

      - name: Display result
        run: echo "Script Result: ${{ steps.my-action.outputs.script-result }}"
In this example:
- The composite action is invoked using the
useskeyword. - Access the output
script-resultusing thesteps.<step-id>.outputs.<output-name>syntax. - Display the result in the workflow logs.
Define outputs in composite actions to create reusable and modular workflows. This approach simplifies data sharing and improves maintainability.
Best practices for composite actions
| Best Practice | Description |
|---|---|
| Use Versioning | Use a v1 tag to reference stable version 1. |
| Keep Actions Modular | Group related steps inside a composite action. |
| Document Inputs & Outputs | Add descriptions for inputs/outputs in action.yml. |
| Test Before Publishing | Validate the composite action in a test repository. |
Composite action in a workflow
Composite actions are a powerful way to simplify workflows by bundling multiple steps into a reusable unit. These actions allow you to define a sequence of commands or actions in a single action.yml file, making it easier to maintain and reuse logic across workflows.
Benefits of composite actions:
- Reusability - Define actions once and use them in multiple workflows.
- Maintainability - Reduce duplication by centralizing logic in a single action.
- Modularity - Combine multiple shell commands or other actions into a single unit.
Develop an action to set up a CLI on GitHub Actions runners
Many CI/CD workflows require a specific version of a CLI tool to interact with cloud services, manage infrastructure, or execute scripts. While GitHub-hosted runners come preinstalled with many tools, they may not include the exact version your workflow needs, especially if it's an older or unsupported version. Instead of installing the required CLI version in every workflow, you can create a reusable GitHub Action that:
- Ensures consistent installation of the required CLI version across jobs.
- Simplifies workflows by centralizing the installation logic.
- Optimizes caching for faster workflow execution.
How to develop a CLI setup action
A CLI setup action is a JavaScript-based action that installs and configures a CLI on a GitHub runner.
Steps to create the action:
Step 1: Set Up the Action Directory
To manually create the directory for your CLI setup action, follow these steps:
- Navigate to your repository

Create a new directory for the action
Create a new directory namedmy-cli-actioninside the.github/actionsfolder. This ensures your action is organized and follows GitHub's recommended structure for custom actions.Navigate to the new directory
Change into the newly created directory to start adding files for your action:Verify the directory structure
After creating the directory, your repository structure should look like this:
your-repository/
├── .github/
│   ├── actions/
│   │   ├── my-cli-action/

You are now ready to proceed with creating the action.yml file and other necessary files for your CLI setup action.
Step 2: Define the action.yml metadata file
Create an action.yml file to describe the action.
name: "Setup MyCLI"
description: "Installs MyCLI and adds it to the PATH"
author: "Your Name"

inputs:
  version:
    description: "The CLI version to install"
    required: false
    default: "latest"

runs:
  using: "node16"
  main: "index.js"
Why use using: node16? This action runs JavaScript code using Node.js 16.

Step 3: Create a JavaScript script to install the CLI
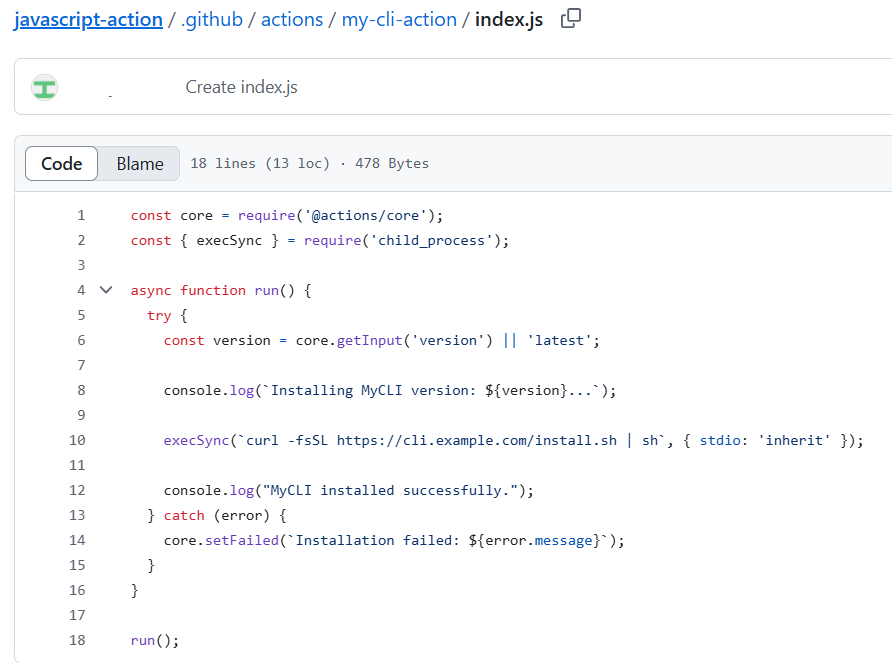
In the same directory, create a file named index.js and add the following code:
const core = require('@actions/core');
const { execSync } = require('child_process');

async function run() {
  try {
    const version = core.getInput('version') || 'latest';

    console.log(`Installing MyCLI version: ${version}...`);

    execSync(`curl -fsSL https://cli.example.com/install.sh | sh`, { stdio: 'inherit' });

    console.log("MyCLI installed successfully.");
  } catch (error) {
    core.setFailed(`Installation failed: ${error.message}`);
  }
}

run();
The JavaScript code above uses core.getInput() to retrieve the CLI version specified as input. It then executes a curl command to download and install the CLI. If the installation process fails, the action uses core.setFailed() to mark the workflow as failed.
Step 4: Test the action locally
Before using the action in a workflow, test it on a GitHub-hosted runner.
Create a workflow file (.github/workflows/test.yml) in your repository:
name: Test MyCLI Setup

on:
  push:
    branches:
      - main
      - feature/*
1. Triggering the workflow
The workflow is triggered on pushes to the main branch and any branch matching the feature/* pattern. You can adjust this to match your repository's branching strategy.
jobs:
  test:
    runs-on: ubuntu-latest
    steps:
      - name: Checkout repository
        uses: actions/checkout@v4
2. Clone the repository
The actions/checkout@v4 action is used to clone the repository onto the runner. This ensures that the workflow has access to the repository's files.
      - name: Install MyCLI
        uses: ./.github/actions/my-cli-action
        with:
          version: '1.2.3'
3. Run the custom action
The uses: ./.github/actions/my-cli-action line references the custom action locally. Ensure that the action directory and action.yml file are correctly set up. The version input specifies the CLI version to install—in this case, version 1.2.3.
      - name: Verify CLI Installation
        run: |
          echo "Checking MyCLI version..."
          mycli --version
4. Verify the CLI installation
This step runs a shell command to verify that the CLI was installed successfully. It checks the version of the installed CLI by running mycli --version.

Test locally
To test this workflow locally, use the act CLI tool:
act -j test
This simulates the GitHub Actions environment on your local machine, allowing you to debug and validate the workflow before pushing changes.
Optimization tip: Caching
To improve workflow performance, cache the CLI installation directory using the actions/cache action:
      - name: Cache MyCLI
        uses: actions/cache@v4
        with:
          path: ~/.mycli
          key: mycli-${{ runner.os }}-${{ inputs.version }}
This ensures that subsequent runs reuse the cached CLI installation, reducing setup time.
Best practices for CLI setup actions
| Best practice | Description |
|---|---|
| Use Versioning | Allow users to specify a CLI version via inputs.version. |
| Handle Errors Properly | Use core.setFailed() to exit on errors. |
| Cache CLI Installation | Optimize workflow performance using actions/cache. |
| Provide Documentation | Explain usage and inputs in README.md. |
Troubleshoot JavaScript actions
When working with JavaScript-based GitHub Actions, you may encounter unexpected behavior, errors, or failures during workflow execution. This unit provides techniques and tools to help you identify and resolve issues in your JavaScript actions.
Common troubleshooting scenarios
| Problem | Possible cause | Suggested fix |
|---|---|---|
| Action fails with a stack trace | Syntax or runtime error in index.js |
Use console.log() and check logs |
Inputs are undefined |
Incorrect input name or missing input | Verify action.yml and how inputs are passed |
| Environment variables not set | core.exportVariable or process.env not used properly |
Review the code setting the variables |
| File not found | Missing relative paths | Use __dirname or full paths to files |
| Cache is not restored | Wrong key or path values |
Check cache configuration and keys |
Use Logging for Debugging
Log messages with core.info, core.debug, and console.log
const core = require('@actions/core');

core.info("This is an info message");
core.debug("This is a debug message");
console.log("This is a raw console log");
✅ Use core.debug for debug logs — these only appear when ACTIONS_STEP_DEBUG is set to true.
Enable debug logging
You can enable step-level debug logs by setting the following secret:
ACTIONS_STEP_DEBUG=true
To enable runner diagnostic logs, set:
ACTIONS_RUNNER_DEBUG=true
Set secrets for debugging
- Go to your GitHub repository.
- Navigate to Settings > Secrets and variables > Actions.
- Add new secrets with the following names and values:
- ACTIONS_STEP_DEBUG:
true - ACTIONS_RUNNER_DEBUG:
true
- ACTIONS_STEP_DEBUG:
Inspect workflow logs
When a workflow fails, click on the failed job in the Actions tab. Expand each step to:
- View detailed logs
- Check standard output (stdout)
- See the exit code of scripts
- Identify unhandled exceptions
🔍 Example log Output
Error: Cannot find module '@actions/core'
Require stack:
- /home/runner/work/_actions/my-org/my-action/index.js
✅ Fix: Run npm install @actions/core and commit node_modules (or use ncc to bundle the action).
Test your action locally
Use act — a CLI tool to run GitHub Actions locally. Example:
act -j test
🛠 Make sure to simulate your GitHub environment properly when testing locally.
Handle errors gracefully
Catch exceptions and fail with helpful messages:
try {
  // your logic
} catch (error) {
  core.setFailed(`Action failed with error: ${error.message}`);
}
🔁 This ensures GitHub stops the workflow on error and provides readable logs.
Best practices for debugging JavaScript actions
| Practice | Description |
|---|---|
| Use core.debug() | Hide verbose logs unless debugging is enabled. |
| Validate action.yml | Ensure inputs and outputs are correctly defined. |
| Bundle code | Use @vercel/ncc to compile JavaScript into a single file. This reduces dependencies and ensures all required modules are included, preventing runtime errors caused by missing files. |
| Test with act | Simulate runs locally for faster iterations. |
| Use try/catch | Prevent workflows from failing silently. |
Troubleshoot Docker container actions
Docker container actions are powerful for encapsulating complex tools and environments in GitHub Actions workflows. However, debugging these actions can be more challenging than JavaScript actions due to their isolated runtime environment. This unit will guide you through identifying, diagnosing, and resolving issues with Docker-based actions.
Common issues in Docker container actions
| Problem | Cause | Suggested fix |
|---|---|---|
| Action fails to start | ENTRYPOINT or CMD misconfigured |
Confirm Dockerfile uses ENTRYPOINT correctly |
| Missing dependencies | Dependencies not installed or misconfigured | Ensure all packages are installed in the image |
| Inputs not received | INPUT_ environment variables not accessed |
Use process.env.INPUT_<INPUT_NAME> (or shell equivalent) |
| File not found | Incorrect file path inside container | Use absolute paths or validate directory structure |
| Permission denied | File or script lacks execution permission | Add RUN chmod +x <script> in Dockerfile |
| Network-related failures | External services not accessible | Validate network settings and retry logic |
Understand the Docker action lifecycle
Before troubleshooting, it's helpful to understand how Docker container actions run.
1. Workflow Trigger
A GitHub Actions workflow starts in response to a configured event—such as a push, pull_request, or manual workflow_dispatch.
2. Runner Setup
GitHub provisions a fresh virtual machine (the runner) to execute the workflow. The runner prepares the environment by downloading action definitions and resolving dependencies.
3. Action Resolution
If the action specifies runs.using: docker in its action.yml file, GitHub recognizes it as a Docker-based action.
4. Image Build or Pull
GitHub builds the Docker image defined in the action’s Dockerfile or pulls a prebuilt image if specified. This image defines the environment in which the action code runs.
5. Container Execution
The runner launches the Docker container, mounts the workspace, and injects environment variables, including secrets and inputs defined in the workflow.
6. Entrypoint Runs
GitHub executes the entrypoint command from the Dockerfile inside the container. This is where the custom action logic runs, typically a script or application.
7. Result Handling
Any outputs set by the container action are captured by the runner and passed along to subsequent steps in the workflow. Once complete, the container shuts down and the runner is discarded.
Note: Docker container actions run in a clean, isolated environment. File system state, installed tools, and environment variables must all be defined within the Dockerfile.
Debugging techniques
1. Add Logging
Use echo, printf, or logging statements in your entrypoint script:
echo "Starting Docker action..."
echo "Input VALUE: $INPUT_VALUE"
Log all critical inputs and steps to diagnose where the failure occurs.
2. Build and test locally
Use Docker on your machine to simulate the container behavior:
docker build -t my-action .
docker run -e INPUT_NAME=value my-action
Ensure environment variables mimic the ones GitHub sets.
3. Use the act CLI to simulate GitHub workflows
Install act to run your GitHub workflows locally:
act -j test-job
Great for testing Docker actions in workflows without pushing to GitHub.
4. Validate Dockerfile configuration
Ensure you define either ENTRYPOINT or CMD. Copy your scripts into the image and give them execute permission:
COPY entrypoint.sh /entrypoint.sh
RUN chmod +x /entrypoint.sh
ENTRYPOINT ["/entrypoint.sh"]
5. Inspect GitHub logs
Click on a failed workflow run, expand each step, and examine:
- Docker build logs
- Standard output and standard error from the container
- Exit codes and stack traces 🔍 Logs often reveal missing packages, syntax issues, or permission errors.
Example: Entry point error
Error: container_linux.go:380: starting container process caused "exec: \"/entrypoint.sh\": permission denied"
✅ Fix: Add RUN chmod +x /entrypoint.sh in your Dockerfile.
Environment variable mapping
| GitHub input | Docker environment variable |
|---|---|
with: name: test |
INPUT_NAME=test |
GITHUB_WORKSPACE |
Mapped into /github/workspace |
GITHUB_EVENT_NAME |
Event that triggered the workflow |
echo "Input was $INPUT_NAME"
echo "Working dir: $GITHUB_WORKSPACE"
Use troubleshooting secrets
Enable additional logging by adding these secrets to your repository or org:
| Secret | Description |
|---|---|
ACTIONS_STEP_DEBUG |
Enables debug logging |
ACTIONS_RUNNER_DEBUG |
Enables runner diagnostics |
Best practices for Docker action debugging
| Best Practice | Why |
|---|---|
| Use logging generously | Helps trace failure points |
| Always set chmod +x | Avoid permission errors on shell scripts |
| Validate inputs in your script | Catch missing or malformed inputs early |
| Minimize container dependencies | Smaller images are easier to debug |
| Test locally with docker run or act | Faster iterations and immediate feedback |