Design the pipeline
- 11 minutes
In this unit, you follow the Tailspin web team as they define their release pipeline for the Space Game website.
When you plan a release pipeline, you usually begin by identifying the stages, or major divisions, of that pipeline. Each stage typically maps to an environment. For example, in the previous module, Andy and Mara's basic pipeline had a Deploy stage that mapped to an Azure App Service instance.
In this module, you promote changes from one stage to the next. Within each stage, you deploy the Space Game website to the environment associated with that stage.
After you define which stages you need, consider how changes are promoted from one stage to the next. Each stage can define the success criteria that must be met before the build can move to the next stage. Azure Pipelines provides several ways to help you control how and when changes move through the pipeline. As a whole, these approaches are used for release management.
In this section, you:
- Learn the differences between common pipeline stages, such as Build, Dev, Test, and Staging.
- Understand how to use manual, scheduled, and continuous deployment triggers to control when an artifact moves to the next stage in the pipeline.
- See how a release approval pauses the pipeline until an approver accepts or rejects the release.
The meeting
The entire Tailspin web team is gathered together. Earlier, the team planned their tasks for the current sprint. Each task relates to building their release pipeline for the Space Game website.
The team decided on these five tasks for their sprint:
- Create a multistage pipeline
- Connect the web app to a database
- Automate quality tests
- Automate performance tests
- Improve release cadence
The team meets to talk about the first task, Create a multistage pipeline. After the team defines the pipeline, it can move from its basic proof of concept to a release pipeline that includes more stages, quality checks, and approvals.
Amita and Tim are watching Andy and Mara demonstrate the release pipeline a second time. They see that the artifact is built and installed on App Service.
What pipeline stages do you need?
When you want to implement a release pipeline, it's important to first identify which stages you need. The stages you choose depend on your requirements. Let's follow along with the team as they decide on their stages.
Tim: OK, I understand the idea of an automated pipeline. I like how it's easy to deploy to Azure. But where do we go from this demo? We need something we can actually use for our releases.
Amita: Right! We need to add other stages. For example, presently, we have no place for a testing stage.
Tim: Plus, we need a stage where we can show new features to the management. I can't send anything to production without management approval.
Andy: Absolutely! Now that it's up to speed on what a release pipeline does, how do we make this pipeline do what we need?
Mara: Let's sketch out our requirements to help us plan our next steps. Let's start with what we have.
Mara moves to the whiteboard and sketches the existing pipeline.
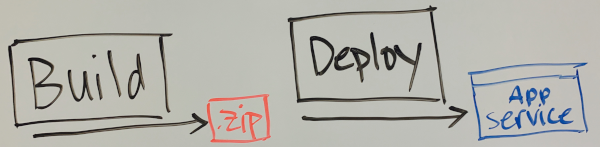
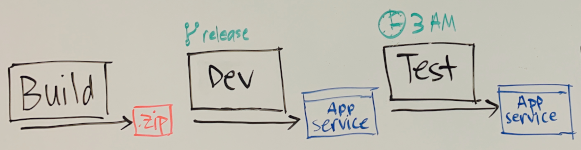
Mara: The Build stage builds the source code and produces a package. In our case, that package is a .zip file. The Deploy stage installs the .zip file, which is the Space Game website, on an App Service instance. What's missing from our release pipeline?
Add the Dev stage
Andy: I might be biased, but I think we need a Dev stage. This stage should be the first stop for the artifact after it's built. Developers can't always run the entire service from their local development environment. For example, an e-commerce system might require a website, product database, and payment system. We need a stage that includes everything the app needs.
In our case, the Space Game website's leaderboard feature reads high scores from an external source. Right now, it reads fictitious scores from a file. Setting up a Dev stage would give us an environment where we can integrate the web app with a real database. That database might still hold fictitious scores, but it brings us one step closer to our final app.
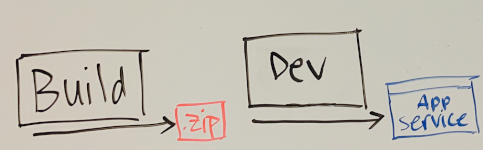
Mara: I like it. We won't integrate with a real database yet. But in a Dev stage, we can deploy to an environment where we can add a database.
Mara updates her drawing on the whiteboard. She replaces "Deploy" with "Dev" to show the Dev stage.
Andy: You bring up an interesting point. We build the app each time we push a change to GitHub. Does that mean each build is promoted to the Dev stage after it finishes?
Mara: Building continuously gives us important feedback about our build and test health. But we want to promote to the Dev stage only when we merge code into some central branch: either main or some other release branch. I'll update the drawing to show that requirement.
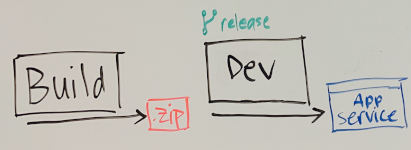
Mara: I think this promotion will be easy to accomplish. We can define a condition that promotes to the Dev stage only when changes happen on a release branch.
What are conditions?
In Azure Pipelines, use a condition to run task or job based on the state of the pipeline. You worked with conditions in previous modules.
Remember, some of the conditions that you can specify are:
- Only when all previous dependent tasks have succeeded
- Even if a previous dependency has failed, unless the run was canceled
- Even if a previous dependency has failed, even if the run was canceled
- Only when a previous dependency has failed
- Some custom condition
Here's a basic example:
steps:
  - script: echo Hello!
    condition: always()
The always() condition causes this task to print "Hello!" unconditionally, even if previous tasks failed.
This condition is used if you don't specify a condition:
condition: succeeded()
The succeeded() built-in function checks whether the previous task succeeded. If the previous task fails, this task and later tasks that use the same condition are skipped.
Here you want to build a condition that specifies:
- The previous task succeeded.
- The name of the current Git branch is release.
To build this condition, you use the built-in and() function. This function checks whether each of its conditions is true. If any condition isn't true, the overall condition fails.
To get the name of the current branch, you use the built-in Build.SourceBranchName variable. You can access variables within a condition in a few ways. Here you use the variables[] syntax.
To test a variable's value, you can use the built-in eq() function. This function checks whether its arguments are equal.
With that in mind, you apply this condition to run the Dev stage only when the current branch name is "release":
condition: |
  and
  (
    succeeded(),
    eq(variables['Build.SourceBranchName'], 'release')
  )
The first condition in the and() function checks whether the previous task succeeded. The second condition checks whether the current branch name equals release.
In YAML, you use the pipe (|) syntax to define a string that spans multiple lines. You could define the condition on a single line, but we write it this way to make it more readable.
Note
In this module, we use the release branch as an example. You can combine conditions to define the behavior that you need. For example, you could build a condition that runs the stage only when the build is triggered by a pull request against the main branch.
In the next unit, when you set up the Dev stage, you work with a more complete example.
For a more complete description of conditions in Azure Pipelines, see expressions documentation.
Mara: By using conditions, you can control which changes are promoted to which stages. We can produce a build artifact for any change to validate our build and confirm that it's healthy. When we're ready, we can merge those changes into a release branch and promote that build to the Dev stage.
Add the Test stage
Mara: So far, we have the Build and Dev stages. What comes next?
Amita: Can we add the Test stage next? That seems like the right place for me to test out the latest changes.
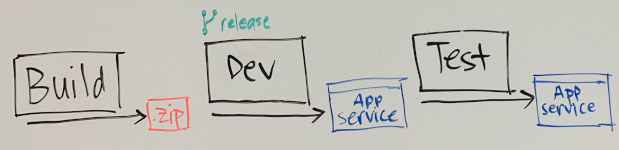
Mara adds the Test stage to her drawing on the whiteboard.
Amita: One concern I have is how often I need to test the app. An email notifies me whenever Mara or Andy makes a change. Changes happen throughout the day, and I never know when to jump in. I think I'd like to see a build once a day, maybe when I get in to the office. Can we do that?
Andy: Sure. Why don't we deploy to Test during nonworking hours? Let's say we send you a build every day at 3 A.M.
Mara: That sounds good. We can always manually trigger the process as well if we need to. For example, we can trigger it if we need you to verify an important bug fix right away.
Mara updates her drawing to show that the build moves from the Dev stage to the Test stage at 3 A.M. each day.
What are triggers?
Amita: I'm feeling better now that we know how one stage moves to another. But how do we control when a stage runs?
Mara: In Azure Pipelines, we can use triggers. A trigger defines when a stage runs. Azure Pipelines provides a few types of triggers. Here are our choices:
- Continuous integration (CI) trigger
- Pull request (PR) trigger
- Scheduled trigger
- Build completion trigger
CI and PR triggers let you control which branches participate in the overall process. For example, you want to build the project when a change is made in any branch. A scheduled trigger starts a deployment at a specific time. A build completion trigger runs a build when another build, such as one for a dependent component, completes successfully. It seems like we want a scheduled trigger.
What are scheduled triggers?
A scheduled trigger uses cron syntax to cause a build to run on a defined schedule.
On Unix and Linux systems, cron is a popular way to schedule jobs to run on a set time interval or at a specific time. In Azure Pipelines, scheduled triggers use the cron syntax to define when a stage runs.
A cron expression includes fields that match certain time parameters. Here are the fields:
mm HH DD MM DW
 \  \  \  \  \__ Days of week
  \  \  \  \____ Months
   \  \  \______ Days
    \  \________ Hours
     \__________ Minutes
For example, this cron expression describes "3 A.M. every day": 0 3 * * *
A cron expression can include special characters to specify a list of values or a range of values. In this example, the asterisk (*) matches all values for the Days, Months, and Days of week fields.
Put another way, this cron expression reads as:
- At minute 0,
- At the third hour,
- On any day of the month,
- On any month,
- On any day of the week,
- Run the job
To specify 3 A.M. only on days Monday through Friday, you would use this expression: 0 3 * * 1-5
Note
The time zone for cron schedules is Coordinated Universal Time (UTC), so in this example, 3 A.M. refers to 3 A.M. in UTC. In practice, you might want to adjust the time in your cron schedule relative to UTC so that the pipeline runs at the expected time for you and your team.
To set up a scheduled trigger in Azure Pipelines, you need a schedules section in your YAML file. Here's an example:
schedules:
- cron: '0 3 * * *'
  displayName: 'Deploy every day at 3 A.M.'
  branches:
    include:
    - release
  always: false
In this schedules section:
cronspecifies the cron expression.branchesspecifies to deploy only from thereleasebranch.alwaysspecifies whether to run the deployment unconditionally (true), or only when thereleasebranch has changed since the last run (false). Here, you specifyfalsebecause you need to deploy only when thereleasebranch has changed since the last run.
The entire pipeline runs when Azure Pipelines executes a scheduled trigger. The pipeline also runs under other conditions, such as when you push a change to GitHub. To run a stage only in response to a scheduled trigger, you can use a condition that checks whether the reason for the build is a scheduled run.
Here's an example:
- stage: 'Test'
  displayName: 'Deploy to the Test environment'
  condition: and(succeeded(), eq(variables['Build.Reason'], 'Schedule'))
This stage, Test, runs only when the previous stage succeeds and the built-in Build.Reason pipeline variable equals Schedule.
You see a more complete example later in this module.
Amita: I like this. I don't even have to pick up the release manually and install it. It's ready for me.
Andy: And remember, if we want to automate more later, we can. Nothing's written in stone. The pipeline evolves as we improve and learn.
Add the Staging stage
Tim: It's my turn. I need a stage to run more stress tests. We also need a stage where we can demo to management to get their approval. For now, we can combine those two needs into a stage that we can call Staging.
Andy: Well said, Tim. Having a staging, or preproduction environment is important. This staging environment is often the last stop before a feature or bug fix reaches our users.
Mara adds Staging to her drawing on the whiteboard.

Amita: We use a scheduled trigger to promote changes from the Dev stage to the Test stage. But how do we promote changes from Test to Staging? Does that promotion also have to happen on a schedule?
Mara: I think the best way to handle that would be a release approval. A release approval lets you manually promote a change from one stage to the next.
Amita: That sounds like exactly what I need! A release approval would give me the time to test out the latest changes before we present the build to management. I can promote the build when I'm ready.
Mara updates her drawing to show that the build moves from Test to Staging only when Amita approves it.

Tim: I could also imagine us using release approvals to promote from Staging to Production after management signs off. I can never predict how long that takes. After they sign off, I can approve the release and promote it to production manually. But how do release approvals work?
What are release approvals?
A release approval is a way to pause the pipeline until an approver accepts or rejects the release. To define your release workflow, you can combine approvals, conditions, and triggers.
Here's an example from an existing pipeline that defines an environment in its configuration to represent a deployment environment:
- stage: 'Deploy'
  displayName: 'Deploy the web application'
  dependsOn: Build
  jobs:
  - deployment: Deploy
    pool:
      vmImage: 'ubuntu-20.04'
    environment: dev
    variables:
    - group: Release
Your environment can include specific criteria for your release. The criteria can specify which pipelines can deploy to that environment and what human approvals are needed to promote the release from one stage to the next.
Later in this module, you define the staging environment, and assign yourself as an approver to promote the Space Game web app from the Test stage to Staging.
Automate as little or as much as you need
Azure Pipelines gives you the flexibility to automate some stages while manually controlling stages that aren't ready for automation.
Tim: I like how we can define the criteria that promote changes from one stage to the next. But we defined some manual criteria in our pipeline. I thought DevOps was about automating everything.
Mara: You raise a good point. DevOps is really about automating repetitive and error-prone tasks. Sometimes human intervention is necessary. For example, we get approval from management before we release new features. As we get more experience with our automated deployments, we can automate more of our manual steps to speed up the process. For example, we can automate more quality checks in the Test stage, so Amita doesn't have to approve each build.
Tim: Sounds great. Let's go with this plan for now, and see how we can speed up the system later.
Amita: Speaking of our plan, can we summarize our next steps?
The plan
Let's review the Tailspin team's plan as they move toward next steps.
Mara: Here's the release pipeline we want to build.
Mara points to the whiteboard.
Mara: To summarize, our steps are to:
- Produce a build artifact each time we push a change to GitHub. This step happens in the Build stage.
- Promote the build artifact to the Dev stage. This step happens automatically when the build stage succeeds and the change is on the release branch.
- Promote the build artifact to the Test stage each morning at 3 A.M. We use a scheduled trigger to promote the build artifact automatically.
- Promote the build artifact to Staging after Amita tests and approves the build. We use a release approval to promote the build artifact.
After management approves the build, we can deploy the build artifact to a production environment.
Amita: Is this going to be hard to do? It seems like a lot of work.
Mara: I don't think it's too bad. Every stage is separate from every other stage. Stages are discrete. Each stage has its own set of tasks. For example, what happens in the Test stage stays in the Test stage.
Every deployment stage in our pipeline also has its own environment. For example, when we deploy the app to Dev or Test, the environment is an App Service instance.
Finally, we test only one release at a time. We never change releases in the middle of the pipeline. We use the same release in the Dev stage as in the Staging stage, and every release has its own version number. If the release breaks in one of the stages, we fix it and build it again with a new version number. That new release then goes through the pipeline from the very beginning.
A few words about quality
You just saw the team design a pipeline that takes their app all the way from build to staging. The whole point of this pipeline isn't just to make their lives easier. It's to ensure the quality of the software they're delivering to their customers.
How do you measure the quality of your release process? You can't measure it directly. What you can measure is how well your process works. If you're constantly changing the process, it might be an indication that there's something wrong. Releases that fail consistently at a particular point in the pipeline might also indicate that there's a problem with the release process.
Do the releases always fail on a particular day or time? Do they always fail after you deploy to a particular environment? Look for these and other patterns to see if some aspects of the release process are dependent or related.
A good way to keep track of your release process quality is to create visualizations of the quality of the releases. For example, add a dashboard widget that shows you the status of every release.
When you want to measure the quality of a release itself, you can perform all kinds of checks within the pipeline. For example, you can execute different types of tests, such as load tests and UI tests while running your pipeline.
Using a quality gate is also a great way to check the quality of your release. There are many different quality gates. For example, work item gates can verify the quality of your requirements process.
You can also add more security and compliance checks. For example, do you comply with the four-eyes principle or do you have the proper traceability?
As you progress through this learning path, you see many of these techniques put into practice.
Lastly, when you design a quality release process, think about what kind of documentation or release notes that you need to provide to the user. Keeping your documentation current can be difficult. You might want to consider using a tool, such as the Azure DevOps Release Notes Generator, which is a function app that contains an HTTP-triggered function. By using Azure Blob Storage, it creates a Markdown file whenever a new release is created in Azure DevOps.