Exercise - Clean up your Azure DevOps environment
You're finished with the tasks for this module. In this unit, you clean up your Azure resources, move the work item to the Done state on Azure Boards, and clean up your Azure DevOps environment.
Important
This page contains important cleanup steps. Cleaning up helps ensure that you don't run out of free build minutes. It also helps ensure that you're not charged for Azure resources after you complete this module.
Clean up Azure resources
Here, you delete your Azure App Service instances. The easiest way to delete the instances is to delete their parent resource group. When you delete a resource group, you delete all resources in that group.
To clean up your resource group:
Go to the Azure portal, and sign in.
From the menu bar, select Cloud Shell. When prompted, select the Bash experience.

To delete the resource group that you used,
tailspin-space-game-rg, run the followingaz group deletecommand.az group delete --name tailspin-space-game-rgWhen prompted, to confirm the operation, enter
y.As an optional step, after the previous command finishes, run the following
az group listcommand.az group list --output tableYou see that the resource group
tailspin-space-game-rgno longer exists.
Move the work item to Done
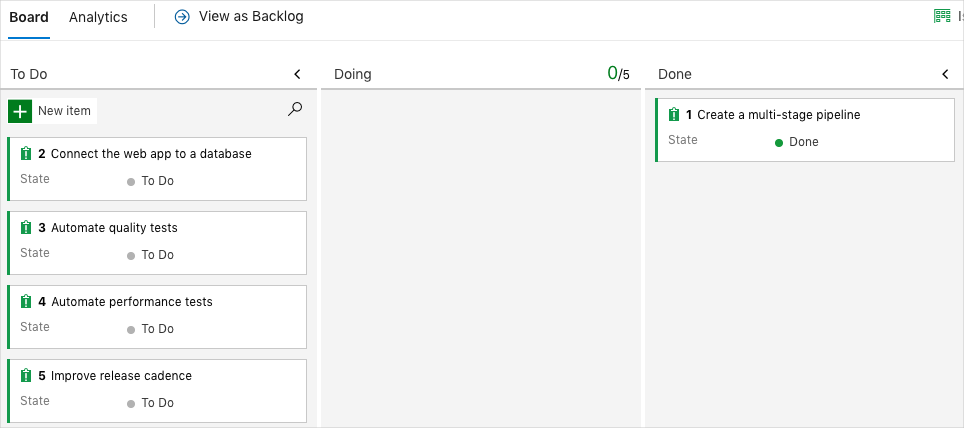
Now, move the work item that you assigned to yourself earlier in this module. Move Create a multistage pipeline to the Done column.
In practice, "Done" often means putting working software into the hands of your users. For learning purposes, here, you mark this work as done because you fulfilled the goal for the Tailspin team. They wanted to define a complete multistage pipeline to deliver new features.
At the end of each sprint, or work iteration, you and your team can hold a retrospective meeting. In the meeting, share the work you completed, what went well, and what you can improve.
To complete the work item:
From Azure DevOps, go to Boards, and from the menu, select Boards.
Move the Create a multistage pipeline work item, from the Doing column to the Done column.
Disable the pipeline or delete your project
Each module in this learning path provides a template. You can run the template to create a clean environment for the module.
Running multiple templates gives you multiple Azure Pipelines projects. Each project points to the same GitHub repository. This setup can trigger multiple pipelines to run each time you push a change to your GitHub repository. The pipeline runs use up free build minutes on our hosted agents. To avoid losing those free build minutes, disable or delete your pipeline before you move to the next module.
Select one of the following options.
Option 1: Disable the pipeline
Disable the pipeline so that it doesn't process build requests. You can re-enable the build pipeline later if you want to. Select this option if you want to keep your DevOps project and your build pipeline for future reference.
To disable the pipeline:
In Azure Pipelines, go to your pipeline.
From the dropdown, select Settings.
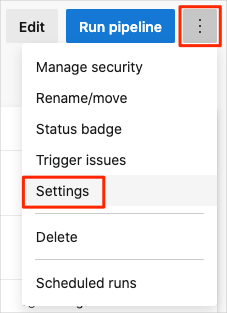
Under Processing of new run requests, select Disabled, and then select Save.
Now, your pipeline no longer processes build requests.
Option 2: Delete the Azure DevOps project
Delete your Azure DevOps project, including the contents of Azure Boards and your build pipeline. In future modules, you can run another template that brings up a new project in a state where this project leaves off. Select this option if you don't need your DevOps project for future reference.
To delete the project:
In Azure DevOps, go to your project. Earlier, we recommended that you name this project Space Game - web - Multistage.
Select Project settings in the lower-left corner of your Azure DevOps page.
In the Project details area, scroll down and select Delete.
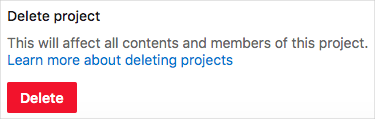
In the window that appears, enter the project name. Select Delete again.
Your project is now deleted.