Deploy with Power Platform pipelines
Power Platform pipelines bring CI/CD automation directly into the platform, making it possible for makers and admins to deploy solutions through a governed, repeatable process - without requiring external DevOps tools or deep ALM expertise.
Understand how pipelines work
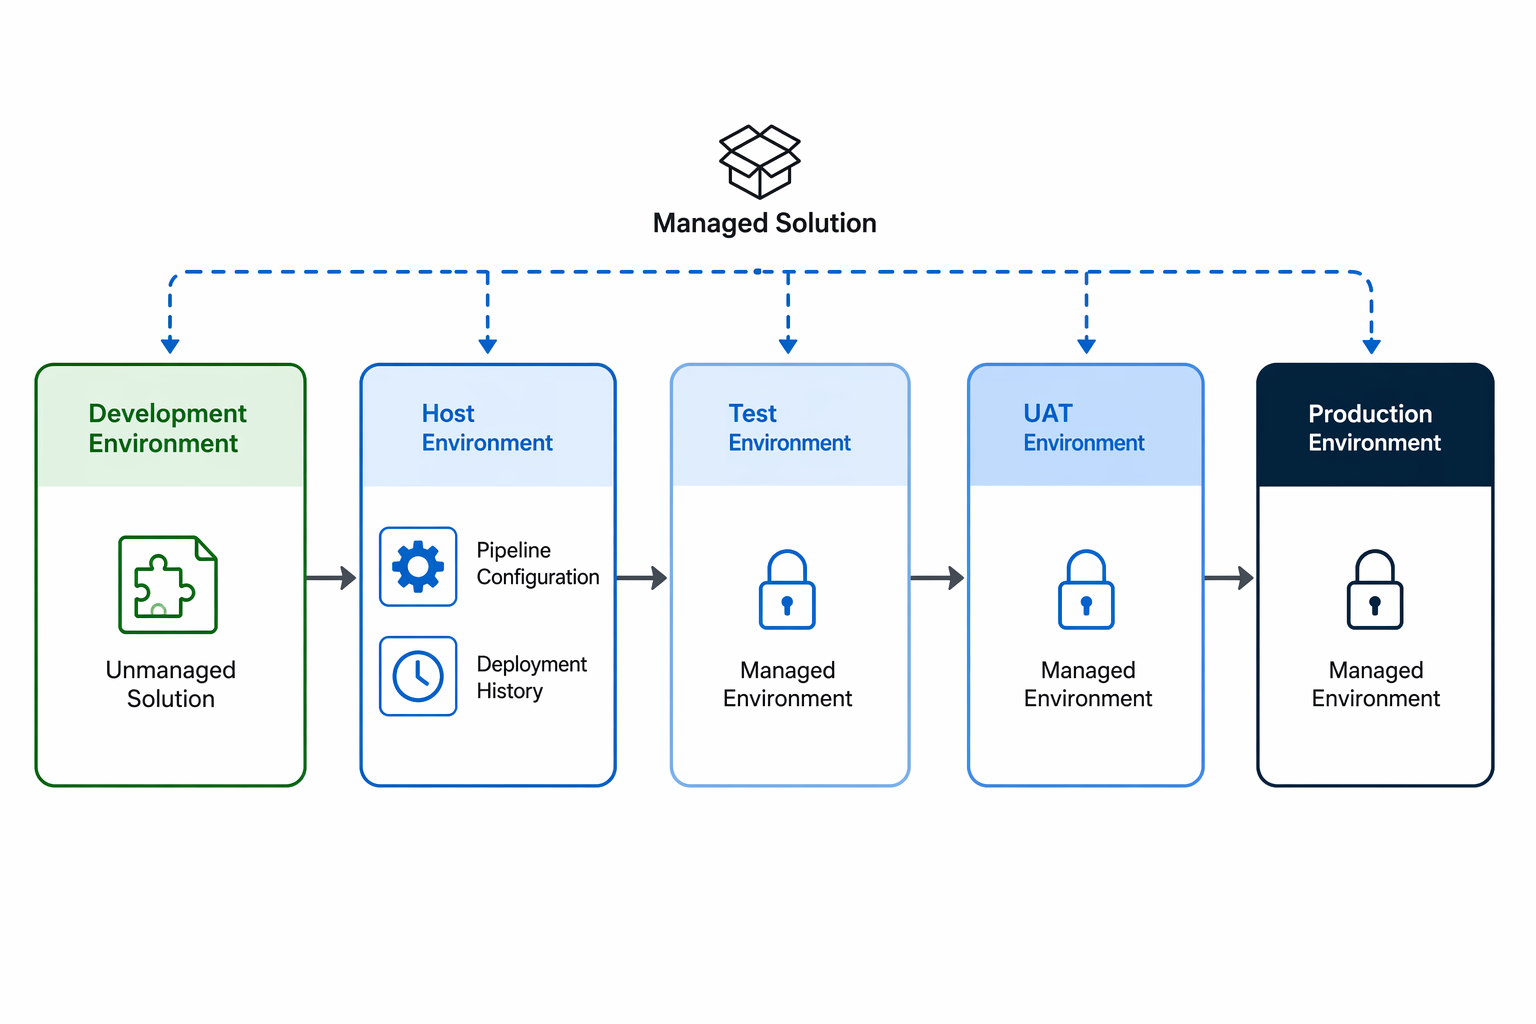
A pipeline defines a deployment path: which environments participate, what order they deploy in, and what validation or approval gates are required at each stage. Pipelines always deploy managed solutions to non-development environments, ensuring production systems stay protected from direct modification.
Pipeline architecture:
| Component | Role |
|---|---|
| Host environment | Stores pipeline configuration, deployment history, and run metadata |
| Development environments | Where makers build unmanaged solutions (linked to the pipeline) |
| Target environments | Where managed solutions are deployed (must be Managed Environments) |
| Stages | Ordered deployment targets (for example: Test → UAT → Production) |
A pipeline can have up to seven stages. Solutions must pass through stages sequentially - you can't skip a stage to deploy directly to production.
Host types:
- Platform host - Default tenant-wide host, configurable by makers with no additional capacity cost
- Custom host - Admin-configured for centralized governance; uses environment capacity but offers full control over security and configuration
Note
Target environments must be Managed Environments. Development environments don't require this - they can use the Developer plan without Managed Environment features.
Set up a pipeline (custom host)
Setting up a pipeline involves creating the host configuration and linking environments:
Prepare environments:
- Identify or create your host environment (recommended: dedicated production environment)
- Ensure target environments are enabled as Managed Environments
- Development environments can be Developer plan environments
Install the pipelines application:
- In the Power Platform admin center, navigate to the host environment
- Select Resources > Dynamics 365 apps > Install app
- Install Power Platform Pipelines
Configure the pipeline:
- Open the Deployment Pipeline Configuration app in the host environment
- Create environment records (Name, Type: Development or Target, Environment ID)
- Validate each environment (wait for Validation Status = Success)
- Create a pipeline record (Name, Description)
- Link development environments to the pipeline
- Create deployment stages in order (Name, Target Environment, Previous Deployment Stage)
Grant access:
- Assign security roles in the host environment:
- Deployment Pipeline Administrator - Full pipeline management
- Deployment Pipeline Maker - Can deploy solutions through the pipeline
- Deployment Pipeline User - Can view deployment history
- Assign security roles in the host environment:
Run a pipeline deployment
Once configured, makers deploy solutions directly from their development environment:
- In Power Apps, select the development environment.
- Go to Solutions and select the unmanaged solution to deploy.
- Select Pipelines from the left navigation (or Deploy from the command bar).
- Select the target stage (for example, "Deploy to Test").
- Choose Now (immediate) or schedule for Later.
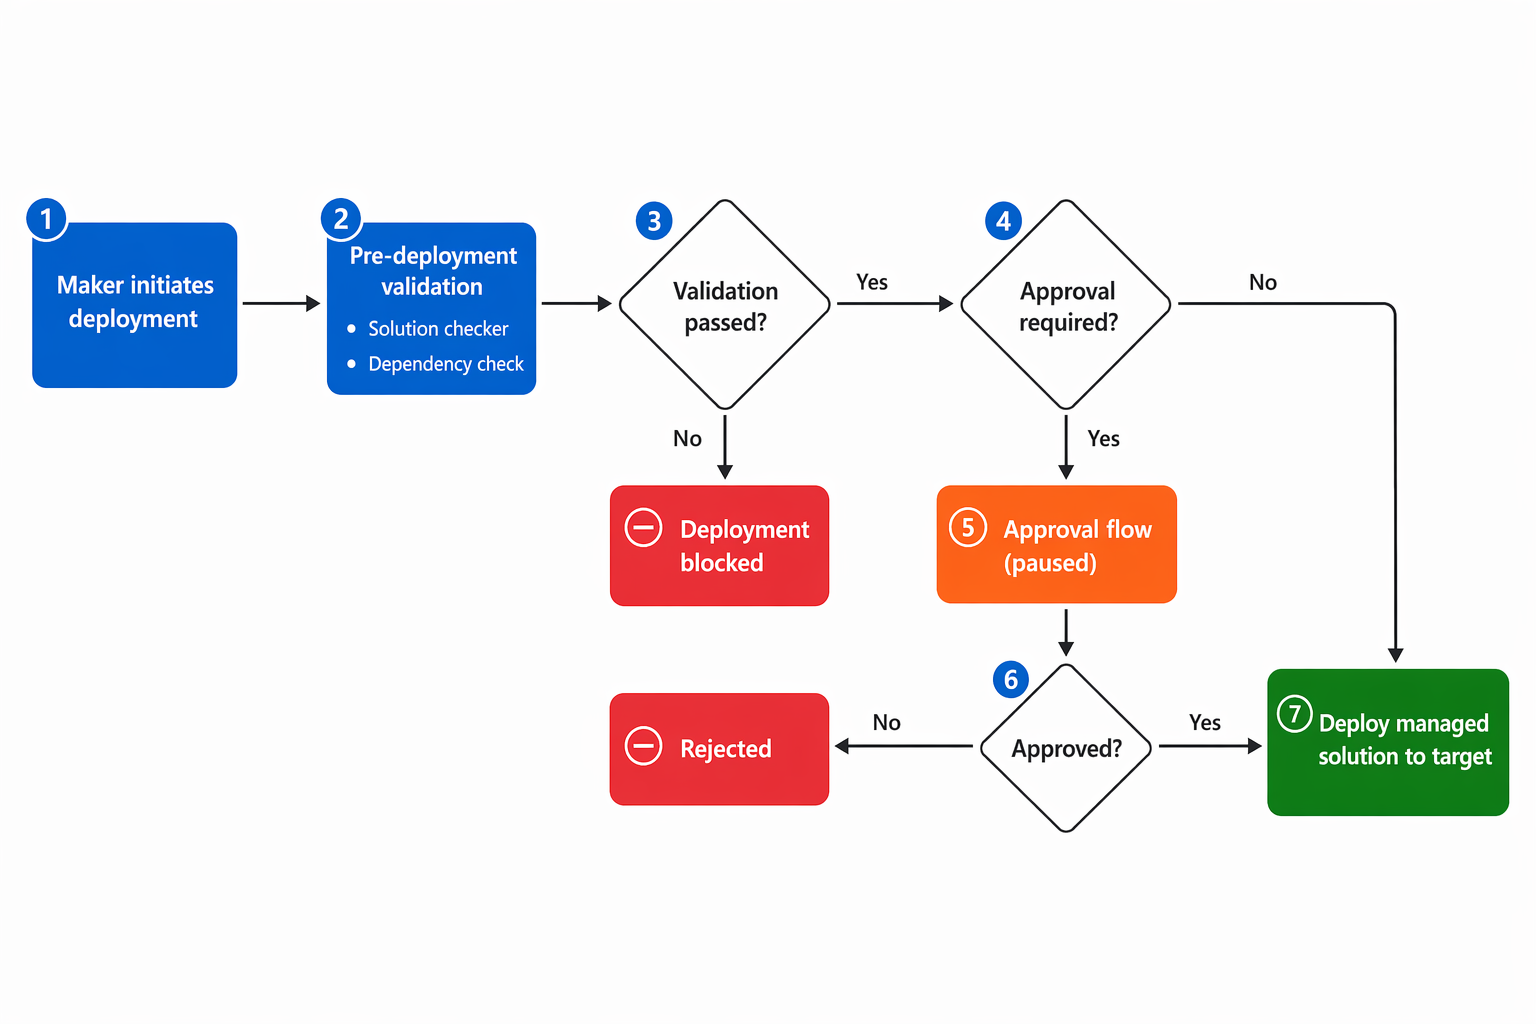
- Select Next - this triggers predeployment validation.
- Provide initial values for any connection references or environment variables that require them in the target environment.
- Review the deployment summary, add deployment notes.
- Select Deploy.
The pipeline exports the solution as managed, validates it against the target environment, and imports it. Deployment history is stored in the host environment for audit purposes.
Important
Pipelines don't publish unmanaged customizations before exporting. If you have unpublished changes in development, publish them individually before running the pipeline.
Configure predeployment validation
Pipelines automatically run preflight checks before deploying:
- Missing dependencies - Components referenced by the solution that don't exist in the target
- Connection reference validation - Ensures all required connections are available
- Environment variable validation - Confirms all required values are set
Additionally, when solution checker enforcement is configured on the target Managed Environment, critical violations can block or warn before import:
- In the Power Platform admin center, select the target environment.
- Select Edit Managed Environments.
- Under Solution checker enforcement, choose:
- Warn - Shows a warning but allows import
- Block - Prevents import when critical violations exist
Add approval gates
For regulated deployments (like Zava Pay's production environment), add approval requirements to pipeline stages:
- In the Deployment Pipeline Configuration app, edit the target stage.
- Enable PreDeployment Step Required.
- In the host environment, create a cloud flow with the OnApprovalStarted trigger.
- Add approval logic (for example, using Power Automate Approvals).
- Call the UpdateApprovalStatus action to approve (value: 20) or reject (value: 30).
When a maker initiates deployment to a stage with predeployment steps required, the deployment pauses until the approval flow completes. This gives reviewers time to validate the change before it reaches the target.
Deploy Copilot Studio agents
Copilot Studio agents are solution components and deploy through pipelines like any other component. For agent-specific quality gates, use the Copilot Studio Kit:
- Configure automated test suites for your agents.
- Create a flow that triggers on deployment requests.
- Run the test suite against the agent in the source environment.
- Approve or reject the deployment based on test results.
This pattern ensures agents meet quality thresholds before reaching production - particularly important for customer-facing agents like Zava Pay's support bot.
Use deployment notes and history
Every pipeline deployment creates a record in the host environment containing:
- Who initiated the deployment
- When it was deployed
- Which solution version was deployed
- Deployment notes (can be AI-generated using Copilot)
- Success or failure status with details
This deployment history provides the audit trail that Zava's compliance team needs - they can trace every change in production back to a specific deployment, maker, and time.
Understand pipeline constraints
Keep these limitations in mind when planning your pipeline strategy:
- Solutions deploy one at a time - you can't batch multiple solutions in a single run
- Deployment is always sequential through stages (no skipping)
- Cross-tenant deployment isn't supported (use Azure DevOps or GitHub Actions for that)
- Cross-geo deployment requires enabling the Cross-Geo Solution Deployments tenant setting
- Power BI dashboards and datasets aren't supported as pipeline components
- Default import behavior is Upgrade without Overwrite customizations