Configure NSX network components
Azure VMware Solution deploys with NSX Manager as the software-defined network layer. The networking environment has two gateways:
- NSX Tier-0 gateway configured in active-active mode
- NSX Tier-1 gateway configured in active-standby mode
Both gateways allow connections between logical switch segments. These gateways also provide East-West and North-South connectivity.
Set up NSX Manager components
After Azure VMware Solution is deployed, the NSX components are configured under Workload Networking in the Azure portal. The portal provides a simplified view of NSX operations for VMware administrator and is designed for users who are not familiar with NSX Manager. If you're familiar with NSX Manager, you can use it to configure the advanced network settings and features.
You have four options to configure NSX components using the Azure portal:
- Segments: Create network segments that are displayed in NSX Manager and vCenter Server.
- DHCP: If you use DHCP, create a DHCP server or DHCP relay.
- Port mirroring: Set up port mirroring to help troubleshoot network issues.
- DNS: Create a DNS forwarder to send DNS requests to a DNS server for resolution.

Create an NSX network segment in the Azure portal
Virtual machines (VMs) either created in or migrated to Azure VMware Solution should be attached to an NSX networking segment. You can create an NSX segment from the Azure VMware Solution console within the Azure portal. These NSX networking segments are connected to the default Tier-1 gateway. Workloads on these segments will have East-West and North-South connectivity. After the segment is created, it displays in NSX Manager and vCenter Server.
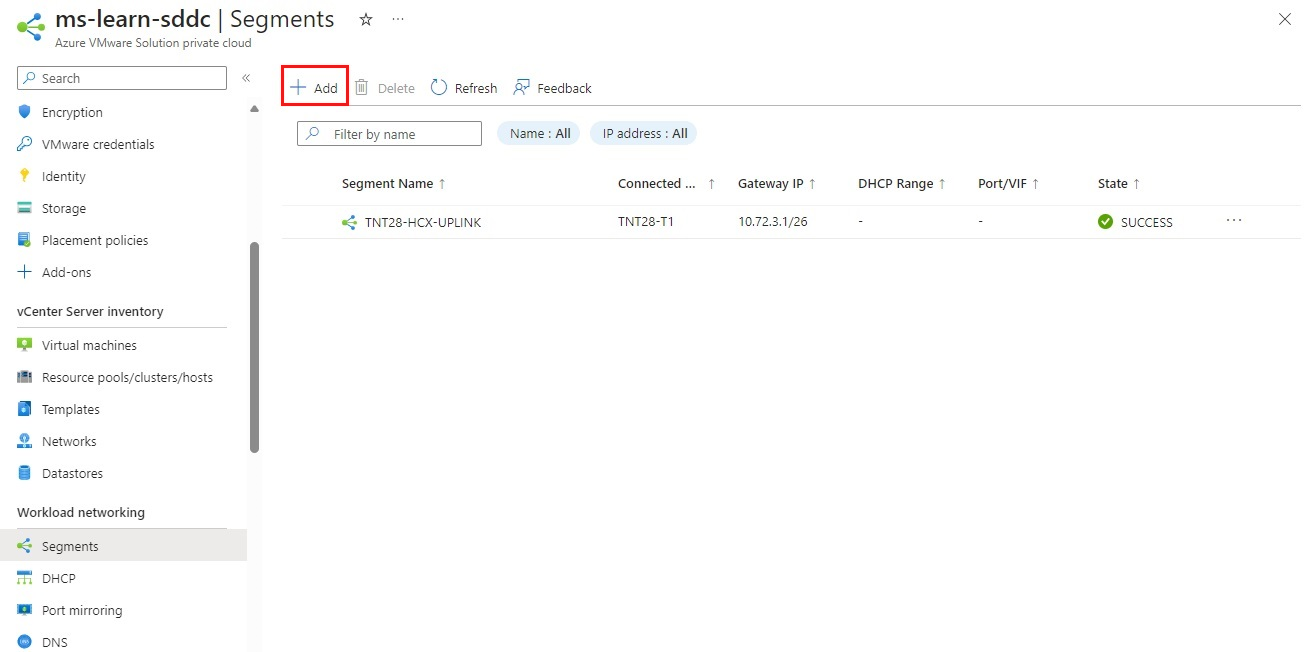
In the Azure portal, select your Azure VMware Solution private cloud.
Under Workload Networking, select Segments > +Add:
Provide details for the new logical networking segment:
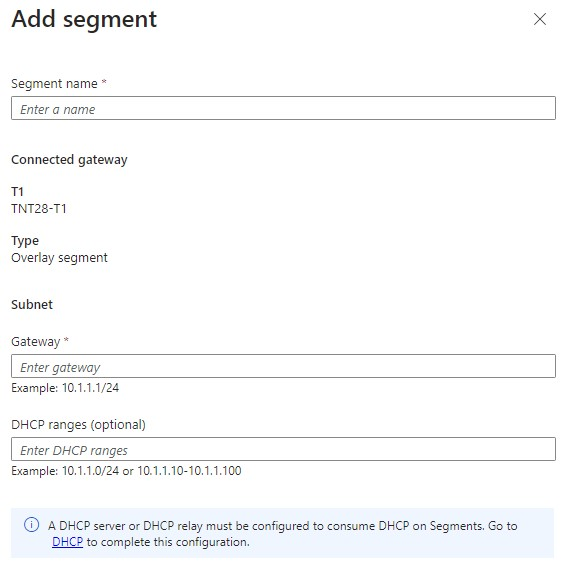
Field Value Segment name The name of the logical switch visible in vCenter Server. Connected gateway This gateway is selected by default and is read only. T1 The name of the Tier-1 gateway in NSX Manager. Segments created connect only to the default Tier-1 gateway. Workloads of these segments have East-West and North-South connectivity. More Tier-1 gateways can be created only by using NSX Manager. Tier-1 gateways created in NSX Manager aren't visible in the Azure VMware Solution console. Type The overlay network segment supported by Azure VMware Solution. Subnet Gateway The gateway IP address for the logical switch's subnet, with a subnet mask. VMs are attached to the logical switch, and all VMs connecting to this switch belong in the same subnet. Also, all VMs attached to this logical networking segment must carry an IP address from the same networking segment. DHCP ranges (optional) DHCP ranges for the logical networking segment. A DHCP server or DHCP relay must be configured to use DHCP on the logical networking segments. Select OK to create and attach the logical networking segment to the Tier-1 gateway. This segment will now be visible in Azure VMware Solution, NSX Manger, and vCenter Server.


Create an NSX network segment in the NSX
Similarly, you can create an NSX segment from the NSX console. These NSX networking segments are connected to the default Tier-1 gateway. Workloads on these segments will have East-West and North-South connectivity.
From a Jumpbox VM, connect to NSX Manager. Get the credentials under Manage > VMware credentials.
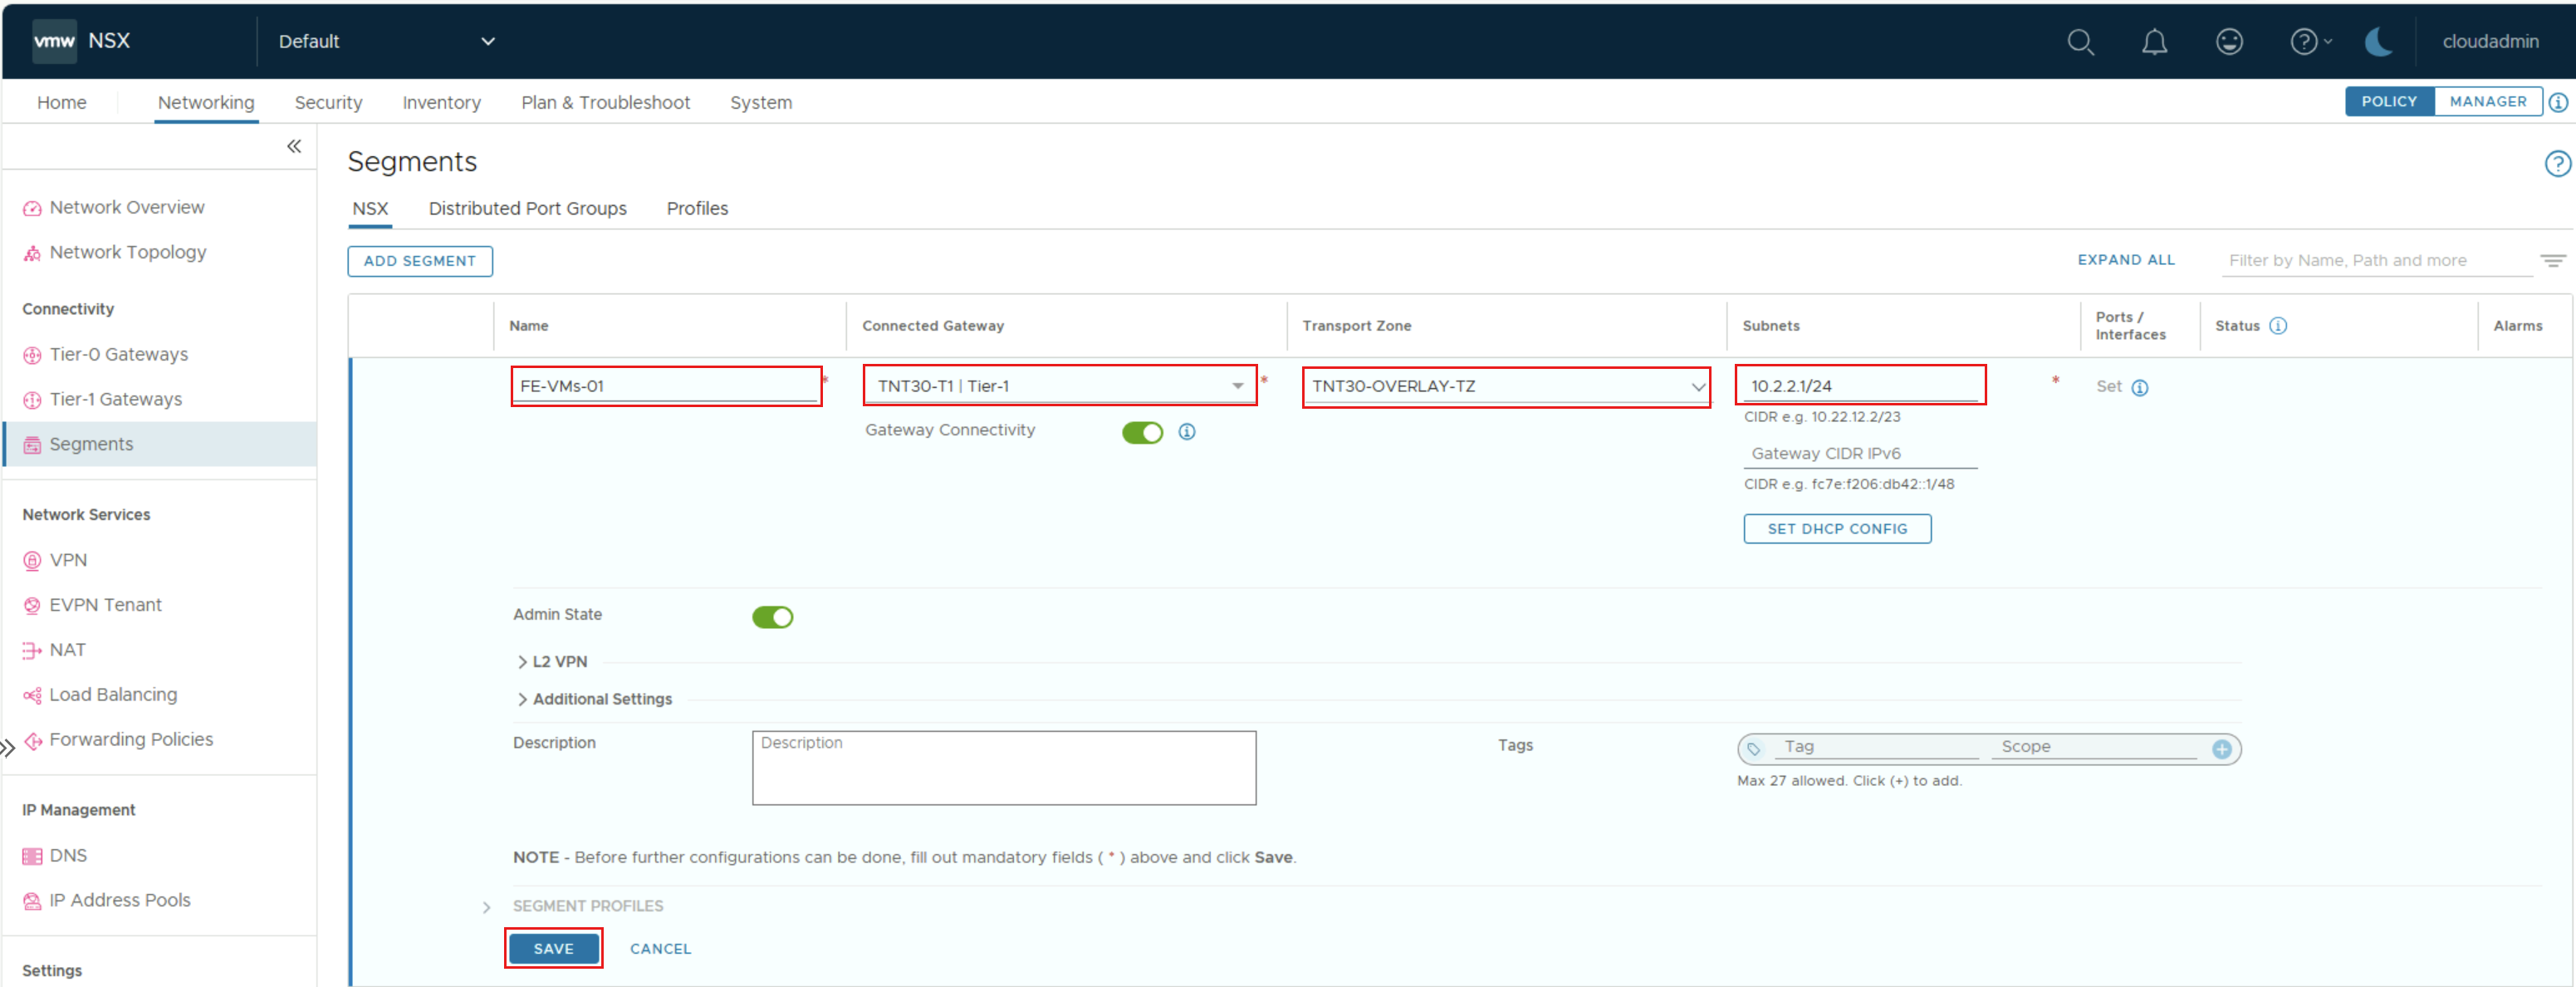
In NSX Manager, select Networking > Segments, then select Add Segment.

Provide details for the new logical networking segment, then select Save.


| Field | Value |
|---|---|
| Segment name | The name of the logical switch visible in vCenter Server. |
| Connected gateway | The name of the Tier-1 gateway in NSX Manager. Segments created only connect to the default Tier-1 gateway. Workloads of these segments have East-West and North-South connectivity. More Tier-1 gateways can be created by using NSX Manager. Tier-1 gateways created in NSX Manager aren't visible in the Azure VMware Solution console. |
| Transport Zone | The name of the preconfigured overlay Transport Zone (TNTxx-OVERLAY-TZ). |
| Subnets | The IP address range of the subnet, in CIDR format. The IP address needs to be on a non-overlapping RFC1918 address block, which ensures connection to the VMs on the new segment. |
Create a DHCP server or DHCP relay in the Azure portal
Applications and workloads running in a private cloud environment require name resolution and DHCP services for lookup and IP address assignments. It's possible to use the DHCP service built-in to NSX or use a local DHCP server in the private cloud.
A DHCP server or relay can be configured directly from the Azure VMware Solution console within the Azure portal. The DHCP server or relay will connect to the Tier-1 gateway, which is created when Azure VMware Solution is deployed. All segments where DHCP ranges are provided will be part of the DHCP components of NSX. After a DHCP server or DHCP relay has been created, you must define a subnet or range on an NSX segment to consume the DHCP services:
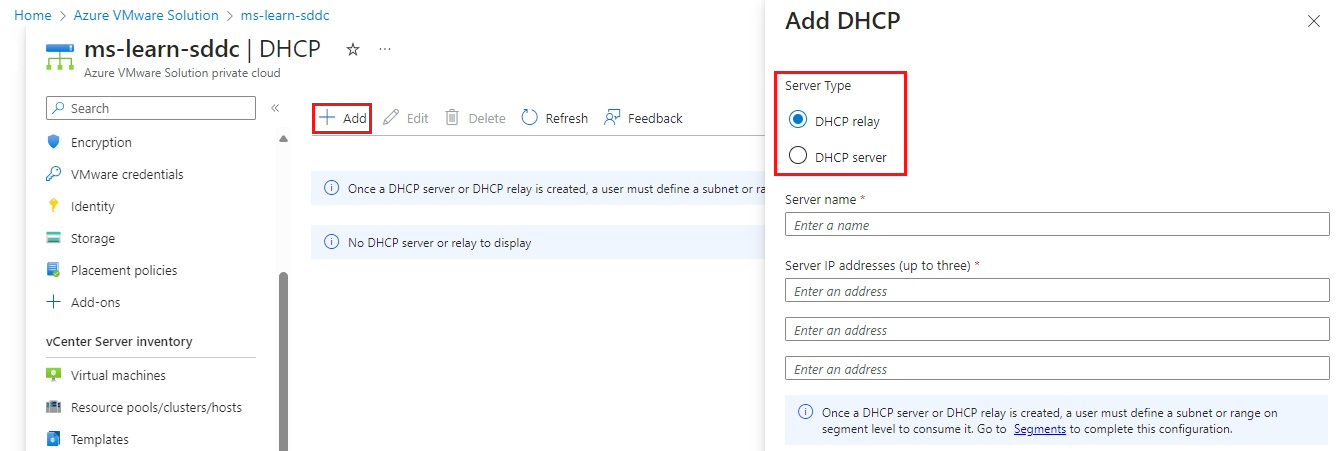
In the Azure VMware Solution private cloud, under Workload Networking, select DHCP > +Add.
Select either DHCP Server or DHCP Relay.
Provide a name for the server or relay and provide three IP addresses. For a DHCP relay, only one IP address is required.
Complete the DHCP configuration by providing DHCP ranges on the logical segments, like those configured previously, then select OK.

Configure port mirroring in the portal
Port mirroring can be configured to monitor network traffic. Port mirroring involves forwarding copies of each network packet from one network switch port to another. Port mirroring places a protocol analyzer on the port that receives all mirrored data. Port mirroring analyzes traffic from a source, either a virtual machine (VM) or a group of VMs, then sends the traffic to a destination. Note that this should only be enabled for short-term troubleshooting.
To set up port mirroring in the Azure VMware Solution console, you'll first create source and destination VMs or VM groups. The source group has either a single VM or multiple VMs where the network traffic is mirrored.
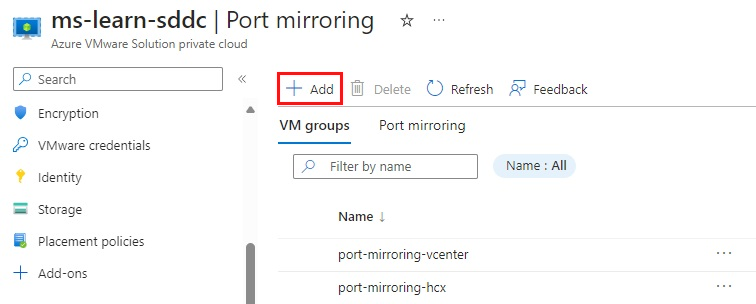
In the Azure VMware Solution private cloud, under Workload Networking, select Port mirroring > VM groups > +Add.
Name the source VM group, select the VMs, then select OK.
Repeat the preceding step to create the destination VM group.

Next, create a port mirroring profile by defining the traffic direction for source and destination VM groups.
Make sure both the source and destination VM groups have been created.
Select Port mirroring > Add, and then provide the following values:
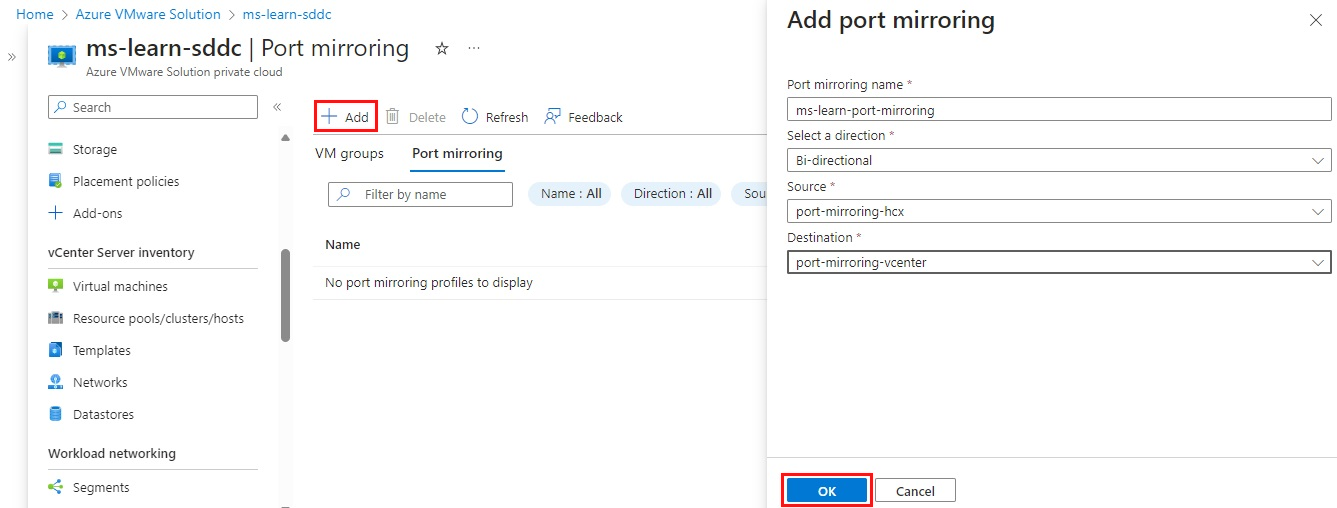
Field Value Port mirroring name Provide a name for the profile. Direction Select Ingress, Egress, or Bi-directional. Source Select the source VM group. Destination Select the destination VM group. Select OK to complete the profile. The profile and VM groups will now be visible in the Azure VMware Solution console.

Configure a DNS forwarder in the Azure portal
Now you'll configure a DNS forwarder. Specific DNS requests will be forwarded to a designated DNS server for resolution. A DNS forwarder is associated with a default DNS zone and up to three FQDN zones.
A DNS service and default DNS zone are provided as part of the Azure VMware Solution private cloud deployment. The default zone forwards the Name resolution request to the default Cloudflare public DNS server. This DNS server helps with public name resolution.
If you require name resolution from a privately hosted DNS server, consider adding conditional forwarding rules for the desired domain name. By doing so, you can forward DNS requests specifically for that domain zone to a selected set of private DNS servers. To achieve this requirement, you need to define an FQDN zone.
Configure additional forwarder:
In your VMware Solution private cloud, under Workload Networking, select DNS > DNS zones, then select +Add.
Select FQDN zone, provide a name and up to three DNS Server IP addresses in the format of 10.0.0.53 then select OK.

Adding DNS zones can take several minutes to complete, you can follow the progress from Notifications. When the DNS zone is created, you see a message in the Notification.
Repeat steps 1-3 to add the other FQDN zones, including any applicable reverse lookup zones.

When a DNS query is received, the DNS forwarder compares the domain name in the query with the domain names in the FQDN DNS zone. If a match is found, the query is forwarded to the DNS servers specified in the FQDN DNS zone. If no match is found, the query is forwarded to the DNS servers specified in the default DNS zone.
Verify on-premises vSphere network connectivity to the Azure VMware Solution private cloud
You should see where the Azure ExpressRoute circuit connects to the NSX network segments and the Azure VMware Solution management segments in the edge router. Each environment is different. You might need to allow routes to propagate back to the on-premises network.
Some environments have firewalls that protect ExpressRoute circuits. If there are no firewalls, try to ping the Azure VMware Solution vCenter Server or a VM on the NSX segment from your on-premises environment. From the VM on the NSX segment, resources should be able to reach the on-premises vSphere environment.
Add a VM on an NSX network segment
Deploy a VM to test network connectivity in the Azure VMware Solution vCenter Server. This VM helps verify network connectivity:
- To and from the internet.
- To and from Azure virtual networks.
- To and from on-premises environments.
Deploy the VM as you would in any vSphere environment:
- Attach the VM to one of the network segments previously created in NSX Manager.
- The VM can receive network configuration from a DHCP server, or you can configure the network configuration statically.
Test the NSX segment connectivity
Sign in to the VM created in the previous step and verify connectivity:
- Ping an IP on the internet.
- Go to an internet site in a web browser.
- Ping an internal VM that sits on the Azure virtual network.
If each test works, Azure VMware Solution is now functional. Going through these steps means you've successfully established connectivity to and from an Azure virtual network, and the internet.