Deploy and configure Microsoft Entra Internet Access
There are four main steps for getting Microsoft Entra Internet Access deployed within your company. After you complete these four steps, users with the Global Secure Access client installed on their Windows device can securely access Microsoft resources from anywhere. Conditional Access policy requires users to use the Global Secure Access client or a configured remote network, when they access resources like Exchange Online and SharePoint Online.
Steps
| Steps | Description |
|---|---|
| 1. Enable the Microsoft traffic forwarding profile. | With the Microsoft profile enabled, Microsoft Entra Internet Access acquires the traffic going to Microsoft services, like Exchange Online and SharePoint Online. |
| 2. Install the Global Secure Access Client on end-user devices. | Download and install the client app to capture and control access from the client. |
| 3. Enable tenant restrictions. | Configure which tenants / organizations are allowed to blocked |
| 4. Enable enhanced Global Secure Access signaling and Conditional Access. | Use Conditional Access and Global Secure Access to prevent attacks. |
Enable Microsoft traffic forwarding profile
- Sign in to the Microsoft Entra admin center as a Global Secure Access Administrator.
- Browse to Global Secure Access > Connect > Traffic forwarding.
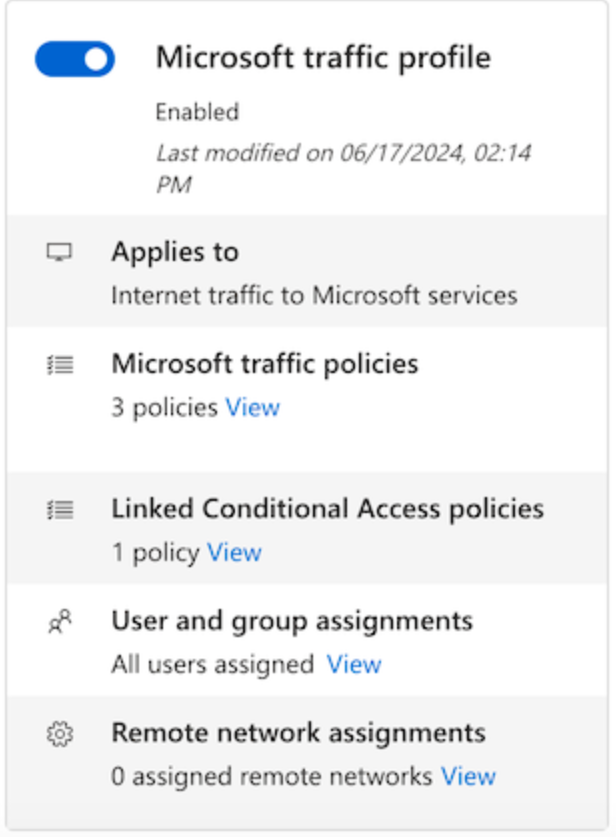
- Enable the Microsoft traffic profile.
Turns on Microsoft traffic forwarding and create the following configurations in Microsoft Entra:
| Configuration Setup | Description |
|---|---|
| Policies (network routing) | 1. Exchange Online, 2. SharePoint Online and OneDrive for Business, and 3. Entra ID and MSGraph - These use fully qualified domain names or IP subnets to manage network traffic. |
| Conditional Access Policy | Linked Conditional Access policies - Captures all traffic to Microsoft Services, routes to the network policies defined earlier if conditions are met. |
| User and Group | Specify specific users or groups that this traffic forward applies to. |
Refer to the documentation article for more details - Enable and manage Microsoft traffic forwarding.
Deploy Global Secure Access client for Windows (or Android)
The client is quick and easy to install. It can be deployed via mobile device management tools like Microsoft Intune, or manually installed on each device. You need to download the client from the Microsoft Entra admin center, then use your choice of deployment methods.
Download the client
- Sign in to the Microsoft Entra admin center as a Global Secure Access Administrator.
- Browse to Global Secure Access > Connect > Client download.
- Select Download Client.
Install the client
- Copy the Global Secure Access client setup file to your client machine.
- Run the GlobalSecureAccessClient.exe setup file. Accept the software license terms.
- The client is installed and users are prompted to sign in with their Microsoft Entra credentials.
- Users sign in and the connection icon turns green. Double-clicking on the connection icon opens a notification with client information showing a connected state.
You can install the Android client instead using either Microsoft Intune or Microsoft Defender for Endpoint on Android. The process is similar, but you get the client app from the Android store.
Configure the Tenant Restrictions
Administrators use tenant restrictions to control user access to external tenants on their network. Tenant restrictions, with cross tenant access settings, add tenant-level restrictions and more granularity such as individual user, group, and application controls. Tenant restrictions move policy management from network proxies to a cloud-based portal. Allow internal identities, such as employees, to access specific external tenants on your managed network. Block access to nonallowed tenants for internal identities. Block external identities, such as contractors and vendors, from accessing all external tenants.
Set up Tenant Restrictions
Sign in to the Microsoft Entra admin center as at least a Security Administrator.
Browse to Identity > External Identities > Cross-tenant access settings, then select Organizational settings.
Select Add organization.
On the Add organization pane, type the full domain name (or tenant ID) for the organization.
Select the organization in the search results, and then select Add.
The organization appears in the Organizational settings list. At this point, all access settings for this organization are inherited from your default settings. To change the settings for this organization, select the Inherited from default link under the Inbound access or Outbound access column.
Modify the organization's settings.
Enable Global Secure Access
Once you created the tenant restriction policies, you can utilize Global Secure Access to apply tagging for tenant restrictions. An administrator with both the Global Secure Access Administrator and Security Administrator roles must take the following steps to enable enforcement with Global Secure Access.
- Sign in to the Microsoft Entra admin center as a Global Secure Access Administrator.
- Browse to Global Secure Access > Global Settings > Session Management > Tenant Restrictions.
- Select the toggle to Enable tagging to enforce tenant restrictions on your network.
- Select Save.
How it works
| Steps | Description |
|---|---|
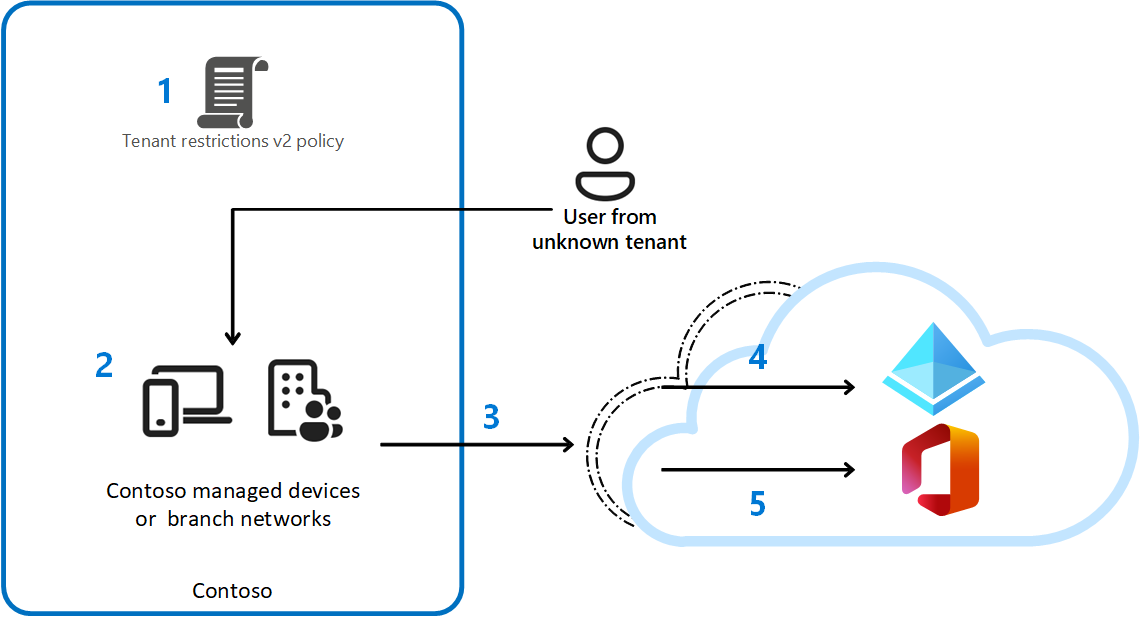
| 1. | Contoso configures a **tenant restrictions v2 ** policy in their cross-tenant access settings to block all external accounts and external apps. Contoso enforces the policy using Global Secure Access universal tenant restrictions. |
| 2. | A user with a Contoso-managed device tries to access a Microsoft Entra integrated app with an unsanctioned external identity. |
| 3. | Authentication plane protection: Microsoft Entra ID, with Contoso's policy, blocks unsanctioned external accounts from accessing external tenants. |
| 4. | Data plane protection: If the user again tries to access an external unsanctioned application by copying an authentication response token they obtained outside of Contoso's network and pasting it into the device, are blocked. The token mismatch triggers reauthentication and blocks access. For SharePoint Online, any attempt at anonymously accessing resources is blocked. |
Enable enhanced Global Secure Access signaling and Conditional Access
Organizations who use Conditional Access along with the Global Secure Access, can prevent malicious access to Microsoft apps, SaaS apps, and private line-of-business (LoB) apps. You can configure multiple conditions to provide defense-in-depth. These conditions might include device compliance, location, and more to provide protection against user identity or token theft. Global Secure Access introduces the concept of a compliant network within Conditional Access. This compliant network check ensures users connect from a verified network connectivity.
The Global Secure Access Client installed on devices or users behind configured remote networks allows administrators to secure resources behind a compliant network with advanced Conditional Access controls. This compliant network feature makes it easier for administrators to manage and maintain, without having to maintain a list of all of an organization's locations IP addresses. Administrators don't need to push traffic through their organization's VPN egress points to ensure security. Continuous Access Evaluation (CAE) with the compliant network feature is currently supported for SharePoint Online. With CAE, you can enforce defense-in-depth with token theft replay protection.
Enable Global Secure Access signaling
Sign into the Microsoft Entra admin center as a Global Secure Access Administrator.
Browse to Global Secure Access > Global settings > Session management Adaptive access.
Select the toggle to Enable Global Secure Access signaling in Conditional Access.
Browse to Protection > Conditional Access > Named locations.
Confirm you have a location called All Compliant Network locations with location type Network Access. Organizations can optionally mark this location as trusted.
Build your Conditional Access policy for networks
- Sign into the Microsoft Entra admin center as at least a Conditional Access Administrator.
- Browse to Protection > Conditional Access.
- Select Create new policy.
- Give your policy a name. We recommend that organizations create a meaningful standard for the names of their policies.
- Look at Assignments, then select Users or workload identities.
- Under Include, select All users.
- Under Exclude, select Users and groups and choose your organization's emergency access or break-glass accounts.
- Review Target resources > Include, and select Select apps.
- Choose Office 365 Exchange Online, and/or Office 365 SharePoint Online, and/or any of your SaaS apps.
- The specific Office 365 cloud app in the app picker is currently NOT supported, so don't select this cloud app.
- Review the Conditions > Location.
- Set Configure to Yes.
- Under Include, select Any location.
- Under Exclude, select Selected locations.
- Select the All Compliant Network locations.
- Choose Select.
- Explore Access controls:
- Grant, select Block Access, and select Select.
- Confirm your settings and set Enable policy to On.
- Select the Create button to create to enable your policy.