Exercise - Deploy a multi-container solution to a Kubernetes cluster
The release pipeline provided with your project is designed to build the solution as a Docker container and deploy it to Azure App Service. To support the deployment of multiple containers to a Kubernetes cluster, you need to modify this pipeline.
In this unit, you'll learn how to:
- Update the pipeline to trigger on a commit to the main branch.
- Define variables to be shared across the pipeline.
- Build and publish Docker images.
- Publish Kubernetes manifests.
- Add a task to create an image pull secret for use between your Kubernetes and container registry instances.
- Deploy updated images to a Kubernetes cluster.
Update the pipeline to support triggers
Sign in to your Azure DevOps organization, and then navigate to your project.
Select Pipelines, and then select your pipeline.
Select Edit to edit your azure-pipelines.yml.
Andy: This was the build stage we had in place for the previous single-container solution. I knew it wasn't going to run properly, so I disabled it. We can start off by re-enabling triggers on commits to the
mainbranch.Replace the existing
triggerline at the top of the file with the following snippet. This triggers a pipeline run every time a commit is made to the main branch.trigger: - 'main'
Define variables accessible across pipeline
Andy: We're going to need to add two pipeline variables. One for specifying the name of the leaderboard repository, which is leaderboard. The other is for the name of the image pull secret used for sharing between AKS and ACR instances during deployment.
Add the following highlighted code to the
variablessection.variables: buildConfiguration: 'Release' leaderboardRepository: 'leaderboard' webRepository: 'web' tag: '$(Build.BuildId)' imagePullSecret: 'secret'
Build and publish Docker image to Azure Container Registry
Andy: We already have a task for building the web app as a Docker container, which we publish to our container registry. We can just use a second task to do the same for our leaderboard.
Add a second
Docker@2task to build and publish the leaderboard container using the following highlighted snippet. Add this task right after the web container task.- task: Docker@2 displayName: 'Build and push the web image to container registry' inputs: command: buildAndPush buildContext: $(Build.Repository.LocalPath) repository: $(webRepository) dockerfile: '$(Build.SourcesDirectory)/Tailspin.SpaceGame.Web/Dockerfile' containerRegistry: 'Container Registry Connection' tags: | $(tag) - task: Docker@2 displayName: 'Build and push the leaderboard image to container registry' inputs: command: buildAndPush buildContext: $(Build.Repository.LocalPath) repository: $(leaderboardRepository) dockerfile: '$(Build.SourcesDirectory)/Tailspin.SpaceGame.LeaderboardContainer/Dockerfile' containerRegistry: 'Container Registry Connection' tags: | $(tag)
Tip
Make sure that the task you add here uses consistent indentation with the previous task as whitespace is important in a YAML file.
Publish the Kubernetes manifests
Andy: I think we can move on to the next stage. Do you see anything missing?
Mara: You mentioned that there were some manifest files in the source project that define the deployment, and services Kubernetes needs when we deploy. We should publish those before we finish this stage.
Andy: Do we need to? Won't they still be on the local disk?
Mara: They would be if we were adding the deployment tasks within the same stage as the build. However, since our deployment tasks happen in their own Deploy stage, it runs on a fresh environment, probably even on a different agent. We should be sure to publish anything this stage produces that the other stage needs.
Andy: That's a great point. Is it easy to do? We just need to ensure the manifests folder is copied to the new agent.
Mara: That's what the PublishBuildArtifacts@1 task is for. It's so common that there's even a shorthand for it, publish.
Add a
publishtask that stores the manifests folder for a future stage as shown in the following code snippet. Make sure that the indentation of this task matches that of the previous task.- task: Docker@2 displayName: 'Build and push the leaderboard image to container registry' inputs: command: buildAndPush buildContext: $(Build.Repository.LocalPath) repository: $(leaderboardRepository) dockerfile: '$(Build.SourcesDirectory)/Tailspin.SpaceGame.LeaderboardContainer/Dockerfile' containerRegistry: 'Container Registry Connection' tags: | $(tag) - publish: '$(Build.SourcesDirectory)/manifests' artifact: manifests
Replace the deploy stage
Mara: I'm going to replace our existing Deploy stage with one that uses a deployment job. A deployment job is a special kind of job that allows us to associate our deployment with the Azure DevOps environment created earlier. This makes it easier to track deployment history, which will be especially useful as our solutions get more sophisticated.
Remove the existing Deploy stage (everything after the build stage) and replace it with the following snippet. Take note of the highlighted line that indicates the deployment environment to be utilized.
- stage: 'Deploy'
  displayName: 'Deploy the containers'
  dependsOn: Build
  jobs:
  - deployment: Deploy
    displayName: Deploy
    pool:
      vmImage: 'ubuntu-20.04'
    environment: 'Dev'
    variables:
    - group: Release
    strategy:
      runOnce:
        deploy:
          steps:
Mara: The first step we'll add in the deployment stage is to download the manifest artifacts published earlier using the
DownloadBuildArtifacts@0task.Andy: Let me guess, is there a
downloadshorthand for that task?Mara: Exactly correct! We can use the
currentspecifier to indicate that we want the artifact from the current run of the pipeline.Add the highlighted lines as the first step of the Deploy stage.
- stage: 'Deploy'
  displayName: 'Deploy the containers'
  dependsOn: Build
  jobs:
  - deployment: Deploy
    displayName: Deploy
    pool:
      vmImage: 'ubuntu-20.04'
    environment: 'spike.default'
    variables:
    - group: Release
    strategy:
      runOnce:
        deploy:
          steps:
          - download: current
            artifact: manifests
Andy: Now we need to create an image pull secret that will be shared between our ACR and AKS instances. Do you know if there's a task we can use?
Mara: I was just looking that up, and we're in luck. The
KubernetesManifest@0task supports an action to create the secret needed.
Kubernetes manifest task
The Kubernetes manifest task is designed to manage all of the mainstream deployment operations required for Kubernetes. It supports multiple action options that range from creating secrets to deploying images. In this case, the createSecret action is used, along with the following parameters:
actionindicates the feature to run. In this case,createSecretcreates the shared secret.connectionTypespecifies the type of service connection to use. Options: azureResourceManager or kubernetesServiceConnection.secretNamespecifies the name of the secret to create.dockerRegistryEndpointspecifies the name of the Azure Container Registry Services connection.azureSubscriptionConnectionspecifies the name of the ARM Services connection.azureResourceGroupspecifies the name of your resource group.kubernetesClusterspecifies the name of your AKS cluster.namespacespecifies the Kubernetes namespace this action applies to.
Add the following snippet to the end of your pipeline. Make sure that both the resource group name and the cluster name match the names of the ones you created earlier. Ensure that the indentation of this task matches that of the download task.
- task: KubernetesManifest@1
  displayName: Create imagePullSecret
  inputs:
    action: createSecret
    connectionType: azureResourceManager
    secretName: $(imagePullSecret)
    dockerRegistryEndpoint: 'Container Registry Connection'
    azureSubscriptionConnection: 'Kubernetes Cluster Connection'
    azureResourceGroup: 'tailspin-space-game-rg'
    kubernetesCluster: 'tailspinspacegame-24591'
    namespace: 'default'
Andy: The final step is to trigger the deployment of our images to the Kubernetes cluster. Based on the documentation, it looks like we can use the same task but with a different action and parameters.
actionindicates the feature to run. In this case,deployto deploy to AKS cluster.connectionTypespecifies the type of service connection to use. Options: azureResourceManager or kubernetesServiceConnection.azureSubscriptionConnectionspecifies the name of the ARM Services connection.azureResourceGroupspecifies the name of your resource group.kubernetesClusterspecifies the name of your AKS cluster.namespacespecifies the Kubernetes namespace this action applies to.imagePullSecretsspecifies the list of secrets needed to pull from the container registry.containersspecifies the list of container images to deploy.
Add the following snippet to the end of the pipeline. Make sure that both the resource group name and the cluster name match the names of the ones you created earlier. Ensure that the indentation of this task matches that of the previous task.
- task: KubernetesManifest@1
  displayName: Deploy to Kubernetes cluster
  inputs:
    action: deploy
    connectionType: azureResourceManager
    azureSubscriptionConnection: 'Kubernetes Cluster Connection'
    azureResourceGroup: 'tailspin-space-game-rg'
    kubernetesCluster: 'tailspinspacegame-24591'
    namespace: 'default'
    manifests: |
      $(Pipeline.Workspace)/manifests/deployment.yml
      $(Pipeline.Workspace)/manifests/service.yml
    imagePullSecrets: |
      $(imagePullSecret)
    containers: |
      $(RegistryName)/$(webRepository):$(tag)
      $(RegistryName)/$(leaderboardRepository):$(tag)
Run your pipeline
Select Save from the upper-right corner of the page. Select Save to confirm your commit message.
Select Run, confirm your branch name and then select Run to trigger a pipeline run.
Select Pipelines, and then select your pipeline to view the logs as your pipeline runs.
After the pipeline run is complete, select Environments from the left pane, and then select the Dev environment to view your deployment jobs.
Now let's go check out our deployed web app and API endpoint. To do so, we need to get the external IP addresses for both the web and leaderboard services.
Navigate to Azure portal, select your AKS cluster, and then select Services and ingresses.
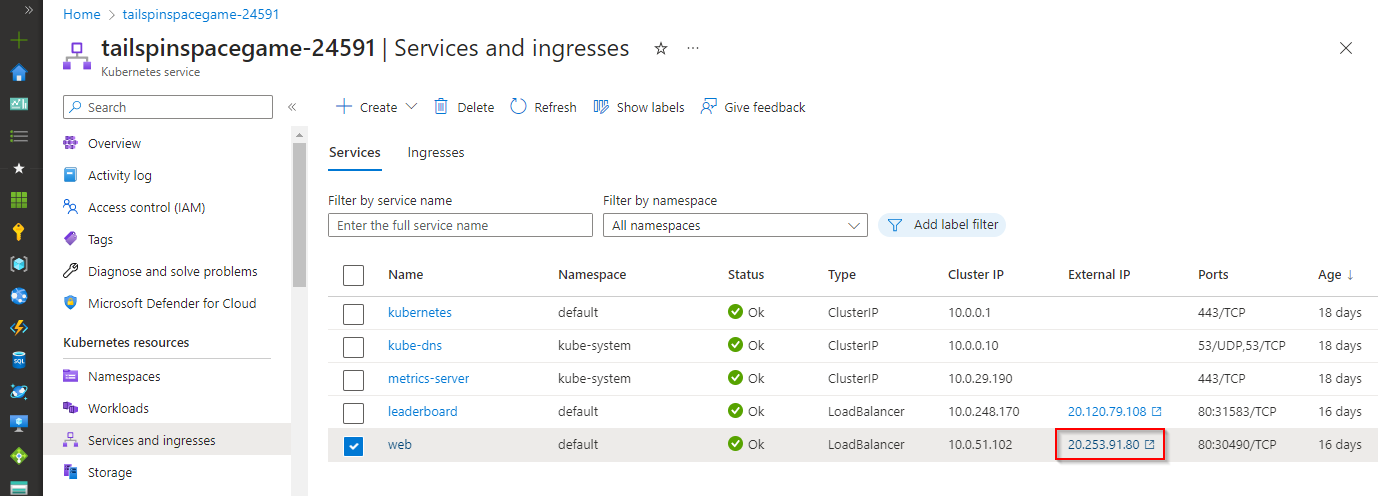
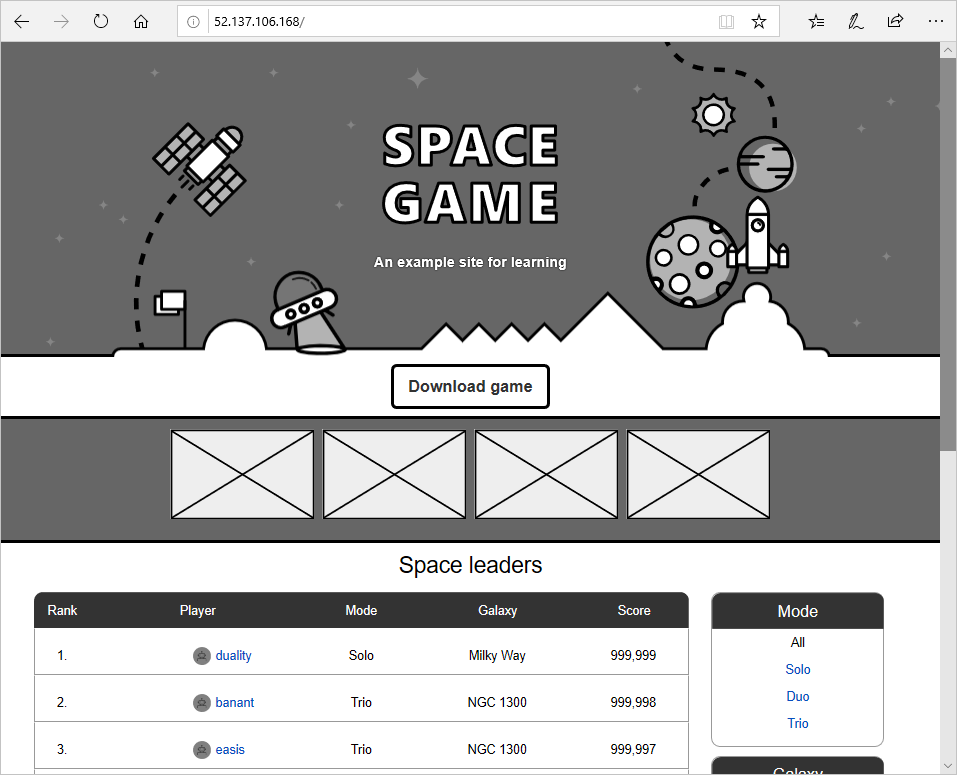
Select the External IP for your web service to view your site on AKS.
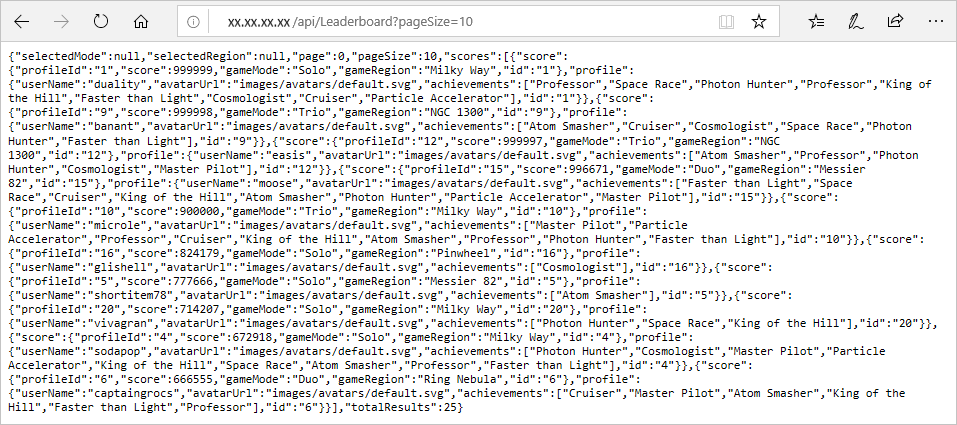
Go back to your Azure portal window where you left off and then copy the External IP for your leaderboard service. This IP address is where the leaderboard API is publicly hosted.
Replace the placeholder in the following link with the external IP you copied. You can also add a
pageSize=10query parameter to make it easier to view the JSON response in your browser. Use a URL like the following one in a new browser tab.http://[IP]/api/Leaderboard?pageSize=10You can view the raw JSON response from the leaderboard API hosted in your AKS cluster. You now have a REST API that you can call from other applications.


Andy: This turned out great! I think using Kubernetes would be a great way for us to adopt a broader microservices strategy.