Explore single SQL database
Let's look at several methods for deploying a single Azure SQL Database.
Deploying via the portal
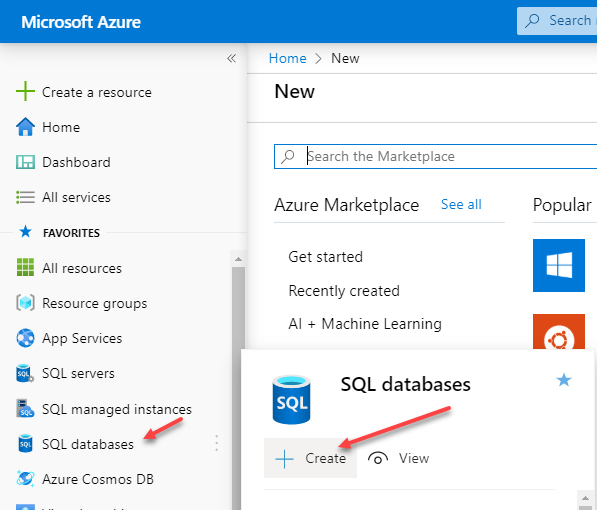
Creating an SQL database through the Azure portal is simple. First, navigate to the Azure portal and select "SQL Databases" from the left-hand menu. In the slide-out panel that appears, select "Create."
In the pane in the image below, you’ll notice that the subscription should already be provided for you. You'll need to supply the following information:
- Resource Group – If you have an existing resource group you wish to use, select it from the drop-down list. To create a new resource group for this Azure SQL Database, choose the Create new option.
- Database Name – Provide a name for your database.
- Server – Each database must reside on a logical server. If you already have one in the appropriate region, you can select it. Otherwise, select the Create new link and follow the prompts to create a new logical server to host the database.
- Want to use SQL elastic pool? – Decide whether to use an elastic pool.
- Compute + storage – Determine the appropriate compute resources needed. By default, it's set to Gen5, 2vCore, with 32 GB of storage. Select Configure database to view and choose alternate configuration options.

Here, you'll notice that the service tier is General Purpose and the compute tier is Serverless, as discussed previously. Serverless is billed per second based on the number of vCores in use. The alternative option is Provisioned, where compute resources are preallocated and billed per hour based on the number of configured vCores.

Deploying an Azure SQL Database via PowerShell/CLI
You can also deploy your database using Azure PowerShell or the Azure CLI. The image below shows the PowerShell example where you're creating a new resource group, and defining an admin called SqlAdmin and then creating a new server, database, and firewall rule.
# Connect-AzAccount

# The SubscriptionId in which to create these objects
$SubscriptionId = ''

# Set the resource group name and location for your server
$resourceGroupName = "myResourceGroup-$(Get-Random)"
$location = "westus2"

# Set an admin login and password for your server
$adminSqlLogin = "SqlAdmin"
$password = "ChangeYourAdminPassword1"

# Set server name - the logical server name has to be unique in the system
$serverName = "server-$(Get-Random)"

# The sample database name
$databaseName = "mySampleDatabase"

# The ip address range that you want to allow to access your server
$startIp = "0.0.0.0"
$endIp = "0.0.0.0"

# Set subscription
Set-AzContext -SubscriptionId $subscriptionId

# Create a resource group
$resourceGroup = New-AzResourceGroup -Name $resourceGroupName -Location $location

# Create a server with a system wide unique server name
$server = New-AzSqlServer -ResourceGroupName $resourceGroupName `
 -ServerName $serverName `
 -Location $location `
 -SqlAdministratorCredentials $(New-Object -TypeName System.Management.Automation.PSCredential -ArgumentList $adminSqlLogin, $(ConvertTo-SecureString -String $password -AsPlainText -Force))

# Create a server firewall rule that allows access from the specified IP range

$serverFirewallRule = New-AzSqlServerFirewallRule -ResourceGroupName $resourceGroupName `
 -ServerName $serverName `
 -FirewallRuleName "AllowedIPs" -StartIpAddress $startIp -EndIpAddress $endIp

# Create a blank database with an S0 performance level

$database = New-AzSqlDatabase -ResourceGroupName $resourceGroupName `
 -ServerName $serverName `
 -DatabaseName $databaseName `
 -RequestedServiceObjectiveName "S0" `
 -SampleName "AdventureWorksLT"
The Azure CLI can also be used to deploy an Azure SQL Database as shown below:
#!/bin/bash

# set execution context (if necessary)
az account set --subscription <replace with your subscription name or id>

# Set the resource group name and location for your server
resourceGroupName=myResourceGroup-$RANDOM
location=westus2

# Set an admin login and password for your database
adminlogin=ServerAdmin
password=`openssl rand -base64 16`

# password=<EnterYourComplexPasswordHere1>

# The logical server name has to be unique in all of Azure
servername=server-$RANDOM

# The ip address range that you want to allow to access your DB
startip=0.0.0.0
endip=0.0.0.0

# Create a resource group
az group create \
 --name $resourceGroupName \
 --location $location

# Create a logical server in the resource group
az sql server create \
 --name $servername \
 --resource-group $resourceGroupName \
 --location $location \
 --admin-user $adminlogin \
 --admin-password $password

# Configure a firewall rule for the server

az sql server firewall-rule create \
 --resource-group $resourceGroupName \
 --server $servername \
 -n AllowYourIp \
 --start-ip-address $startip \
 --end-ip-address $endip

# Create a database in the server
az sql db create \
 --resource-group $resourceGroupName \
 --server $servername
 --name mySampleDatabase \
 --sample-name AdventureWorksLT \
 --edition GeneralPurpose \
 --family Gen4 \
 --capacity 1 \

# Echo random password
echo $password
Deploying Azure SQL Database Using Azure Resource Manager templates
Another method for deploying resources is as mentioned earlier using an Azure Resource Manager template. A Resource Manager template gives you the most granular control over your resources, and Microsoft provides a GitHub repository called Azure-Quickstart-Templates, which hosts Azure Resource Manager templates that you can reference in your deployments. A PowerShell example of deploying a GitHub based template is shown below:
#Define Variables for parameters to pass to template
$projectName = Read-Host -Prompt "Enter a project name"
$location = Read-Host -Prompt "Enter an Azure location (i.e. centralus)"
$adminUser = Read-Host -Prompt "Enter the SQL server administrator username"
$adminPassword = Read-Host -Prompt "Enter the SQl server administrator password" -AsSecureString
$resourceGroupName = "${projectName}rg"

#Create Resource Group and Deploy Template to Resource Group
New-AzResourceGroup -Name $resourceGroupName -Location $location

New-AzResourceGroupDeployment -ResourceGroupName $resourceGroupName `
 -TemplateUri "https://raw.githubusercontent.com/Azure/azure-quickstart-templates/master/101-sql-logical-server/azuredeploy.json" `
 -administratorLogin $adminUser -administratorLoginPassword $adminPassword

Read-Host -Prompt "Press [ENTER] to continue ..."
This script automates the creation of an Azure resource group and the deployment of a SQL logical server within it. It prompts the user for a project name, Azure location, and SQL server administrator credentials, then creates a resource group using the provided details. Finally, it deploys a SQL logical server to the resource group using a predefined ARM template from a specified URI, and pauses execution until the user presses ENTER.