Exercise - Provision a finance and operations cloud-hosted environment
In this exercise, you'll provision a finance and operations cloud-hosted environment by using Microsoft Dynamics Lifecycle Services. Your first task will be to create a new project in Lifecycle Services and then grant admin consent to the Azure subscription.
Next, you'll configure the access control to the Azure subscription and add Azure Connector to the Lifecycle Services project. Then, you'll deploy the finance and operations environment.
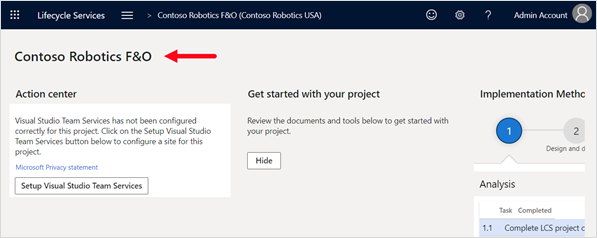
Sign in and create a new project in Lifecycle Services
In this task, you'll sign in to Lifecycle Services and create a new project.
Open a new tab in your web browser in InPrivate or Incognito mode. In the web address field, enter lcs.dynamics.com and then press the Enter key.
On the Lifecycle Services webpage, select Sign in.
On the Lifecycle Services page, select Accept.
Under the Recent projects section, select the plus (+) button.
In the What is this project for? pane, select Migrate, create solutions, and learn.
In the Create a project pane, complete the following settings, and then select Create.
Name - Contoso Robotics F&O
Product name and Product version - finance and operations
Industry - Professional services
Methodology - Implementation Methodology
On the Lifecycle Services portal page, the name of your project is displayed in the upper left side.

Grant admin consent to Microsoft Azure subscription
In this task, you'll configure the Microsoft Azure settings to grant admin consent to the Dynamics 365 Deployment Services.
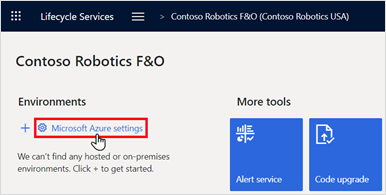
On the Contoso Robotics F&O page, scroll to the right, and under the Environments section, select Microsoft Azure settings.
On the Project settings page, under the Organization List section, select Authorize.
On the Grant admin consent page, select Authorize.
In the Microsoft Account window, select your user account.
In the Permission requested dialog box, review the information and then select Accept.
On the Grant admin consent page, wait until the Authorization complete message is displayed.
Press the F5 key to refresh status and then select the Project Name to return to the Project page.
Configure access control to Microsoft Azure subscription
In this task, you'll go to the Azure portal and assign your account and the Dynamics Deployment Services account contributor role to your Azure subscription.
Switch to the web browser tab to the Azure Subscriptions page.
On the Subscriptions page, select your subscription name.
From the navigation pane, select Access control (IAM), select + Add, and then select Add role assignment.
In the Add role assignment pane, in the Role list, select Contributor. In the Select box, enter Dynamics, select Dynamics Deployment Services [wsfed-enabled], and then select Save.
Repeat Steps 3-4 using Admin Account.
Close the web browser tab to the Azure portal.
Add an Azure connector to the Lifecycle Services project
In this task, you'll add an Azure connector that will be used to deploy a finance and operations environment on Azure.
Switch the web browser tab to the Lifecycle Services Project page.
On the Contoso Robotics F&O page, scroll to the Environments section and select Microsoft Azure settings.
On the Project settings page, under the Azure Connectors section, select + Add.
In the Microsoft Azure setup pane, complete the following settings and then select Next.
Name - Azure Connector
Azure subscription ID - Copy and paste the Azure subscription ID that you previously saved in Notepad
Configure to use Azure Resource Manager (ARM) - Yes
On the Microsoft Azure setup pane, ensure that a Valid check mark is displayed and then select Next.
On the Microsoft Azure setup pane, select Next.
On the Microsoft Azure setup pane, in the Azure region list, select a region and then select Connect.
On the Project settings page, review the Azure connection.
On the Project settings page, select Lifecycle Services.

Enable Project Operations automated provisioning
In this task, you'll enable the Project Operations automated provisioning flow for your Lifecycle Services project.
On the Lifecycle Services page, select Preview feature management.
On the Preview feature management page, select Project Operations Feature and then ensure that Preview feature enabled is set to Yes.
Select Lifecycle Services to return to the Lifecycle Services Home page.
Provision finance and operations and Project Operations environments
In this task, you'll add a new topology in the Lifecycle Services portal to deploy finance and operations in an Azure virtual machine cloud-hosted environment. At the same time, you'll configure settings to also deploy a Project Operations tenant.
On the Lifecycle Services home page, select on your project name.
Under the Environments section, select the plus (+) sign.
On the Select application and platform version pane, complete the settings and then select Next.
Application version - 10.0.18 or higher
Platform version - Platform Update
In the Select environment topology pane, select DEVTEST.
Select finance and operations - Develop (10.0.18 with Platform update 39) or higher.
In the Deploy environment pane, in the Environment name box, enter FO-Environment and then select Advanced Settings.
In the Deployment settings pane, select Customize SQL Database Configuration. In the AX Database (Developer VM) list, select Demo.
In the Deployment settings pane, select Dataverse, complete the following settings, and then select Done.
Configure Microsoft Power Platform environment - Yes
Microsoft Power Platform Template - Project Operations
Agree - Select the check box
In the Deploy environment pane, on the virtual machine Size list, select E2 v3, select the agreement check box, and then select Next.
In the Are you sure you want to deploy? dialog box, select Deploy.
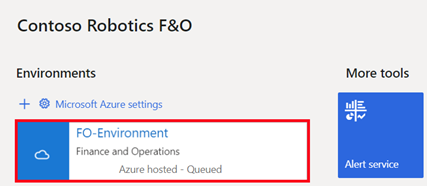
On the Contoso Robotics F&O page, under the Environments section, notice that the status is Queued.
Note
The finance and operations deployment might take over seven hours to complete. Press the F5 key periodically to refresh the status.
When the status displays Deployed, select the environment name to review the details of the deployment.
On the FO-Environment details page, to confirm that the environment has deployed successfully, select Login and Log on to environment to confirm that it's running.

Establish a dual-write connection
In this task, you'll establish the dual-write connection between finance and operations and Project Operations.
On the finance and operations home page, on the navigation menu, select Workspaces > Data Management.
On the Data management page, select the Dual-write tile.
On the Dual-write page, select New link to environment.
Note
If you already have an environment that is enabled for dual-write, proceed to step 8.
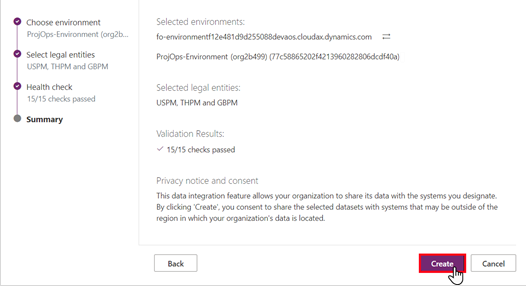
On the Setup link to Dataverse wizard page, under the Choose environment section, select ProjOps-Environment and then select Next.
Under the Select legal entities section, on the Legal entity list, select USPM, THPM, and GBPM and then select Next.
Under the Health check section, review the health checks list, and if you have 15/15 checks passed, select Next.
If not, then you'll need to fix the identified errors and restart the Setup link to Dataverse wizard.
Under the Summary section, review the information and then select Create.
On the Dual-write page, on the menu bar, select Apply solution.
On the Apply solution page, select the following display names and then select Apply.
Dynamics 365 Project Operations Dual Write Entity Maps
Dynamics 365 finance and operations Dual Write Entity Maps
It should take less than one minute for the solutions to be applied.

On the Dual-write page, a listing of all mappings should be displayed.
Update security settings on the Project Operations environment
In this task, you'll open Microsoft Power Platform admin center and update the Dynamics 365 security settings in the Project Operations environment.
Open a new web browser tab. In the web address box, enter https://admin.powerplatform.microsoft.com and then press the Enter key.
On the Microsoft Power Platform admin center page, select ProjOps-Environment and then select Open environment. A new web browser tab will open to the Dynamics 365 App page.
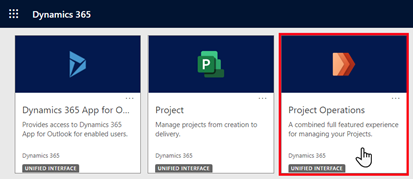
On the Dynamics 365 page, select the Project Operations tile.
On the Project Operations page, select the settings icon and then select Advanced Settings.
On the Business Management page, in the title menu, select the arrow next to Settings and then select Security.
On the Security page, select Security Roles.
On the Security Roles page, select dual-write app user, which will open a new web browser.
On the Security Role: dual-write app user page, select the Custom Entities tab and then ensure that the following entities have Read and Append To privileges assigned for the Organization.
Chart of accounts
Currency Exchange Rate Type
Fiscal Calendar
Ledger
Note
Select the circle to change between User, Business Unit, Parent: Child Business Units, and Organization.
When you're finished, select Save and Close on the menu bar.
From the web browser tab, on the Security Roles page, on the title menu, select Security.
On the Security page, select Teams.
From the Local Business Owner Teams view, select the default team name.
On the Teams page, on the menu bar, select Manage Roles.
On the Manage Team Roles dialog box, select the dual-write app user check box and then select OK.
On the Teams page, select the settings icon and then select Options.
On the Set Personal Options page, in the Time Zone box, select (GMT-08:00) Pacific Time (US and Canada) and then select OK.
On the Teams page, on the title bar, select the arrow next to Dynamics 365 and then select Project Operations.
Stop at this point in preparation for the next exercise in the module.
