Exercise - Deploy a subscription-scoped resource
Important
You need your own Azure subscription to complete this exercise, and you might incur charges. If you don't already have an Azure subscription, create a free account before you begin.
Project Teddybear is in full swing, and the R&D team is waiting for you to give it access to the new Azure subscription. You've created the subscription already, but before you give the team access, you need to ensure that it deploys only virtual machines that comply with the team's policies. The team has told you that it doesn't want to deploy F or G series virtual machines.
In this exercise, you'll create a Bicep template that configures the subscription based on the team's policies.
During the process, you'll:
- Create a Bicep template to be deployed at a subscription scope.
- Add an Azure Policy definition and assignment.
- Deploy the template and verify the result.
This exercise requires that you have permission to deploy subscription-scoped resources. If you can't meet this requirement with your current Azure account, you can get a free trial and create a new Azure subscription and tenant. Alternatively, you can skip the deployment steps in this exercise.
This exercise uses the Bicep extension for Visual Studio Code. Be sure to install this extension in Visual Studio Code.
Create a subscription-scoped template
Open Visual Studio Code.
Create a new file called main.bicep.
Save the empty file so that Visual Studio Code loads the Bicep tooling.
You can either select File > Save As or select Ctrl+S in Windows (⌘+S on macOS). Be sure to remember where you've saved the file. For example, you might want to create a scripts folder to save it in.
Add the following content to the main.bicep file. You'll deploy the template soon. It's a good idea to type it in manually instead of copying and pasting, so that you can see how the tooling helps you to write your Bicep files.
targetScope = 'subscription'This line of code tells Bicep that your template is going to be deployed at a subscription scope.
Add a policy definition
Below the line you just added, add the following variable definition:
var policyDefinitionName = 'DenyFandGSeriesVMs'At the bottom of the file, add the following Azure Policy definition:
resource policyDefinition 'Microsoft.Authorization/policyDefinitions@2024-05-01' = {
  name: policyDefinitionName
  properties: {
    policyType: 'Custom'
    mode: 'All'
    parameters: {}
    policyRule: {
      if: {
        allOf: [
          {
            field: 'type'
            equals: 'Microsoft.Compute/virtualMachines'
          }
          {
            anyOf: [
              {
                field: 'Microsoft.Compute/virtualMachines/sku.name'
                like: 'Standard_F*'
              }
              {
                field: 'Microsoft.Compute/virtualMachines/sku.name'
                like: 'Standard_G*'
              }
            ]
          }
        ]
      }
      then: {
        effect: 'deny'
      }
    }
  }
}
Notice that the policy definition applies only to resources where:
- The resource type is equal to
Microsoft.Compute/virtualMachines. - The
sku.nameproperty either begins withStandard_ForStandard_G.
When you try to create a resource that matches these conditions, Azure will deny the resource creation.
Warning
Be careful when you use the deny policy effect for your policy definitions, especially at wide scopes such as subscriptions and management groups. If the definition isn't created correctly, it can have unexpected effects that can lead to outages. It's better to start with the audit policy effect, and then switch to the deny effect only after you've seen it work well over a period of time.
You're creating the policy definition at the scope of the subscription. This means that, after the definition is deployed, it will be available throughout all resource groups in the subscription.
- The resource type is equal to
Assign the policy
A policy definition has no effect until it's applied. In this step, you'll deploy a second subscription-scoped resource that applies the policy definition to the subscription.
Below the
policyDefinitionNamevariable definition, add the following variable definition:var policyAssignmentName = 'DenyFandGSeriesVMs'At the bottom of the file, under the policy definition resource, add the following policy assignment:
resource policyAssignment 'Microsoft.Authorization/policyAssignments@2024-05-01' = {
  name: policyAssignmentName
  properties: {
    policyDefinitionId: policyDefinition.id
  }
}
Notice that you don't explicitly configure the policy assignment to apply to the whole subscription. Bicep understands this, because the template will be deployed at the subscription scope.
Save the changes to the file.
Verify your template
Your template should look like the following:
targetScope = 'subscription'

var policyDefinitionName = 'DenyFandGSeriesVMs'
var policyAssignmentName = 'DenyFandGSeriesVMs'

resource policyDefinition 'Microsoft.Authorization/policyDefinitions@2024-05-01' = {
  name: policyDefinitionName
  properties: {
    policyType: 'Custom'
    mode: 'All'
    parameters: {}
    policyRule: {
      if: {
        allOf: [
          {
            field: 'type'
            equals: 'Microsoft.Compute/virtualMachines'
          }
          {
            anyOf: [
              {
                field: 'Microsoft.Compute/virtualMachines/sku.name'
                like: 'Standard_F*'
              }
              {
                field: 'Microsoft.Compute/virtualMachines/sku.name'
                like: 'Standard_G*'
              }
            ]
          }
        ]
      }
      then: {
        effect: 'deny'
      }
    }
  }
}

resource policyAssignment 'Microsoft.Authorization/policyAssignments@2024-05-01' = {
  name: policyAssignmentName
  properties: {
    policyDefinitionId: policyDefinition.id
  }
}
If it doesn't, either copy the example or adjust your template to match the example.
Deploy the template
To deploy this template to Azure, you need to sign in to your Azure account from the Visual Studio Code terminal. Be sure you've installed the Azure CLI tools.
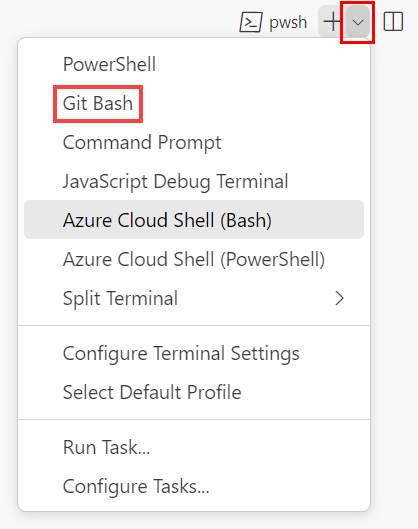
On the Terminal menu, select New Terminal. The terminal window usually opens in the lower half of your screen.
If the terminal window displays bash on the right side, it means the correct shell is already open. Alternatively, if you see a bash shell icon on the right, you can select it to launch the shell.

If a shell other than bash appears, select the shell dropdown arrow, and then select Git Bash.
In the terminal, go to the directory where you saved your template. For example, if you saved your template to the templates folder, you can use this command:
cd templates
Install Bicep
Run the following command to ensure you have the latest version of Bicep:
az bicep install && az bicep upgrade
Sign in to Azure by using Azure CLI
In the Visual Studio Code terminal, sign in to Azure by running the following command:
az loginIn the browser that opens, sign in to your Azure account.
The Visual Studio Code terminal displays a list of the subscriptions associated with this account.
In the list, find the subscription that you want to use for this exercise.
If you missed the list from the sign-in, you can use the following snippet to list your subscriptions again.
az account list --output tableSet the default subscription for all the Azure CLI commands that you run in this session.
az account set --subscription "Your Subscription Name or ID"
To deploy this template to Azure, sign in to your Azure account from the Visual Studio Code terminal. Be sure you've installed Azure PowerShell.
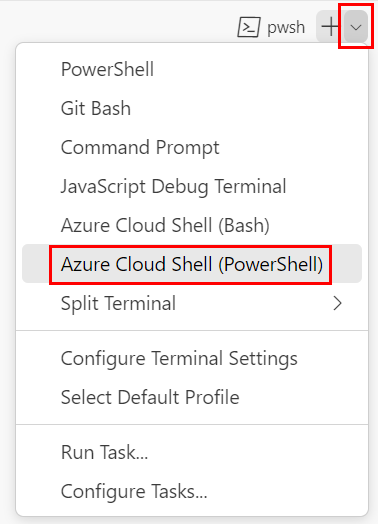
On the Terminal menu, select New Terminal. The terminal window usually opens in the lower half of your screen.
If the terminal window displays pwsh or powershell on the right side, it means the correct shell is already open. Alternatively, if you see a PowerShell shell icon on the right, you can select it to launch the shell.

If a shell other than pwsh or powershell appears, select the shell dropdown arrow, and then select PowerShell.
In the terminal, go to the directory where you saved your template. For example, if you saved your template in the templates folder, you can use this command:
Set-Location -Path templates
Install the Bicep CLI
To use Bicep from Azure PowerShell, install the Bicep CLI.
Sign in to Azure by using Azure PowerShell
In the Visual Studio Code terminal, sign in to Azure by running the following command:
Connect-AzAccountIn the browser that opens, sign in to your Azure account.
Get the ID of the subscription that you want to use for this exercise by running the following command:
Get-AzSubscriptionThe subscription ID is the second column. Copy the second column. It looks something like aaaa0a0a-bb1b-cc2c-dd3d-eeeeee4e4e4e.
Set the default subscription for all the Azure PowerShell commands that you run in this session.
Set-AzContext -SubscriptionId {Your subscription ID}
Deploy the template to Azure
In the Visual Studio Code terminal, deploy the template by using the following Azure CLI commands:
templateFile="main.bicep"
today=$(date +"%d-%b-%Y")
deploymentName="sub-scope-"$today

az deployment sub create \
    --name $deploymentName \
    --location westus \
    --template-file $templateFile
Notice that you're creating a subscription-scoped deployment by using the az deployment sub create command, instead of the az deployment group create command that you might be used to.
In the Visual Studio Code terminal, deploy the template by using the following Azure PowerShell commands:
$templateFile = 'main.bicep'
$today = Get-Date -Format 'MM-dd-yyyy'
$deploymentName = "sub-scope-$today"

New-AzSubscriptionDeployment `
  -Name $deploymentName `
  -Location westus `
  -TemplateFile $templateFile
Notice that you're creating a subscription-scoped deployment by using the New-AzSubscriptionDeployment cmdlet, instead of the New-AzResourceGroupDeployment cmdlet that you might be used to.
Also notice that you're explicitly specifying a name and location for the deployment. Azure uses this information to store the deployment metadata.
Tip
Your deployment name includes today's date. This makes it less likely that you'll accidentally use the same name as another deployment.
The deployment might take a minute or two to finish, and then you'll see a successful deployment.
Note
If you receive an error message with the code AuthorizationFailed, you probably don't have permission to deploy subscription-scoped resources. Ask your Azure administrator to grant you permissions. Alternatively, if you can't meet this requirement with your current Azure account, you can get a free trial and create a new Azure subscription and tenant.
Verify the deployment
You can view subscription-scoped deployments in the Azure portal. This can be helpful to verify that the deployment has finished successfully and to inspect the results.
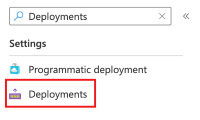
Go to the Azure portal.
On left pane, select Subscriptions.
Select your subscription.
In the Search box, enter Deployments, and then select the Deployments menu item.
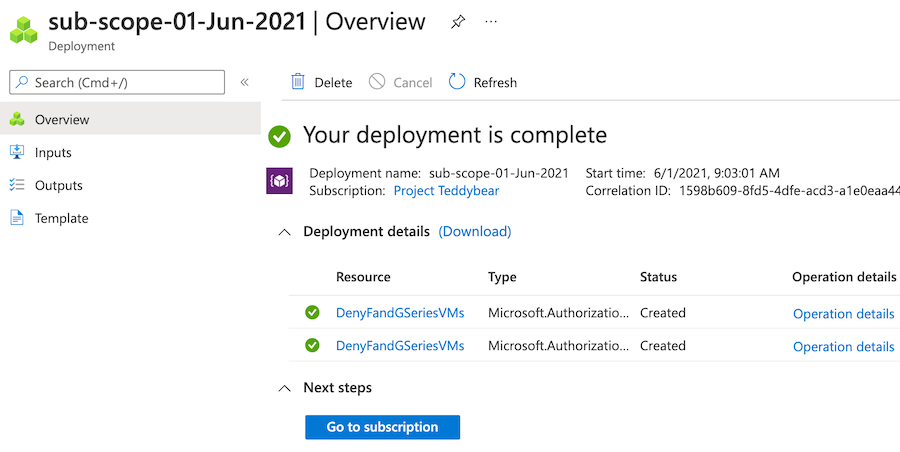
In the Deployment name column, select the deployment beginning with sub-scope to see what resources were deployed.
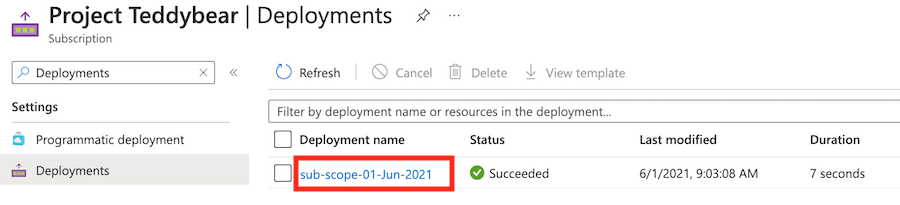
Select Deployment details to expand it. In this case, the two Azure Policy resources are listed.
Clean up the resources
You've successfully deployed subscription-scoped resources. You can remove the policy resources that you've created by running the following commands:
subscriptionId=$(az account show --query 'id' --output tsv)

az policy assignment delete --name 'DenyFandGSeriesVMs' --scope "/subscriptions/$subscriptionId"
az policy definition delete --name 'DenyFandGSeriesVMs' --subscription $subscriptionId
$subscriptionId = (Get-AzContext).Subscription.Id

Remove-AzPolicyAssignment -Name 'DenyFandGSeriesVMs' -Scope "/subscriptions/$subscriptionId"
Remove-AzPolicyDefinition -Name 'DenyFandGSeriesVMs' -SubscriptionId $subscriptionId
In the next exercise unit, you'll redeploy the same policy resources. They'll be re-created, but you can clean them up again afterward.