Exercise - Deploy resources to a management group
Project Teddybear was a success, and now the secretive R&D development at your toy company is ready to research even more new toys. The team has started to ask you for new subscriptions on a near-daily basis, and it needs to apply its policies across all of them.
Rather than duplicate the policy definitions and assignments in each subscription, you've decided to put all the team's subscriptions within a management group. You can then apply the policy to the entire management group instead of to each subscription individually.
In this exercise, you'll create a new Bicep template to apply policy definitions and assignments to a management group.
During the process, you'll:
- Create a new management group.
- Create a new management group-scoped Bicep file.
- Add the Azure Policy resources to the file.
- Link the policy assignment to the policy definition by manually constructing the resource ID.
- Deploy the template and verify the result.
This exercise requires the following prerequisites:
- Management groups must be enabled on your Azure tenant.
- You need permissions for creating a new management group within your hierarchy.
- You need permissions for deploying Azure Policy resources to the management group.
If you can't meet these requirements with your current Azure account, you can get a free trial and create a new Azure subscription and tenant. Alternatively, you can skip the deployment steps in this exercise.
Create a management group
In this exercise, you'll create a new management group so that you don't accidentally affect any resources in another part of your Azure environment.
In the Visual Studio Code terminal, run the following Azure CLI commands:
az account management-group create \
  --name SecretRND \
  --display-name "Secret R&D Projects"
By default, the new management group is created as a direct child of the tenant root management group. If you need to place the management group in a specific place in your existing management group hierarchy, use the --parent-id parameter, and specify the name of the management group to use as the parent.
In the Visual Studio Code terminal, run the following Azure PowerShell commands:
New-AzManagementGroup `
  -GroupId 'SecretRND' `
  -DisplayName 'Secret R&D Projects'
By default, the new management group is created as a child of the tenant root management group. If you need to place the management group in a specific place in your existing management group hierarchy, use the -ParentId parameter, and specify the name of the management group to use as the parent.
In a real deployment, you'd move the R&D team's subscriptions into the management group. For this exercise, you'll deploy the policies even though the management group contains no subscriptions. The same deployment process applies whether the management group is empty or contains subscriptions.
Create a Bicep file to deploy to a management group
Open Visual Studio Code.
Delete your main.bicep file, and then create a new empty file with the same name.
Save the empty file.
Add the following content to the file.
targetScope = 'managementGroup'Note that this line of code tells Bicep that your template will be deployed at the management group scope.
Add a policy definition
As you did earlier, create a policy definition in the Bicep file.
Below the line you just added, add the following variable definition:
var policyDefinitionName = 'DenyFandGSeriesVMs'At the bottom of the file, add the following Azure Policy definition:
resource policyDefinition 'Microsoft.Authorization/policyDefinitions@2024-05-01' = {
  name: policyDefinitionName
  properties: {
    policyType: 'Custom'
    mode: 'All'
    parameters: {}
    policyRule: {
      if: {
        allOf: [
          {
            field: 'type'
            equals: 'Microsoft.Compute/virtualMachines'
          }
          {
            anyOf: [
              {
                field: 'Microsoft.Compute/virtualMachines/sku.name'
                like: 'Standard_F*'
              }
              {
                field: 'Microsoft.Compute/virtualMachines/sku.name'
                like: 'Standard_G*'
              }
            ]
          }
        ]
      }
      then: {
        effect: 'deny'
      }
    }
  }
}
The policy definition is the same as the one you previously applied to your subscription. This time, though, you're deploying it to a management group.
Add a policy assignment
You'll now apply the policy to the management group. This means that the policy will apply to all subscriptions that are children of this management group.
Below the
policyDefinitionNamevariable definition, add the following variable:var policyAssignmentName = 'DenyFandGSeriesVMs'At the bottom of the file, under the policy definition resource, add the following policy assignment:
resource policyAssignment 'Microsoft.Authorization/policyAssignments@2024-05-01' = {
  name: policyAssignmentName
  properties: {
    policyDefinitionId: policyDefinition.id
  }
}
Save the changes to the file.
Verify your template
Your template should look like the following:
targetScope = 'managementGroup'

var policyDefinitionName = 'DenyFandGSeriesVMs'
var policyAssignmentName = 'DenyFandGSeriesVMs'

resource policyDefinition 'Microsoft.Authorization/policyDefinitions@2024-05-01' = {
  name: policyDefinitionName
  properties: {
    policyType: 'Custom'
    mode: 'All'
    parameters: {}
    policyRule: {
      if: {
        allOf: [
          {
            field: 'type'
            equals: 'Microsoft.Compute/virtualMachines'
          }
          {
            anyOf: [
              {
                field: 'Microsoft.Compute/virtualMachines/sku.name'
                like: 'Standard_F*'
              }
              {
                field: 'Microsoft.Compute/virtualMachines/sku.name'
                like: 'Standard_G*'
              }
            ]
          }
        ]
      }
      then: {
        effect: 'deny'
      }
    }
  }
}

resource policyAssignment 'Microsoft.Authorization/policyAssignments@2024-05-01' = {
  name: policyAssignmentName
  properties: {
    policyDefinitionId: policyDefinition.id
  }
}
If it doesn't, either copy the example or adjust your template to match the example.
Deploy the template to Azure
In the Visual Studio Code terminal, deploy the template by using the following Azure CLI commands:
managementGroupId="SecretRND"
templateFile="main.bicep"
today=$(date +"%d-%b-%Y")
deploymentName="mg-scope-"$today

az deployment mg create \
  --management-group-id $managementGroupId \
  --name $deploymentName \
  --location westus \
  --template-file $templateFile
Deploy the template by using Azure PowerShell commands in the terminal.
$managementGroupId = 'SecretRND'
$templateFile = 'main.bicep'
$today = Get-Date -Format 'MM-dd-yyyy'
$deploymentName = "mg-scope-$today"

New-AzManagementGroupDeployment `
  -ManagementGroupId $managementGroupId `
  -Name $deploymentName `
  -Location westus `
  -TemplateFile $templateFile
Notice that, as with subscription deployments, you're explicitly specifying a name and location for the deployment metadata. And you're using today's date to reduce the chance of using an existing deployment's name.
The deployment might take a minute or two to complete, and then you'll see a successful deployment.
Verify the deployment
As with subscription-scoped deployments, you can view management group-scoped deployments in the Azure portal.
Go to the Azure portal.
On left pane, select All services.
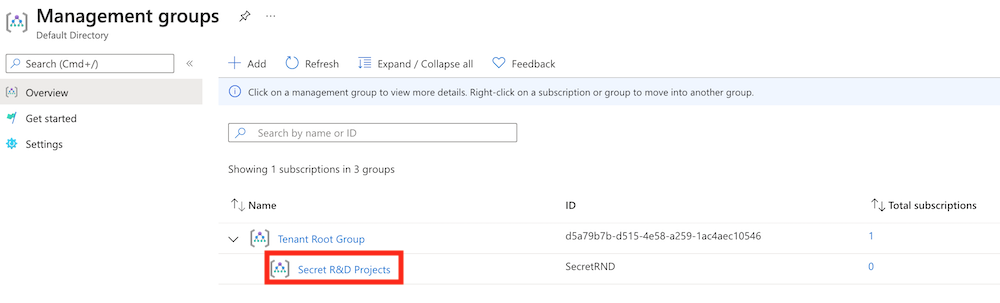
In the Search box, enter management group, then select Management groups in the results list.

Select the Secret R&D Projects management group.
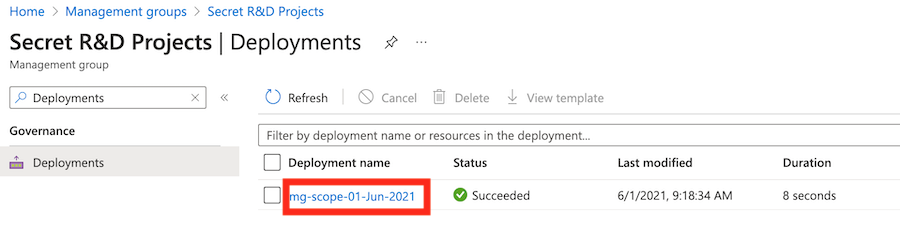
On the left pane, in the Search box, enter Deployments, then select Deployments under Governance.

Select the deployment beginning with mg-scope to see what resources were deployed.
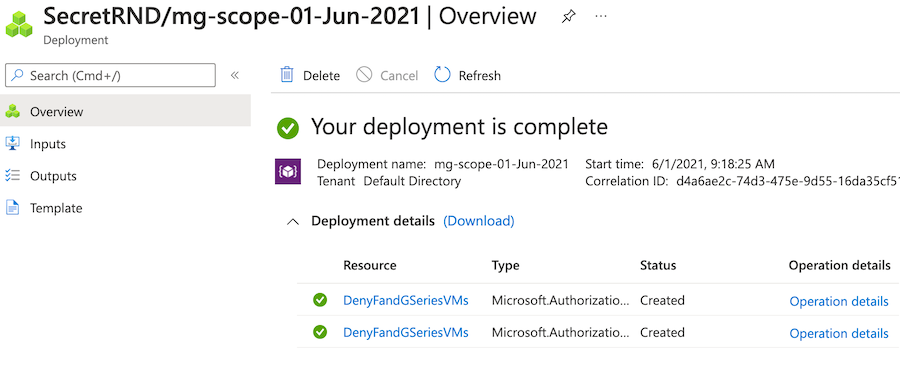
On the Overview pane for the selected deployment, select Deployment details to expand it. The two Azure Policy resources are listed.
Clean up the resources
You've successfully deployed your management group-scoped resources. You can remove the policy resources and management group that you've created.
az account management-group delete --name SecretRND
Remove-AzManagementGroup -GroupId SecretRND