Describe purchase orders, receipts, and returns
This unit explores the processes involved in creating purchase orders, managing receipts, and handling returns. You learn about key fields, workflow options, and how each step connects to procurement activities and vendor relationships.
Purchase order
A purchase order (PO) is a legal agreement with a vendor to buy goods or services. Use the PO document to keep track of product receipt status and the accounting of vendor invoices that the vendor bills toward the order.
Open the PO from the Procurement and sourcing > Purchase orders > All purchase orders page. The PO landing page lists all existing purchase orders.
A purchase order number is autogenerated and can be configured by using the number sequence framework available in finance and operations apps.
The vendor account and invoice account are usually the same. They might differ when an item is procured from a subsidiary company and the parent company sends the invoice.
The Purchase type field has three possible options:
- Purchase order: When you create a PO with Purchase type as Purchase order, you can confirm the purchase order and proceed with other purchase activities, like receipt and invoicing.
- Journal: Journal is a type of PO template. You can't process a journal for confirmation, receipt, or invoice. You can convert the journal to a purchase order from the Procurement and sourcing > Purchase orders > Purchase journal > Post purchase journal page.
- Returned order: You can use this option when you need to return a purchased item to the vendor. You can select the PO that you want to return and perform all inventory and finance-related steps from here.
When you create a PO, by default the value of the Approval status field is Approved if no workflow is associated to the PO.
Navigate to the General tab of the Procurement and sourcing > Setup > Procurement and sourcing parameters page. Under the Change management for purchase orders section, change the value of Activate change management to Yes. Notice that a new Workflow button is displayed in the action pane when you create a new PO. The value of the Approval status field changes to Draft.
When you submit the PO to the workflow, the status changes to In review. When the PO is approved by the workflow approver, the status changes to Approved.
The vendor associated with the PO might have vendor collaboration activated. In that case, the vendor can also review the PO before confirmation if the Collaboration activation field is set to Active (PO is not auto-confirmed) on the General FastTab of the All vendors page. The Approval status field changes to In external review. When the vendor confirms the PO, the Approval status field changes to Confirmed.
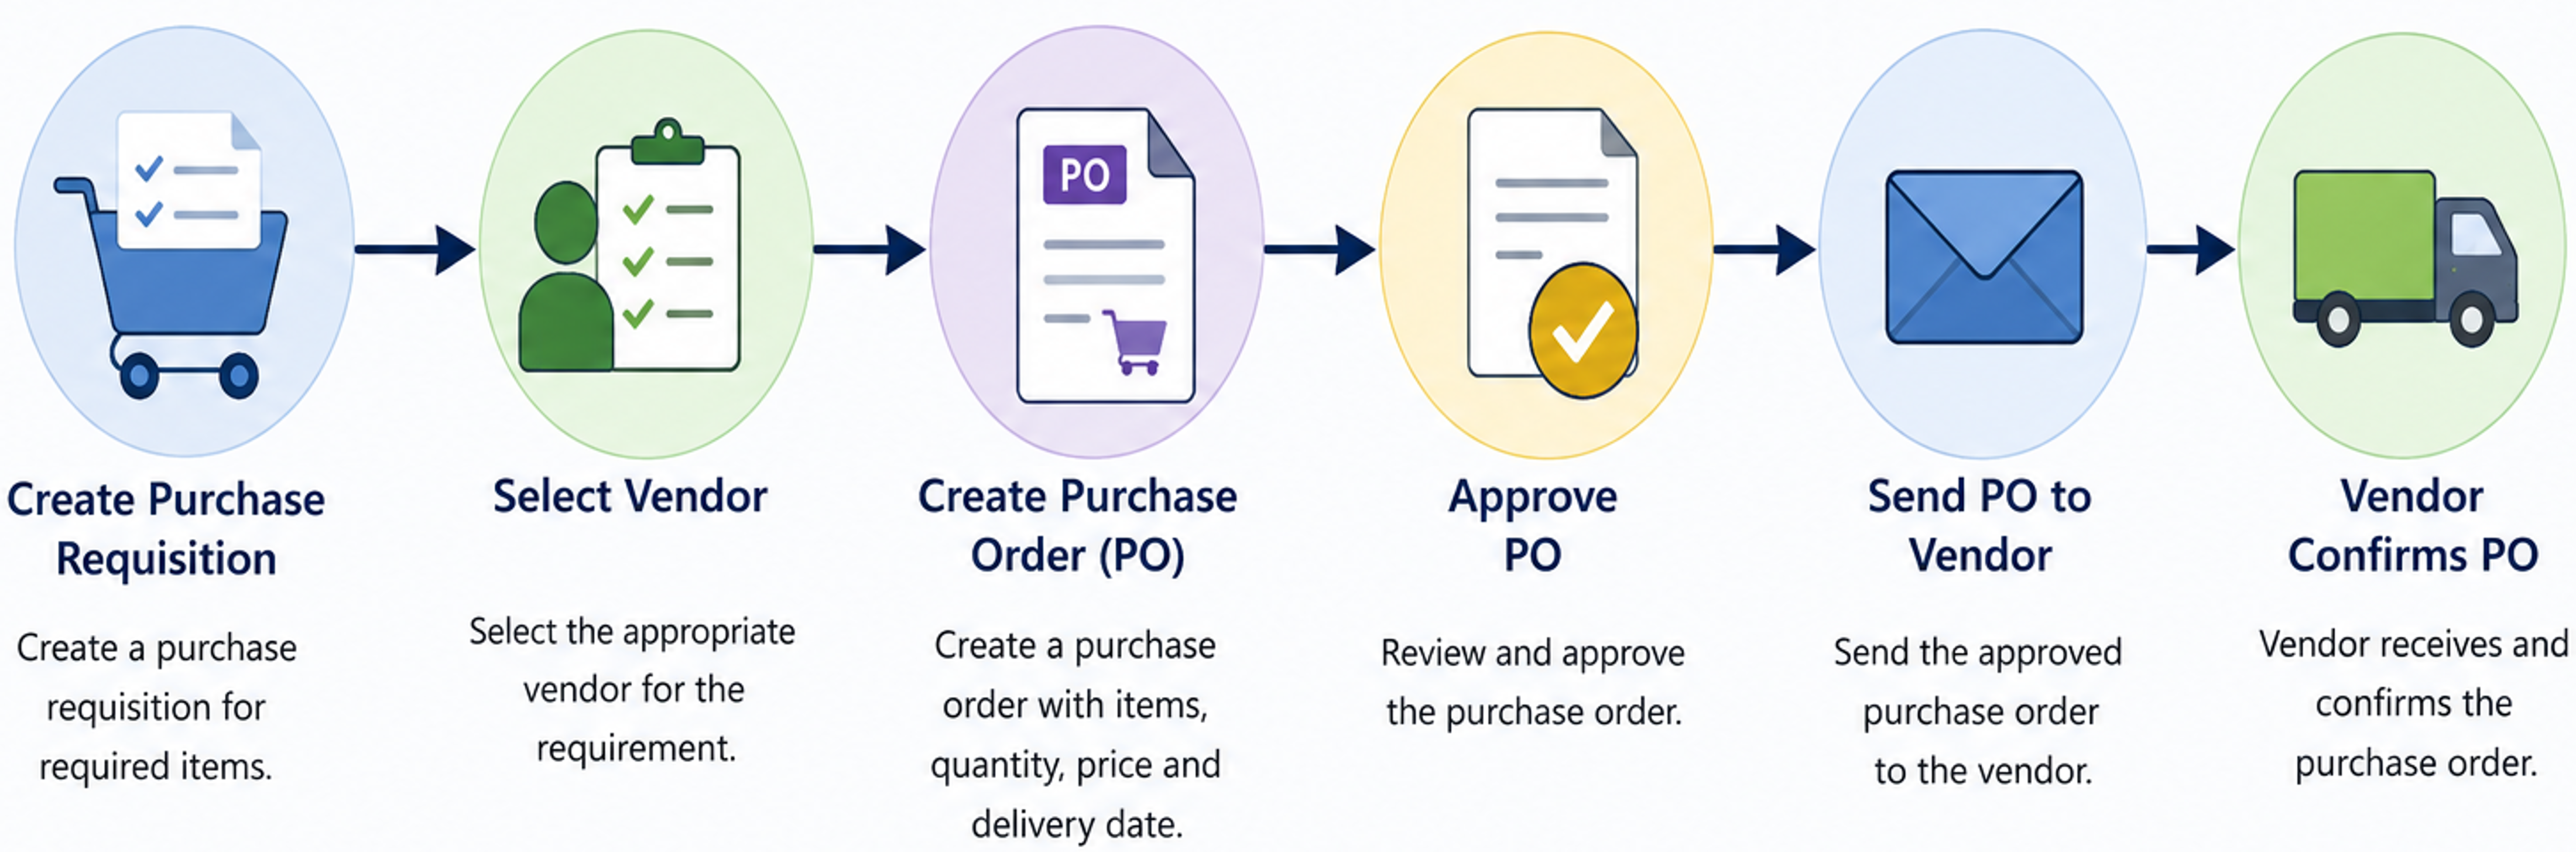
The Purchase order status field shows the stage of the purchase order. When you create and confirm the PO, the value is Open order. When the item is delivered, the field changes to Received. After posting the invoice, it changes to Invoiced. If you cancel the PO, it changes to Canceled.
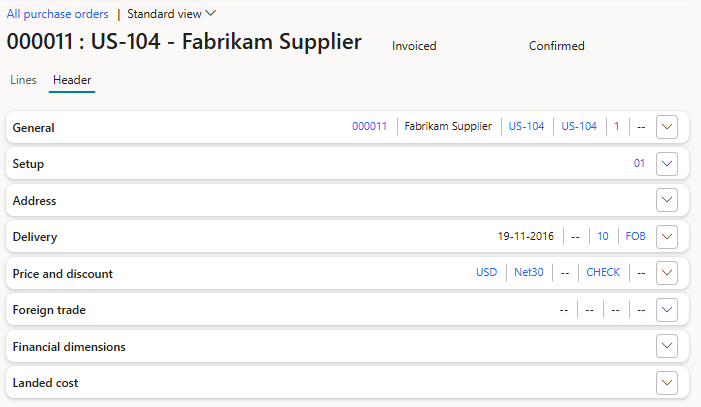
From the Purchase order list page, you can open the detail page of the purchase order, which contains a purchase order header and a line section.
The purchase header has several FastTabs.
- The General FastTab contains the purchase order number and vendor details.
- On the Setup FastTab, you define the ledger posting profile and tax-related information.
- The delivery address should be available on the Address FastTab.
- The Delivery FastTab contains information that includes receipt date, mode of delivery, delivery terms, and shipping carrier.
- The Price and discount FastTab holds information that includes currency, payment terms, method of payment, discount details, price groups, and charge groups.
- The Landed cost FastTab holds information that includes voyage status, port information, and shipping company.
For the purchase line, the following tabs capture line-specific information.
- The Setup tab contains the sales tax that is specific for items. You can also find inventory-related information that includes the lot ID and reservation process for individual items.
- If an individual item in the purchase order has a different delivery address, you can capture it on the Address tab.
- On the Product tab, you can capture the inventory dimensions.
- The Delivery tab provides information such as receipt dates, delivery details, and the over/under delivery tolerance individually for each line item.
- The Picking tab captures bar code details.
- The Price and discount tab includes prices and discounts.
- You can use the Fixed assets tab to convert a newly purchased item to a fixed asset.
- The Landed cost tab holds voyage, port, and shipping-related information for each item.
The action pane of the Purchase order page has several menus and buttons under them.
The Purchase menu contains important features such as confirmation, prepayment, charges, discounts, sales tax, supplementary items, and account distribution. On the Receive menu, you can initiate different processes, including the receipt list, product receipt, and quality order. From the Invoice menu, you can match and post the invoice.
The purchase line includes menu buttons for line-specific features. The Purchase order line button provides features such as delivery schedule, credit note, and bill of materials (BOM) lines. The Financials button provides account distribution, line-level charges, sales tax, and voyage cost. The Inventory button lets you process reservations, check on-hand stock, and trace by dimension. Use the Product and supply button for explosion and the Update line button for inventory registration.
When the PO is ready for processing, select the Confirm button in the Purchase action pane to confirm the PO for further processing.
The previously described process is the manual creation of a PO. However, you can also create a PO automatically:
- After approving a requisition, create a PO directly from it. On the purchase requisition page, select the Related information icon in the right pane. The PO created from the requisition appears under the Related documents section.
- Create the PO from Procurement and sourcing > Requests for quotations > All requests for quotations. When you accept a quotation, activate the Purchase order option for that vendor from the action pane by selecting Quotation > Replies > Manage replies.
- Create planned purchase orders from master planning. Create the purchase order by firming the planned purchase orders.
Purchase return
Purchased goods can be returned to the vendor for various reasons. Vendor returns impact inventory on-hand and costs.
To create a purchase return, complete the following steps:
- Navigate to Procurement and sourcing > Purchase orders > All purchase orders.
- Create a purchase order.
- Select Returned order in the Purchase type field.
- Enter the mandatory RMA number (return merchandise authorization) from the vendor.
You can return items to a vendor in two ways:
- In the purchase line, you can set a negative quantity and process the return order. This process doesn't reference the original purchase order being returned.
- To maintain the reference of the original purchase order, select the Credit note button on the Purchase tab in the action pane.
When you select Credit note, all purchase orders for the selected vendor are displayed with received items. Add selected items to the purchase return order lines, and record the quantity as negative.
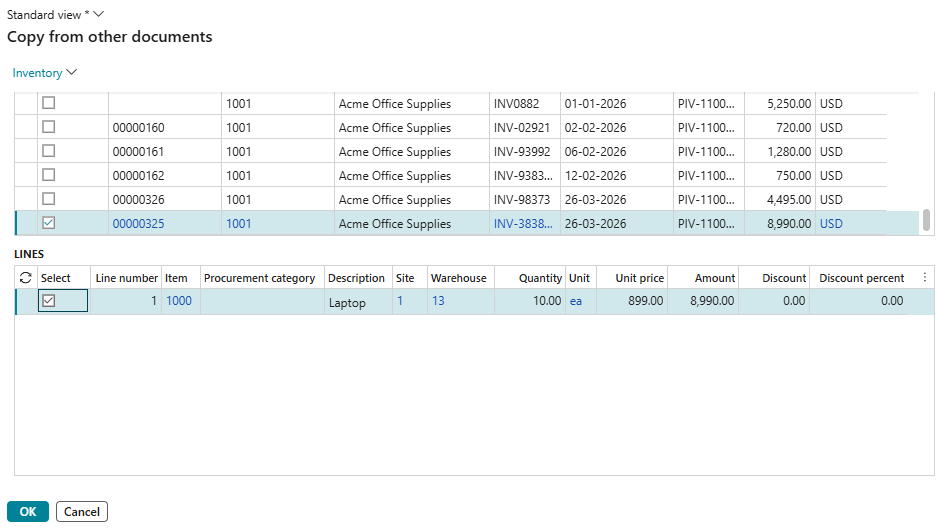
To process the return order, complete the following steps:
- Confirm the return order.
- In the order line, select Update line > Pick to pick items from the warehouse.
- On the Receive tab, select Purchase receipt to post the return shipment to the vendor.
- On the Invoice tab, select Invoice to generate the credit note.
The system posts the transaction as a negative vendor balance, reflecting accounts receivable for the organization.
Receipt list
The receipt list is a reference document for workers. If your organization doesn't have a warehouse management system, you can use the receipt list to compare physical incoming items. The receipt list doesn't impact stock. Use the document to cross-check the incoming vendor invoice.
To post the receipt list, complete the following steps:
- On the Purchase order page, open the Receive menu in the action pane.
- Under Generate, select Receipts list to open the Posting receipts list dialog.
- Optional: Select Pro-forma receipts list if you want to print without posting.
- On the Overview FastTab, select the document date to indicate the expected receipt date.
- On the Lines FastTab, enter the expected quantity in the Quantity field.
- Select OK to post the receipts list or pro-forma receipts list.
Purchase receipt
If you don't use warehouse management in your system, you can receive the item directly from the Purchase order page.
To post the product receipt, complete the following steps:
On the Purchase order page, open the Receive menu in the action pane.
Under Generate, select Product receipt to open the Posting product receipt dialog.
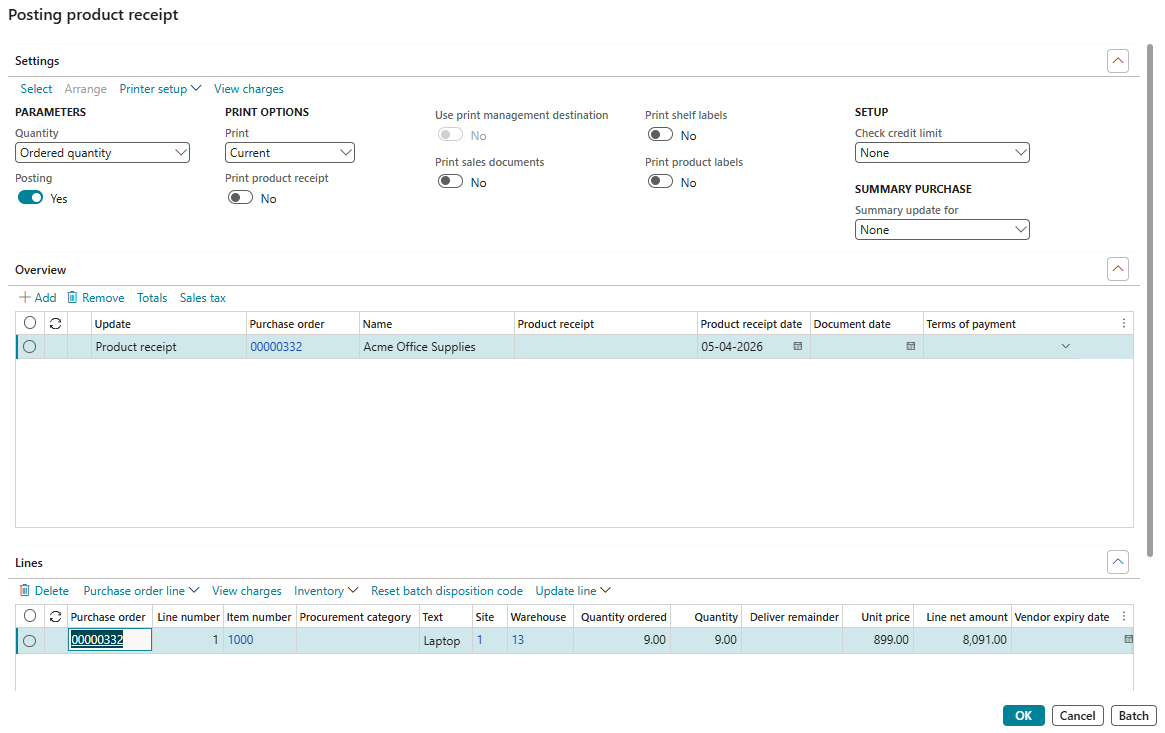
Enter the product receipt number and document date.
Update the quantity based on the physical quantity received from the vendor.
Optional: Clear the Posting checkbox to print a pro-forma product receipt.
Post the product receipt to increase stock.
To view entries, navigate to Purchase order > Receive > Journal > Product receipt, and then select View accounting on the Product receipt journal page.
To check the posting profile, navigate to the Inventory management > Setup > Posting > Posting page. On the Posting page, select the Purchase order tab.
Registration
Based on business requirements, you can introduce another step before the product receipt, which is registration. The supplier might share product information electronically through an advanced shipment notice (ASN) that can be recorded to your system. Alternatively, registration occurs at the inbound dock in the warehouse. It can be performed by using a hand-held device or through an arrival journal (discussed later in this unit). Alternatively, it can be done manually from the Purchase order page.
To register items from a purchase order line, complete the following steps:
- In the purchase line, select Update line > Registration.
- On the Registration page, review the order quantity on the Transactions FastTab.
- Select Add registration line to move the ordered quantity to the Registration line FastTab.
- In Register Now, enter the physical quantity to register.
- On the Registration lines FastTab, specify storage dimensions such as warehouse, location, or license plate.
- If required by the item's tracking dimensions, enter the batch number or serial number.
- Select Confirm registration.
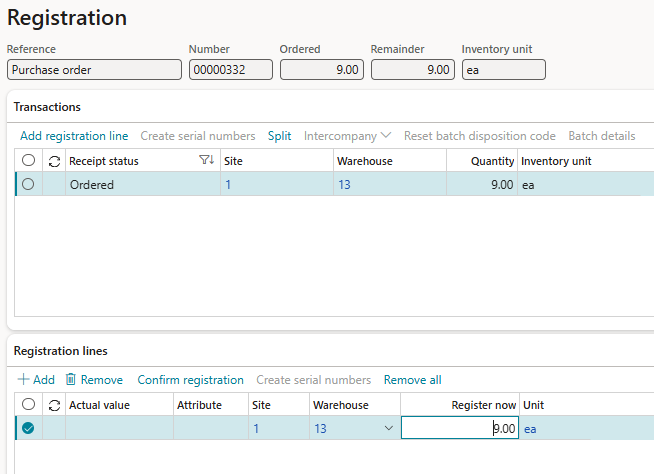
In the item model group, you can select the Registration requirement checkbox. This setting ensures that item registration is mandatory before the item is added to stock. If Registration requirement isn't selected, you can bypass this process.
Some products might go through quality inspection before they're put away to inventory. Either a quality order or quarantine order can perform this process. In such scenarios, generate a quality order as soon as you process registration. It's recommended to make the registration process mandatory for those items.
Arrival journal
Use an arrival journal to register the receipt of items from purchase orders without using the purchase order interface. Create an item arrival journal as part of arrival management from the Arrival overview page, or manually create a journal entry from the Item arrival page.
The Arrival overview page helps the warehouse manager and warehouse workers see an overview of expected work for an inbound process. Access the Arrival overview page from Inventory management > Inbound orders > Arrival overview. The page contains all inbound orders, including purchase orders and transfer orders.
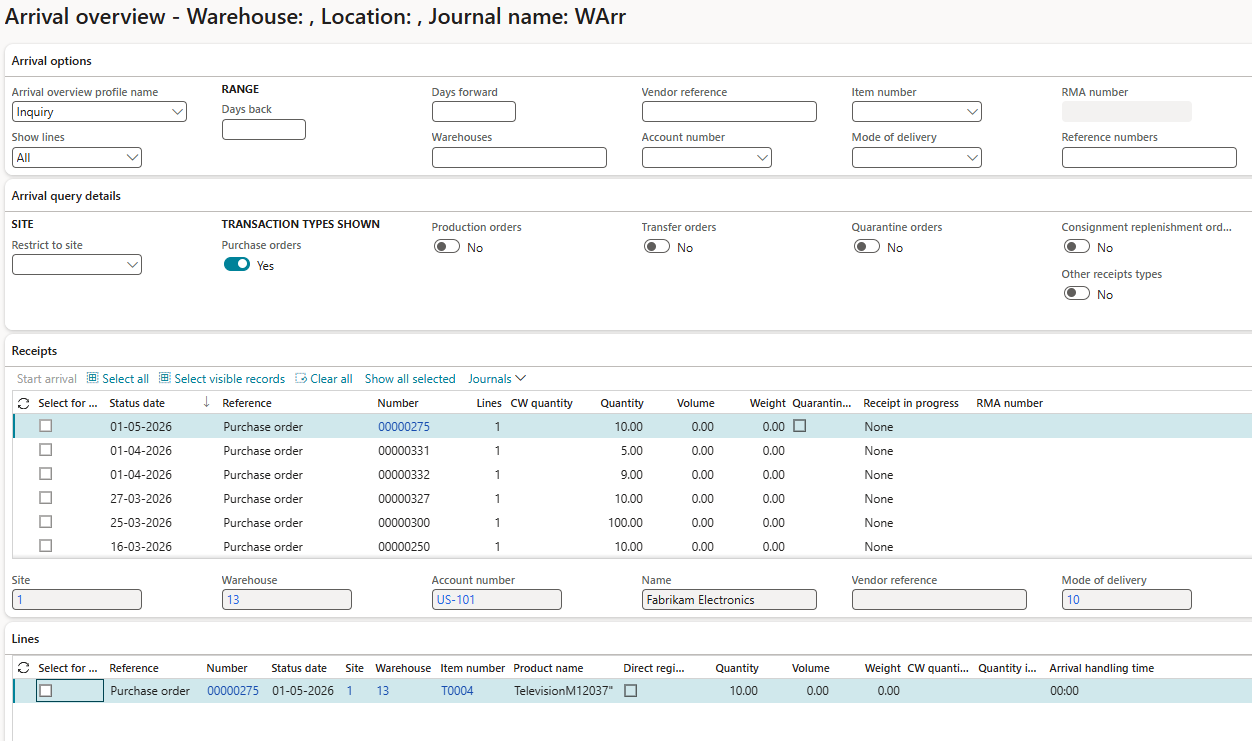
To use the arrival journal for a purchase order, complete the following steps:
- On the Arrival overview page, select the purchase order you want to register.
- Select Start arrival.
- Select Journal > Show arrival from receipts to open the Warehouse arrival journal.
- In the journal, specify the storage and tracking dimensions for inbound inventory.
- Post the journal to automatically register the purchase order.