Enable and configure Defender for Containers
Enabling Defender for Containers on a subscription activates protection for all Azure Kubernetes Service (AKS) clusters and Azure Container Register (ACR) registries in that subscription. The plan deploys lightweight components to your clusters through autoprovisioning—a process that starts automatically after you turn on the plan. Knowing what each component does and how to verify its deployment ensures you get the coverage the plan promises.
Required roles
You need the following roles to enable and configure Defender for Containers. Because these are privileged actions that affect subscription-wide security settings, use eligible assignment through Microsoft Entra Privileged Identity Management (PIM) rather than permanent assignment—except for Security Reader, which is a read-only operational role.
| Role | Scope | Task | Recommended assignment |
|---|---|---|---|
| Security Admin | Subscription | Enable the plan, configure components, dismiss alerts, modify drift policies | Eligible |
| Contributor | Subscription | Enable the plan via portal or CLI as an alternative to Security Admin | Eligible |
| Owner or User Access Administrator | Subscription | Required for initial autoprovisioning—Defender for Cloud creates service principals and assigns roles on your behalf | Eligible |
| Security Reader | Subscription | View vulnerability findings, posture recommendations, and drift policies | Permanent |
Note
Autoprovisioning creates service principals that are assigned Kubernetes Extension Contributor, Contributor, Azure Kubernetes Service Contributor, and Log Analytics Contributor at subscription scope. The user enabling the plan must hold Owner or User Access Administrator for Defender for Cloud to complete these role assignments successfully.
Enable the Defender for Containers plan
To enable Defender for Containers from the Azure portal:
- Sign in to the Azure portal.
- Go to Microsoft Defender for Cloud.
- In the left menu, select Environment settings.
- Select the subscription where your AKS clusters are located.
- On the Defender plans page, find the Containers row and toggle the status to On.
- Select Save.
After you save the change, Defender for Cloud begins deploying components to your AKS clusters.
Configure plan components
After you enable the plan, review and configure the individual components. To access component settings:
In the Containers row on the Defender plans page, select Settings.
The Settings pane lists all available components with their current state.
The following components are enabled by default when you turn on the plan:
Component Purpose Defender sensor Deployed on each AKS node as a DaemonSet. Collects runtime data required for threat protection and binary drift detection. Two optional subsettings are available within this component: Enable Defender Security Gating (adds an admission control layer that evaluates deployments against security policies before workloads run in the cluster) and Enable Defender Runtime Anti Malware (enables runtime malware detection for Kubernetes hosts and containers, with optional real-time blocking of malicious file execution—requires Helm-based sensor deployment). Azure Policy Deployed as an AKS add-on. Provides Kubernetes data plane hardening through admission control enforcement. Agentless scanning for machines Periodically snapshots node VM disks for out-of-band OS and file system vulnerability analysis. No agents or network connectivity required. Kubernetes API access Required for agentless container posture management, runtime vulnerability assessment, and response actions. Registry access Enables agentless vulnerability assessment for images stored in ACR. 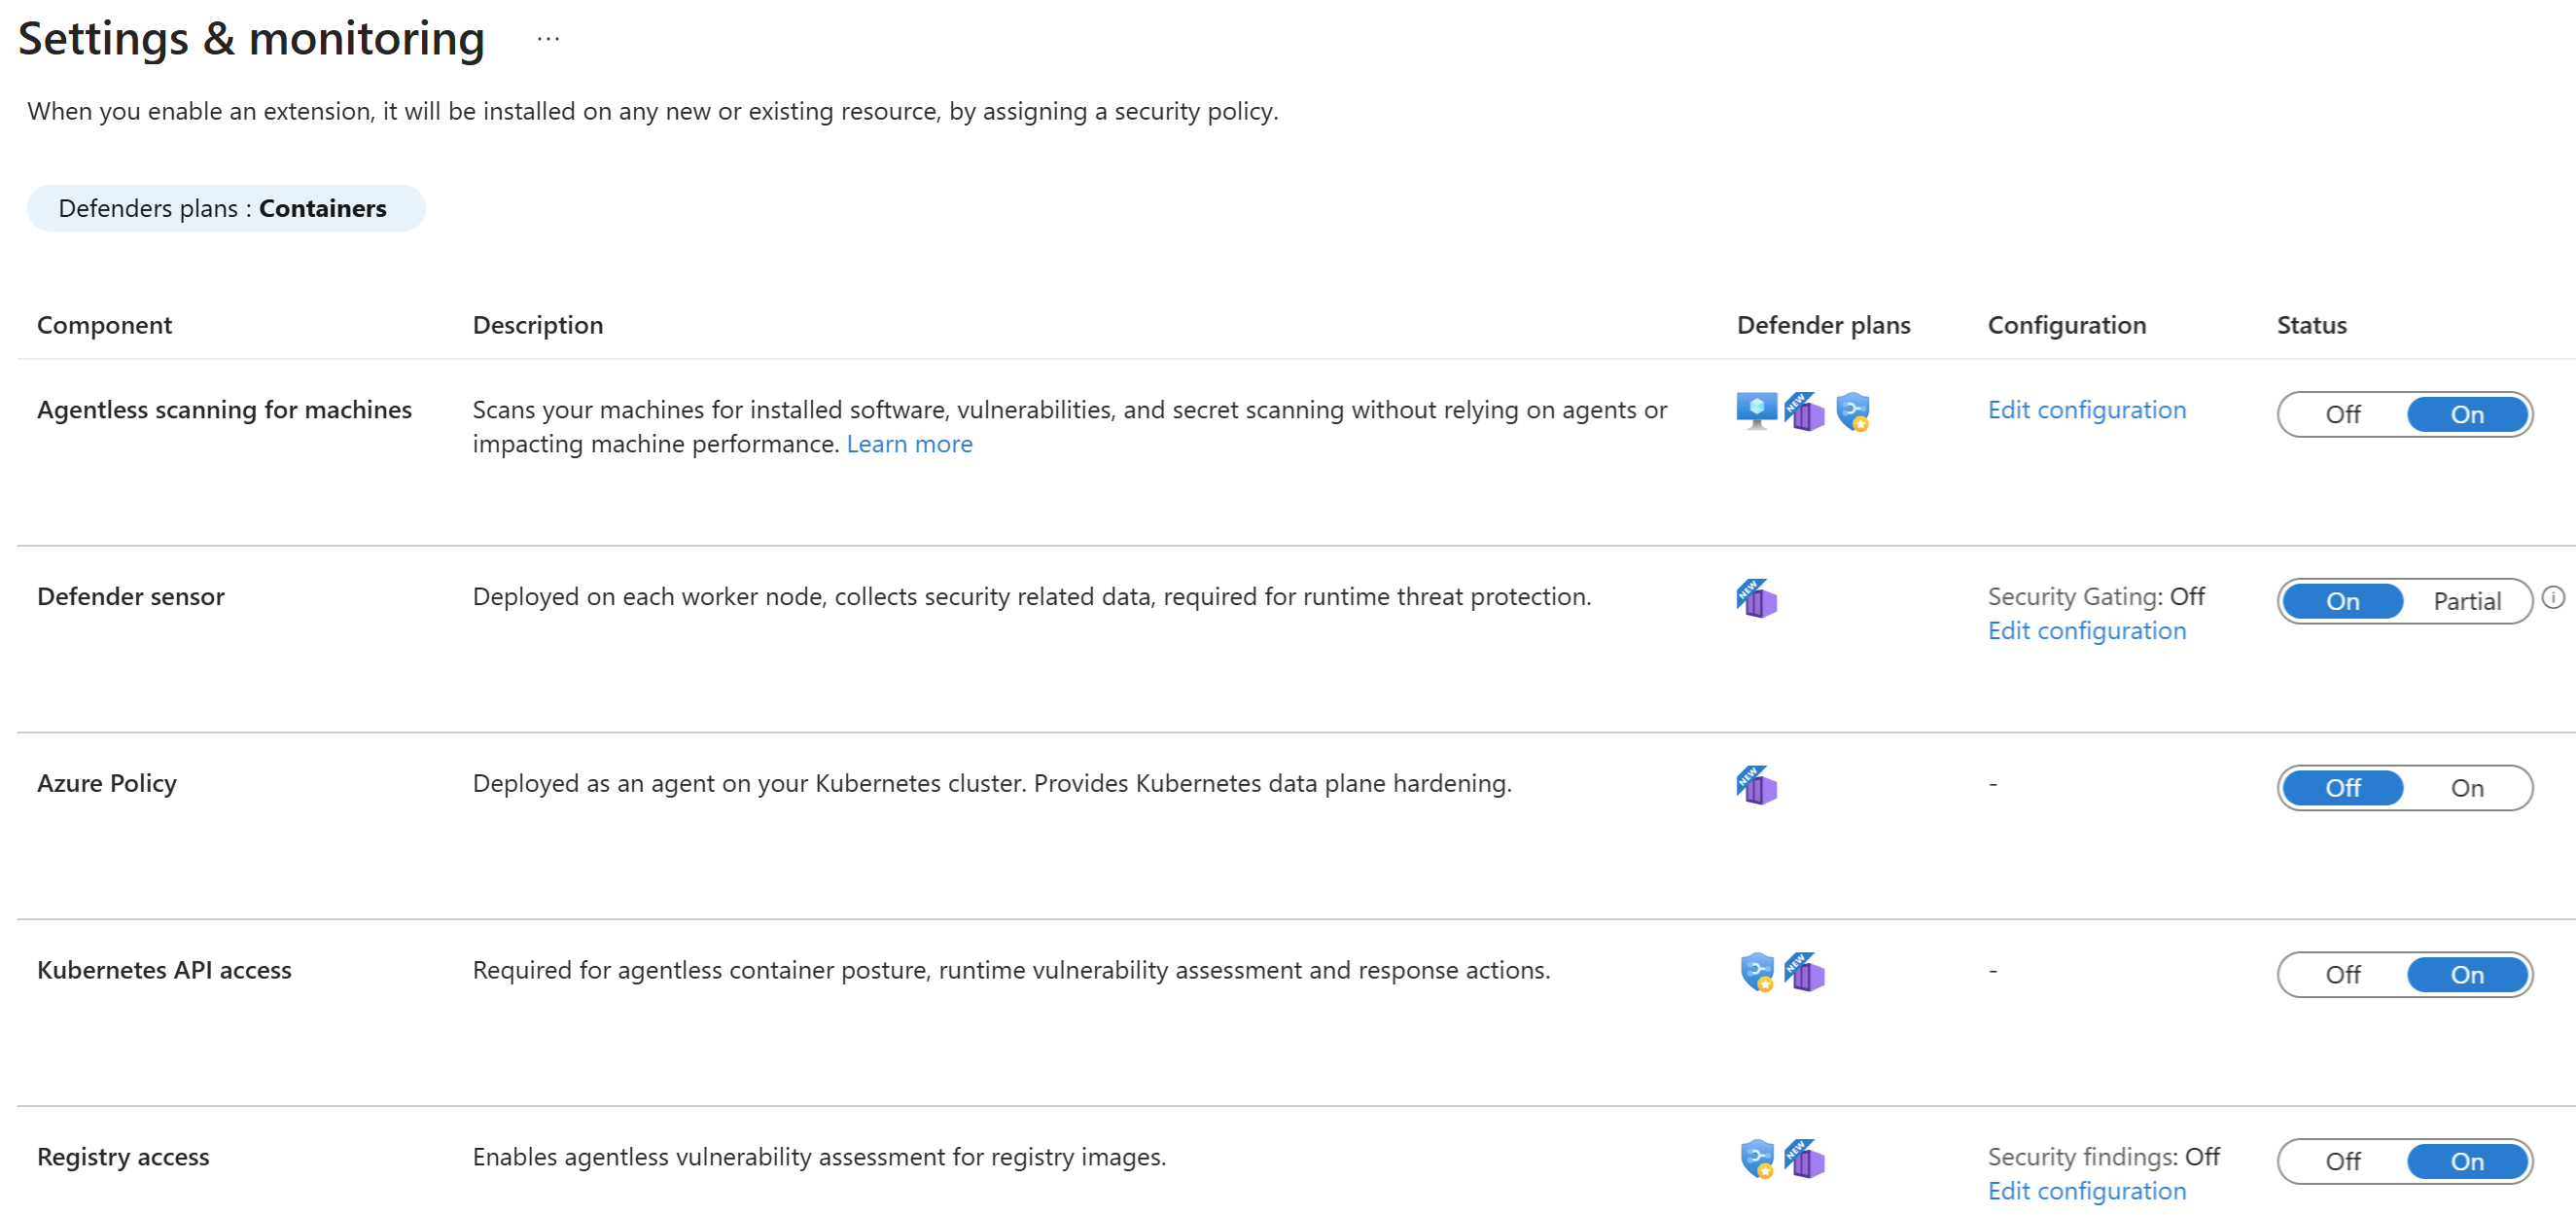
Select Continue.
Review the monitoring coverage page to see what resources are protected.
Select Continue again.
Review the configuration summary, then select Save.
Tip
Keep all components enabled. Disabling any component removes the specific capability it provides without affecting others.
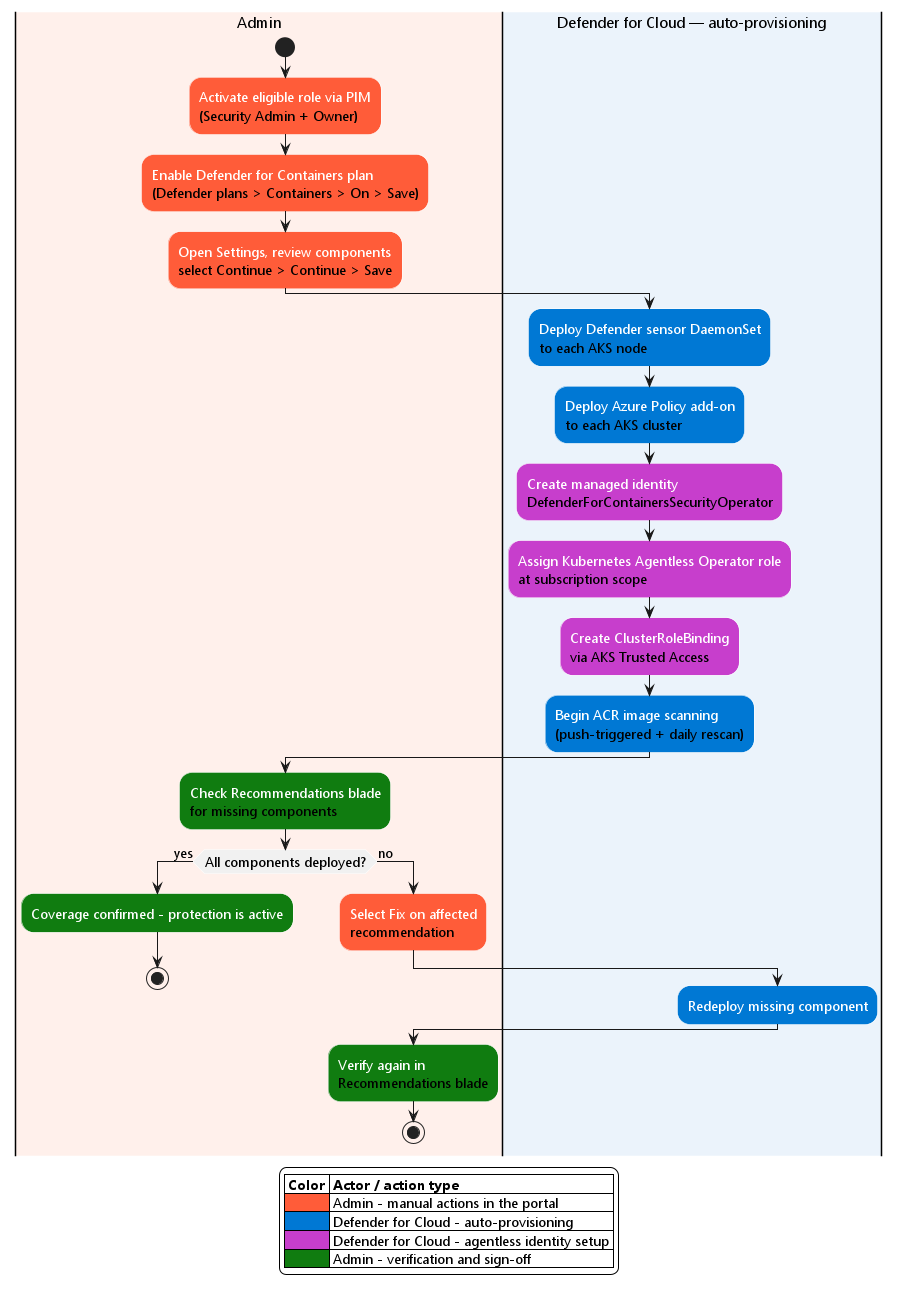
The following diagram shows which steps you perform and which steps Defender for Cloud handles automatically—including the agentless identity setup that runs when Kubernetes API access is enabled.
Configure agentless discovery for Kubernetes
Agentless discovery provides configuration visibility into your AKS clusters without deploying any agents inside the cluster. When you enable the Defender for Containers plan with Kubernetes API access turned on, Defender for Cloud automatically performs the following setup:
- Creates a managed identity in your tenant named
CloudPosture/securityOperator/DefenderForContainersSecurityOperator. - Assigns the Kubernetes Agentless Operator built-in role to that identity at subscription scope.
- Uses AKS Trusted Access to create a
ClusterRoleBindingbetween the identity and theaks:trustedaccessrole:defender-containers:microsoft-defender-operatorClusterRole inside each AKS cluster.
This setup gives Defender for Cloud read access to cluster configuration data through the AKS API server, without requiring network access into the cluster.
Verify deployment coverage
After you enable the plan and its components, verify that the Defender sensor and Azure Policy add-on are deployed to your AKS clusters.
- In Defender for Cloud, select Recommendations in the left menu.
- Filter recommendations by Resource type and select Kubernetes services.
- Look for the following recommendations:
- Azure Kubernetes Service clusters should have Defender profile enabled - identifies clusters that are missing the Defender sensor.
- Azure Policy for Kubernetes should be installed and enabled on your clusters - identifies clusters missing the Azure Policy add-on.
Clusters that appear under either recommendation haven't yet received the corresponding component. Select a recommendation, choose the affected clusters, and select Fix to trigger deployment.
Note
After the Defender sensor is enabled on an AKS cluster, the cluster undergoes a brief reconciliation process. This is expected behavior as AKS integrates the Security profile. The cluster remains operational throughout.
For Contoso Retail's Cloud Security Engineering team, enabling the plan through the portal and verifying sensor deployment through the Recommendations screen provides immediate coverage across all existing AKS clusters and ACR registries—closing the first detection gap identified in the security review.