Exercise - Connect using SSH through Visual Studio Code
Now that you have a remote host configured, you need to connect to it from Visual Studio Code. To connect to the remote machine, you need the Remote – SSH extension.
In this exercise, you'll install the Visual Studio Code Remote – SSH extension and connect to the SSH host.
Install a supported SSH client
Your local machine must have a supported SSH client to enable SSH connections to the remote machine.
- Install a supported SSH client for your local operating system.
Install the Remote – SSH extension
The Visual Studio Code Remote – SSH extension must be installed to connect to your SSH server from within Visual Studio Code.
Open Visual Studio Code.
Select the Extensions icon in the Activity Bar to open the Extensions view.

Type remote ssh in the Search Extensions in Marketplace bar.
Locate the Remote – SSH extension and select the Install button.
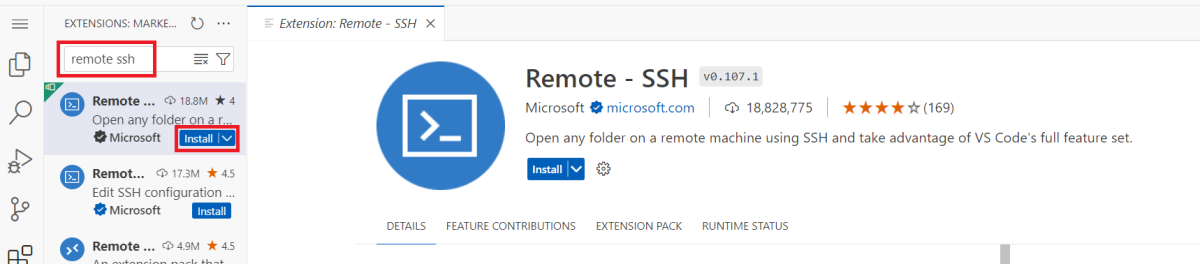
Once the Remote - SSH extension installs, you'll have access to the commands that it adds to Visual Studio Code.
Set up new SSH host
Now, you can use the Remote - SSH commands in Visual Studio Code to set up your SSH host configuration.
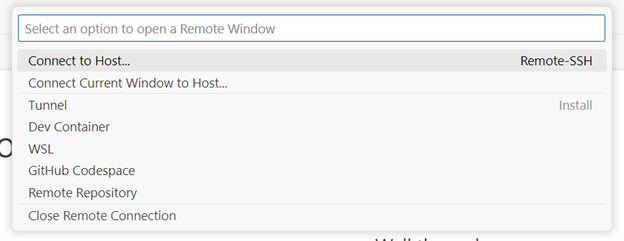
In the Command Palette (View > Command Palette), type and select Remote-SSH: Connect to Host.

Select Add New SSH Host. You'll be prompted to enter connection information for your VM. You need to specify to use the .pem file that contains the VM's private key. The command takes the following format:
ssh user@hostname -i filepath- The
useris the username you set when adding the SSH public key to your VM. If you kept the defaults, this value should be azureuser. - The
hostnameis the public IP address of the VM that you copied in the last step of the previous exercise. - The
filepathis the file path of the.pemfile that was downloaded in the previous exercise.

- The
Press Enter to update the default SSH configuration file. This action adds a host to the configuration file.
Connect to VM
Now that the host is configured, you can connect to the remote machine.
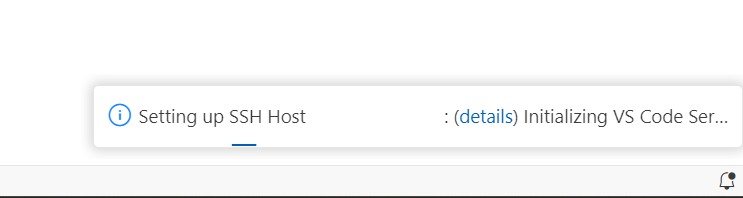
Run the Remote-SSH: Connect to Host command again. You can now see your newly added host listed by its IP address. Select the host.
Once you select the host, Visual Studio Code will now open a new window. You'll see a notification that the "Visual Studio Code Server" is initializing on the SSH Host.
You might be prompted to select the platform of the host. Select Linux.
If prompted to trust the connection, select yes or Continue.
Once complete, you know that you're connected by viewing the remote indicator in the bottom left of the Status Bar in the editor.
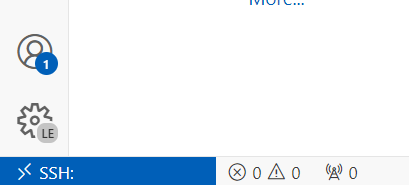
- You can also select the remote indicator as a quick entry into top commands.
- You can also select the remote indicator as a quick entry into top commands.
Once you're connected to your SSH host, you can interact with files and open folders on the remote machine. If you open the integrated terminal, you'll see you're working inside a bash shell, even though your local machine might not be Linux-based.
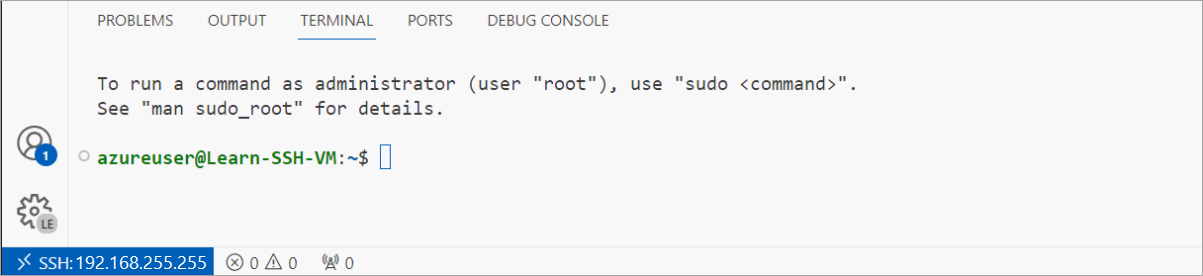
You successfully connected to the VM! Other than providing the host and connection information, Visual Studio Code takes care of the rest of the connection process, so you don't need to memorize any commands or worry about other configuration.
In the next section, you'll learn how to run and debug code while connected using SSH in Visual Studio Code.