Examine webhooks
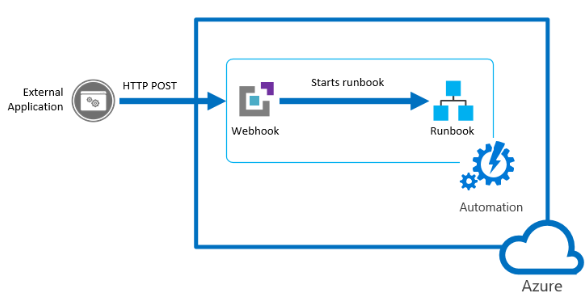
You can automate starting a runbook either by scheduling it or by using a webhook.
A webhook allows you to start a particular runbook in Azure Automation through a single HTTPS request.
It allows external services such as Azure DevOps, GitHub, or custom applications to start runbooks without implementing more complex solutions using the Azure Automation API.
More information about webhooks is available at Starting an Azure Automation runbook with a webhook.
Create a webhook
You create a webhook linked to a runbook using the following steps:
- In the Azure portal, open the runbook that you want to create the webhook.
- In the runbook pane, under Resources, select Webhooks, and then choose Add webhook.
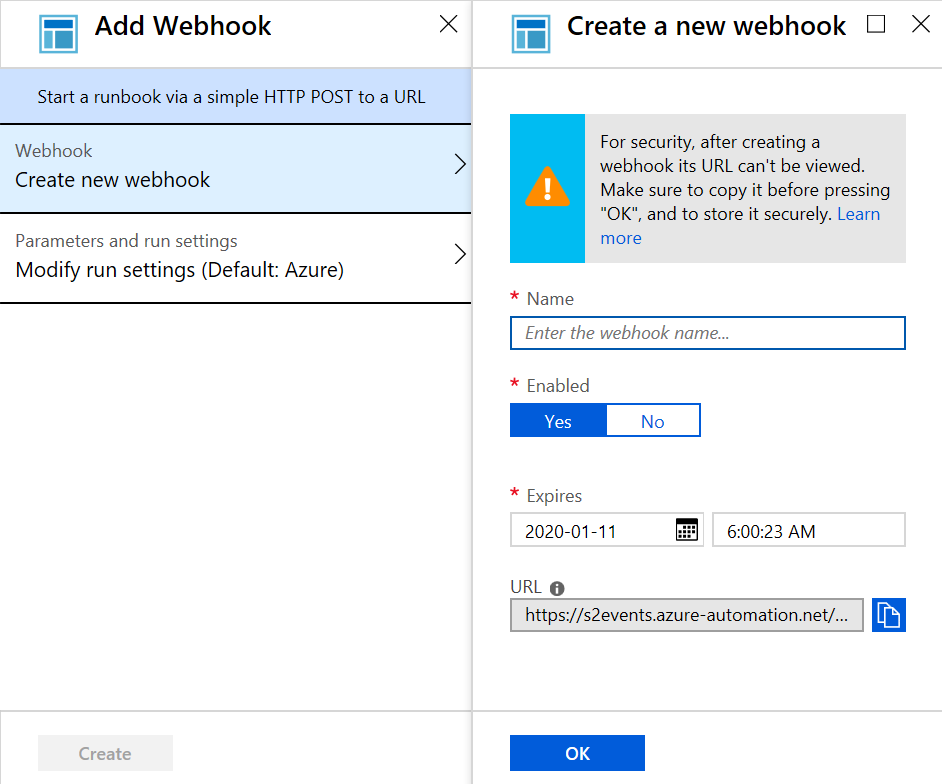
- Select Create new webhook.
- In the Create new webhook dialog, there are several values you need to configure. After you configure them, select Create:
- Name. Specify any name you want for a webhook because the name isn't exposed to the client. It's only used for you to identify the runbook in Azure Automation.
- Enabled. A webhook is enabled by default when it's created. If you set it to Disabled, then no client can use it.
- Expires. Each webhook has an expiration date, at which time it can no longer be used. You can continue to modify the date after creating the webhook providing the webhook isn't expired.
- URL. The webhook URL is the unique address that a client calls with an HTTP POST to start the runbook linked to the webhook. It's automatically generated when you create the webhook, and you can't specify a custom URL. The URL contains a security token that allows the runbook to be invoked by a third-party system with no further authentication. For this reason, treat it like a password. You can only view the URL in the Azure portal for security reasons when the webhook is created. Make a note of the URL in a secure location for future use.
Note
When creating it, make sure you copy the webhook URL and then store it in a safe place. After you create the webhook, you can't retrieve the URL again.
Select the Parameters run settings (Default: Azure) option. This option has the following characteristics, which allows you to complete the following actions:
- If the runbook has mandatory parameters, you'll need to provide these required parameters during creation. You aren't able to create the webhook unless values are provided.
- If there are no mandatory parameters in the runbook, there's no configuration required here.
- The webhook must include values for any mandatory parameters of the runbook and include values for optional parameters.
- When a client starts a runbook using a webhook, it can't override the parameter values defined.
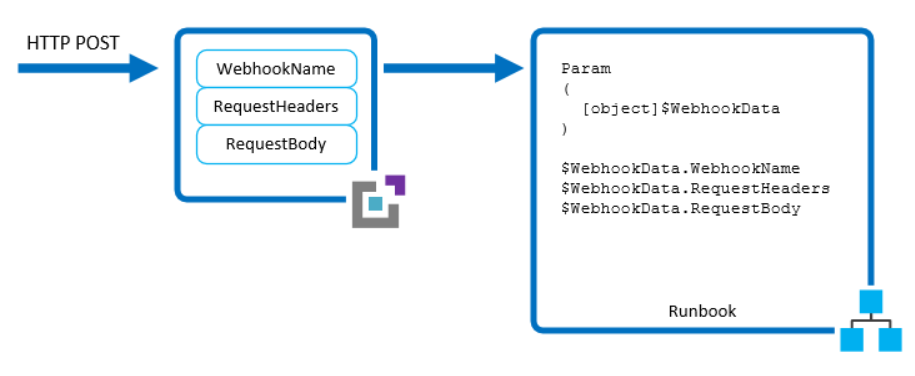
- To receive data from the client, the runbook can accept a single parameter called $WebhookData of type
[object]that contains data that the client includes in the POST request. - There's no required webhook configuration to support the $WebhookData parameter.
When finished, select Create.
Using a webhook
To use a webhook after it has been created, your client application must issue an HTTP POST with the URL for the webhook.
The syntax of the webhook is in the following format:
http://< Webhook Server >/token?=< Token Value >The client receives one of the following return codes from the POST request.
Code Test Description 202 Accepted The request was accepted, and the runbook was successfully queued. 400 Bad request The request wasn't accepted because the runbook has expired, been disabled, or the token in the URL is invalid. 404 Not found The request wasn't accepted because the webhook, runbook, or account wasn't found. 500 Internal Server Error If successful, the webhook response contains the job ID in JSON format as follows:
{"JobIds":["< JobId >"]}The response will contain a single job ID, but the JSON format allows for potential future enhancements.
You can't determine when the runbook job completes or determine its completion status from the webhook. You can only choose this information using the job ID with another method such as PowerShell or the Azure Automation API.
More details are available on the Starting an Azure Automation runbook with a webhook page.