Exercise: Create Azure Cosmos DB resources by using the Azure portal
In this exercise you learn how to perform the following actions in the Azure portal:
- Create an Azure Cosmos DB account
- Add a database and a container
- Add data to your database
- Clean up resources
Prerequisites
- An Azure account with an active subscription. If you don't already have one, you can sign up for a free trial at https://azure.com/free.
Create an Azure Cosmos DB account
Sign-in to the Azure portal.
From the Azure portal navigation pane, select + Create a resource.
Search for Azure Cosmos DB, then select Create/Azure Cosmos DB to get started.
On the Which API best suits your workload? page, select Create in the Azure Cosmos DB for NoSQL box.
In the Create Azure Cosmos DB Account - Azure Cosmos DB for NoSQL page, enter the basic settings for the new Azure Cosmos DB account.
- Subscription: Select the subscription you want to use.
- Resource Group: Select Create new, then enter az204-cosmos-rg.
- Account Name: Enter a unique name to identify your Azure Cosmos account. The name can only contain lowercase letters, numbers, and the hyphen (-) character. It must be between 3-31 characters in length.
- Availability Zones: Select Disable.
- Location: Use the location that is closest to your users to give them the fastest access to the data.
- Capacity mode: Select Serverless.
Select Review + create.
Review the account settings, and then select Create. It takes a few minutes to create the account. Wait for the portal page to display Your deployment is complete.
Select Go to resource to go to the Azure Cosmos DB account page.
Add a database and a container
You can use the Data Explorer in the Azure portal to create a database and container.
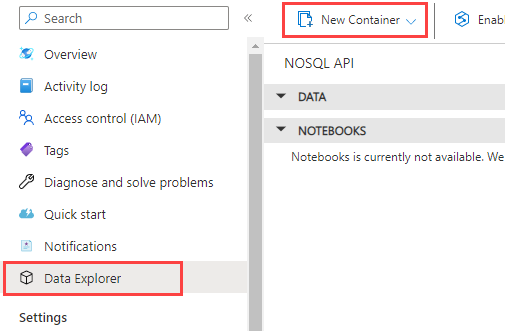
Select Data Explorer from the left navigation on your Azure Cosmos DB account page, and then select New Container.
In the New container pane, enter the settings for the new container.
- Database ID: Select Create new, and enter ToDoList.
- Container ID: Enter Items
- Partition key: Enter /category. The samples in this demo use /category as the partition key.
Select OK. The Data Explorer displays the new database and the container that you created.
Add data to your database
Add data to your new database using Data Explorer.
In Data Explorer, expand the ToDoList database, and expand the Items container. Next, select Items, and then select New Item.
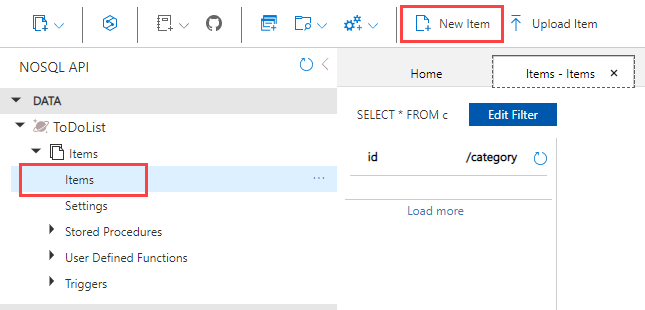
Add the following structure to the item on the right side of the Items pane:
{
    "id": "1",
    "category": "personal",
    "name": "groceries",
    "description": "Pick up apples and strawberries.",
    "isComplete": false
}
Select Save.
Select New Item again, and create and save another item with a unique
id, and any other properties and values you want. Your items can have any structure, because Azure Cosmos DB doesn't impose any schema on your data.
Clean up resources
Select Overview from the left navigation on your Azure Cosmos DB account page.
Select the az204-cosmos-rg resource group link in the Essentials group.
Select Delete resource group and follow the directions to delete the resource group and all of the resources it contains.