Implement the workflow framework
A workflow is a system or business process that defines how a document flows through a system by showing who must complete a task, make a decision, or approve a document. You can configure workflows in the applicable system or create them in a development environment.
In this unit, you learn how to create a flow and its elements from a development environment. Workflow elements include:
- Workflow categories
- Workflow approvals
- Workflow manual and automated tasks
- Workflow types
- Flow-control elements
- Providers
Create required elements for a new workflow type
In Microsoft Visual Studio, you use a wizard to create a workflow type and subsequent workflow configurations. First, you must create several elements for which the workflow type wizard prompts you, including:
- Workflow category - Specifies the workflow’s module.
- Query - Queries the document table.
- Document menu item - Points to a form, which means that you must have a table and form already created.
To create the workflow category, query, and document menu item, follow these steps:
In Solution Explorer, specify a project for the workflow development by right-clicking the solution to open the context menu and then selecting Add > New project.
Enter MyWorkflow as the name for the project.
Note
You should have previously created a solution for use in this step.
On the properties for the project, select True for Synchronize Database because you're adding a new table to the project.
Right-click the project to open the context menu, and then select Add > New Item.
Go to Dynamics 365 Items > Business Process and Workflow.
Select workflow category, and then enter MyWorkflowCategory in the Name field.
Open the created workflow category in Visual Studio Designer, and then in Properties, set the module to Inventory and enter My workflow category for the label.
Create a base enumerator to manage the workflow’s status by right-clicking the project to open the context menu and then selecting Add > New Item.
Select Data Types and then select Base Enum.
In the Name field, enter MyWorkflowStatus and then select Add. Right-click the new base enumerator to open the context menu and then select New Element.
Add the following seven new elements to the Base Enum (we recommend that you set the name and label):
- Submit
- Started
- Canceled
- Complete
- Denied (for approval workflow)
- Change requested (for approval workflow)
- Returned (for approval workflow)
Create a table that includes the workflow status by right-clicking the project to open the context menu, selecting Add > Table, and then entering MyWorkflowTable as the name.
Add the following extended data types to the Field node:
- Num
- Description
- MyWorkflowStatus (the newly created base enum for statuses) - Change the Allow Edit property to No.
Select Save.
Right-click the project to open the context menu, select Add > Form, and then enter the name MyWorkflowTableForm. The created form is now in Visual Studio Designer.
Drag your workflow table (MyWorkflowTable) into the Data Sources node on the form.
Right-click the form in the design area to open the context menu, and then select Apply Pattern > Custom.
Right-click the form in the design area to open the context menu, and then select New > Action Pane.
Right click the form in the design area to open the context menu, and then select New > Grid.
Open the Data Sources node, select your data source (MyWorkflowTable), and then select Fields. Select and drag the Num, Description, and MyWorkflowStatus fields from the Fields node into the grid in the design area. Select Save.
Right-click the project to open the context menu, and then select Add > New Item. Go to the user interface and select Display Menu Item.
Enter a name, such as MyWorkflowTableForm. You use this display menu item for the Workflow type and to add the form to a menu.
On the properties for the new Display Menu Item, select an Object of MyWorkflowTableForm.
Enter a label for the menu item, such as My workflow, and then select Save.
In Application Explorer, search for the InventoryManagement menu under User Interface, and then right-click the menu and select Create Extension. (Your solution should reference ApplicationSuite.) The system creates a menu extension in your project.
Right-click the menu extension in Solution Explorer, and then select Open. The menu extension opens in Designer.
Go to the InquiriesAndReports node. Select and drag the display menu item from the project to the InquiriesAndReports node in the menu extension. Select Save.
Right-click the project to open the context menu, and then select Add > New Item. Go to Data Model and select Query. Enter the name MyWorkflowTableQuery.
Select and drag the table (MyWorkflowTable) from the project into the Data Source node on the query.
In the properties for the MyWorkflowTable data source, in the Dynamic Fields property, select Yes and then select Save.
You’ve now created all required elements for creating a workflow type.
Create a workflow type
After creating all required elements for creating a workflow type, you can create a workflow type.
Right-click the project to open the context menu, and then select Add > New Item. Go to Business Process and Workflow.
Select Workflow Type, and then enter the name MyWorkflowType. The Workflow Type wizard opens.
Enter your newly created workflow category, query, and display menu items in the fields of the same names, and then select Next:
Category - MyWorkflowCategory
Query - MyWorkflowTableQuery
Document menu item - MyWorkflowTableForm

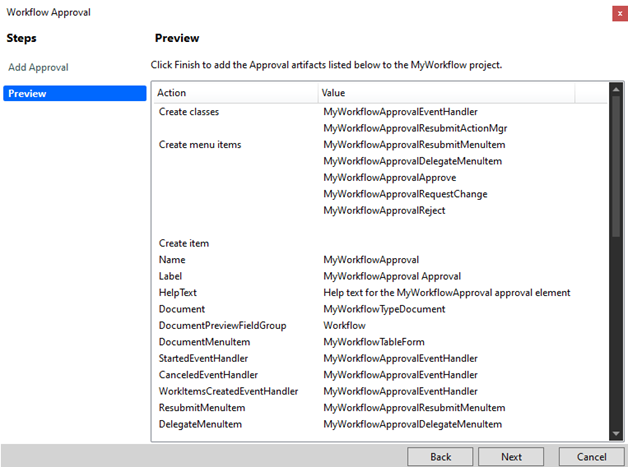
The Preview window lists the workflow type artifacts (classes and menu items). Select Next to create the workflow type and artifacts. The Add New Items window opens again, and you can close it by selecting Cancel. Several new elements should now be added to your project.
Open the two new Action Menu items and change the following labels:
- CancelMenuItem - Change the label to Cancel.
- SubmitMenuItem - Change the label to Submit.
Select Save All.
Open the SubmitManager class (MyWorkflowSubmitManager), and then replace the existing code with the following code. A dialog opens when you run the code. When you close the dialog, the new table’s status should change to Submit.
 /// <summary>
 /// The MyWorkflowTypeSubmitManager menu item action event handler.
 /// </summary>
 public class MyWorkflowTypeSubmitManager
 {
     public static void main(Args args)
 	{
 		//  TODO:  Write code to execute once a work item is submitted.

         MyWorkflowTable         myWorkflowTable;

         WorkflowComment         note = "";
         WorkflowSubmitDialog    workflowSubmitDialog;
         WorkflowCorrelationId   workflowCorrelationId;
         WorkflowTypeName        workflowTypeName = workFlowTypeStr('MyWorkflowType');

         // Use WorkflowSubmitDialog to create a dialog.

         workflowSubmitDialog =    WorkflowSubmitDialog::construct(args.caller().getActiveWorkflowConfiguration());
         workflowSubmitDialog.run();

         if (workflowSubmitDialog.parmIsClosedOK())
         {
             myWorkflowTable = args.record();

             note = workflowSubmitDialog.parmWorkflowComment();

             try
             {
                 ttsbegin;

                 workflowCorrelationId = Workflow::activateFromWorkflowType(workflowTypeName, myWorkflowTable.RecId, note, NoYes::No);

                 myWorkflowTable.MyWorkflowStatus = MyWorkflowStatus::Submit;
                 myWorkflowTable.update();

                 ttscommit;

                 info("Workflow submitted.");
             }

             catch (Exception::Error)
             {
                 error("Workflow error.");
             }
         }

         args.caller().updateWorkFlowControls();
 	}
 }
You can set each status in the workflow event handler class by using a method for updating the Status field on the table that you previously created.
Open the workflow table (MyWorkflowTable) in Visual Studio Designer, and then right-click it to open the context menu. To open the code editor, select View Code.
Create a new
publicmethod for updating the status for a specific RecId, as follows:public class MyWorkflowTable extends common { public static void updateWorkflowStatus(RefRecId _recId , MyWorkflowStatus _status) { MyWorkflowTable myWorkflowTable; ttsbegin; select forupdate myWorkflowTable where myWorkflowTable.RecId == _recId; if (myWorkflowTable) { myWorkflowTable.MyWorkflowStatus = _status; myWorkflowTable.update(); } ttscommit; } }Go to the workflow table (MyWorkflowTable), and then right-click the Methods node to open the context menu.
Select Override, and then select the
canSubmitToWorkflowmethod. The method should return a status of True so that you can submit the workflow. The system should now allow you to submit all incomplete workflows./// <summary> /// Can workflow be submitted. /// </summary> /// <param name = "_workflowType"></param> /// <returns></returns> public boolean canSubmitToWorkflow(str _workflowType = '') { boolean ret; ret = super(_workflowType); if (this.MyWorkflowStatus != MyWorkflowStatus::Complete) { ret = true; } else { ret = false; } return ret; }Select Save all and then build the project.
Open the
event handlerclass for the workflow type (MyWorkflowTypeEventHandler). The class has event methods for started, canceled, and completed. Call the method for updating the status on the table, as follows:/// <summary> /// The MyWorkflowTypeEventHandler workflow event handler. /// </summary> public class MyWorkflowTypeEventHandler implements WorkflowCanceledEventHandler, WorkflowCompletedEventHandler, WorkflowStartedEventHandler { public void started(WorkflowEventArgs _workflowEventArgs) { // TODO: Write code to execute once the workflow is started. MyWorkflowTable::updateWorkflowStatus(_workflowEventArgs.parmWorkflowContext().parmRecId(),MyWorkflowStatus::Submit); } public void canceled(WorkflowEventArgs _workflowEventArgs) { // TODO: Write code to execute once the workflow is canceled. MyWorkflowTable::updateWorkflowStatus(_workflowEventArgs.parmWorkflowContext().parmRecId(),MyWorkflowStatus::Canceled); } public void completed(WorkflowEventArgs _workflowEventArgs) { // TODO: Write code to execute once the workflow is completed. MyWorkflowTable::updateWorkflowStatus(_workflowEventArgs.parmWorkflowContext().parmRecId(),MyWorkflowStatus::Complete); } }Select Save all and then build the project again.
The system creates the workflow type. To set workflow properties, open MyWorkflowTableForm.
In FormDesign properties, locate and fill out the following elements:
- Title Data Source - MyWorkflowTable
- Workflow Data Source - MyWorkflowTable
- Workflow enabled - Yes
- Workflow Type - MyWorkflowType
Select Save all and then build the project again with synchronization turned on.

Your workflow type is now created.
Create workflow approval
After you create the workflow type, you can create workflow approval. To do so, make sure that you have the following prerequisites:
- Document type - The workflow type creates the document type class.
- Document preview field group - You must create a new field group on the table, which the following process explains how to complete.
- Document menu item - You previously created this component.
Add the preview field group to the table
To add the preview field group to the table, follow these steps:
- Open the MyWorkflowTable table in Visual Studio Designer, and then go to the field groups.
- Right-click the Field groups node to open the context menu, and then add a new group named Workflow.
- Move your three fields from the table into the field group.
- Select Save all and then build the project.
Now, you can create the workflow approval.
Create the new workflow approval
To create the workflow approval, follow these steps:
Right-click the project to open the context menu, and then select Add New Item.
Go to Business Process and Workflow, select Workflow Approval, and then enter the name MyWorkflowApproval.
Enter the following settings in the Workflow Approval wizard that opens:
- Workflow document - The document that you created (MyWorkflowTypeDocument) when creating the workflow type.
- Document preview field group - The field group (Workflow) that you created.
- Document menu item - The menu item that you created for your form and used in the workflow type (MyWorkflowTableForm).
- Enable Deny outcome - Leave the field as it is.
Select Next. The Workflow Approval page should appear.
Select Next to have the system create all classes and menu items or select Cancel to close the window. The system adds the classes and menu items to your project, but you must modify it.
Open your workflow approval event handler class from the project MyWorkflowEventHandler.
For each status, update your table. The following code example calls the
updateWorkflowStatusmethod for each event to update its status in the table.public void started(WorkflowElementEventArgs _workflowElementEventArgs) { // TODO: Write code to execute once the workflow is started. MyWorkflowTable::updateWorkflowStatus(_workflowElementEventArgs.parmWorkflowContext().parmRecId(),MyWorkflowStatus::Started); } public void canceled(WorkflowElementEventArgs _workflowElementEventArgs) { // TODO: Write code to execute once the workflow is canceled. MyWorkflowTable::updateWorkflowStatus(_workflowElementEventArgs.parmWorkflowContext().parmRecId(),MyWorkflowStatus::Canceled); } public void completed(WorkflowElementEventArgs _workflowElementEventArgs) { // TODO: Write code to execute once the workflow is completed. MyWorkflowTable::updateWorkflowStatus(_workflowElementEventArgs.parmWorkflowContext().parmRecId(),MyWorkflowStatus::Complete); } public void denied(WorkflowElementEventArgs _workflowElementEventArgs) { // TODO: Write code to execute once the workflow is denied. MyWorkflowTable::updateWorkflowStatus(_workflowElementEventArgs.parmWorkflowContext().parmRecId(),MyWorkflowStatus::Denied); } public void changeRequested(WorkflowElementEventArgs _workflowElementEventArgs) { // TODO: Write code to execute once change is requested for the workflow. MyWorkflowTable::updateWorkflowStatus(_workflowElementEventArgs.parmWorkflowContext().parmRecId(),MyWorkflowStatus::ChangeRequested); } public void returned(WorkflowElementEventArgs _workflowElementEventArgs) { // TODO: Write code to execute once the workflow is returned. MyWorkflowTable::updateWorkflowStatus(_workflowElementEventArgs.parmWorkflowContext().parmRecId(),MyWorkflowStatus::Returned); } public void created(WorkflowWorkItemsEventArgs _workflowWorkItemsEventArgs) { // TODO: Write code to execute once work items are created. }Select Save all.
For the workflow approval action menu items, you must set labels:
- Open the Action Menu Item for the Approve workflow approval (MyWorkflowApprovalApprove) in Visual Studio Designer, and then set the Label property to Approve.
- Select Save all and then close the menu item.
- Open the Action Menu Item for the Delegate workflow approval (MyWorkflowApprovalDelegateMenuItem), and then set the Label property to Delegate.
- Select Save all and then close the menu item.
- Open the Action Menu Item for the Reject workflow approval (MyWorkflowApprovalReject), and then set the Label property to Reject.
- Select Save all and then close the menu item.
- Open the Action Menu Item for the Request change workflow approval (MyWorkflowApprovalRequestChange), and then set the Label property to Request change.
- Select Save all and then close the menu item.
- Open the Action Menu Item for the Re-submit workflow approval (MyWorkflowApprovalResubmit), and then set the Label property to Re-submit.
- Select Save all and then close the menu item.
Point the workflow type to workflow approval by opening the workflow type (MyWorkflowType) in Visual Studio Designer. Go to and right-click Supported Elements to open the context menu, and then select New Workflow Element Reference.
In the Properties window, enter your workflow approval name (MyWorkflowApproval) in the Element Name and Name fields.
Go to the top node for MyWorkflowType, and in the Properties window, change the label to My workflow type.
Select Save all and then build the project with synchronize.

You’ve now completed all workflow development.
Test a created workflow
To test a workflow in finance and operations apps, you must first activate it.
Your newly created workflow belongs to the Inventory module. In Inventory Management > Setup > Inventory management workflows, set up your newly developed workflow:
- Select New. A window opens that lists all workflows for the module.
- Select your workflow type (My workflow type). In the dialog that appears, select Open. Run the application.
- Enter the applicable username and password for authentication. A new application should open. Typically, your workflow designer appears beneath the new application, so make sure that you watch your taskbar. Select the workflow designer to configure the workflow.
- Select Basic Settings to enter a placeholder of My workflow, and then close Basic Settings.
- Select and drag the MyWorkflowApproval into the workflow under Start.
- Connect Start to MyWorkflowApproval and MyWorkflowApproval to End.
- Double-click MyWorkflowApproval to go to the next level, where you configure the basic settings.
- Select Step 1, and then configure the Basic Settings by entering text and instructions.
- Select Assignments for the user assignment, and then select User to go to the User tab.
- Select Admin as the user, and then select Close.

- Select Save and close (shrink the window so you can find it in the lower part), and then enter Version notes.
- Select Activate the new version, and in Inventory management workflows, find your workflow.
- Under Manage, select Versions.
- Verify that your workflow is active. If it’s not, select Active to activate it. Finance and operations apps should show your workflow as activated, and a new action should appear in the form
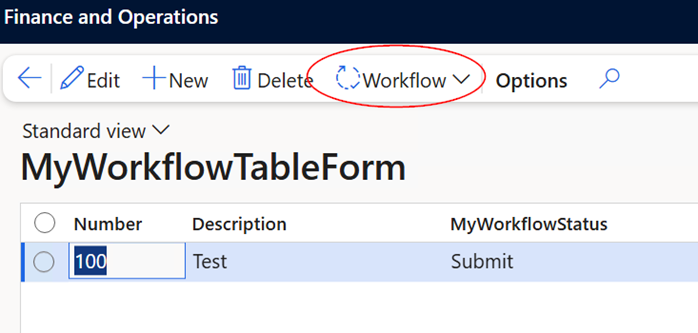


Your workflow is now in use in finance and operations apps.