Implement external CI/CD
While Git integration provides source control, you still need automated pipelines to build, validate, and deploy solutions to downstream environments. Power Platform Build Tools for Azure DevOps and GitHub Actions for Power Platform provide the automation tasks purpose-built for this workflow.
Choose your CI/CD platform
Both platforms use the same underlying Power Platform CLI (version 2.0) and offer equivalent functionality. Your choice depends on your organization's existing tooling:
| Capability | Azure DevOps | GitHub Actions |
|---|---|---|
| Pipeline syntax | YAML (azure-pipelines.yml) | YAML (workflow files) |
| Authentication | Service connections | GitHub Secrets |
| Runners | Microsoft-hosted or self-hosted agents | GitHub-hosted or self-hosted runners |
| Solution checker | Power Platform Checker task | check-solution action |
| Marketplace | Power Platform Build Tools extension | powerplatform-actions |
| Runner OS | Windows | Windows and Linux |
Both support the full lifecycle: export, pack/unpack, import, solution checker, environment management, and deployment settings.
Authenticate with a service principal
Automated pipelines can't use interactive sign-in. Instead, configure a service principal (SPN) with the permissions needed to export from development and import to target environments:
- Register an application in Microsoft Entra ID (or use
pac admin create-service-principalto create one automatically). - Record the Tenant ID, Application (client) ID, and generate a client secret or configure workload identity federation.
- In each target Power Platform environment, add the application as an Application User with the System Administrator security role.
- Store the credentials securely:
- Azure DevOps: Create a service connection of type "Power Platform" with the SPN details.
- GitHub: Store Tenant ID, Application ID, and Client Secret as repository or environment secrets.
Tip
Workload identity federation (certificate-based, no shared secret) is the recommended authentication method for production pipelines. It eliminates the risk of leaked client secrets and supports environments that require multifactor authentication.
Build a CI pipeline
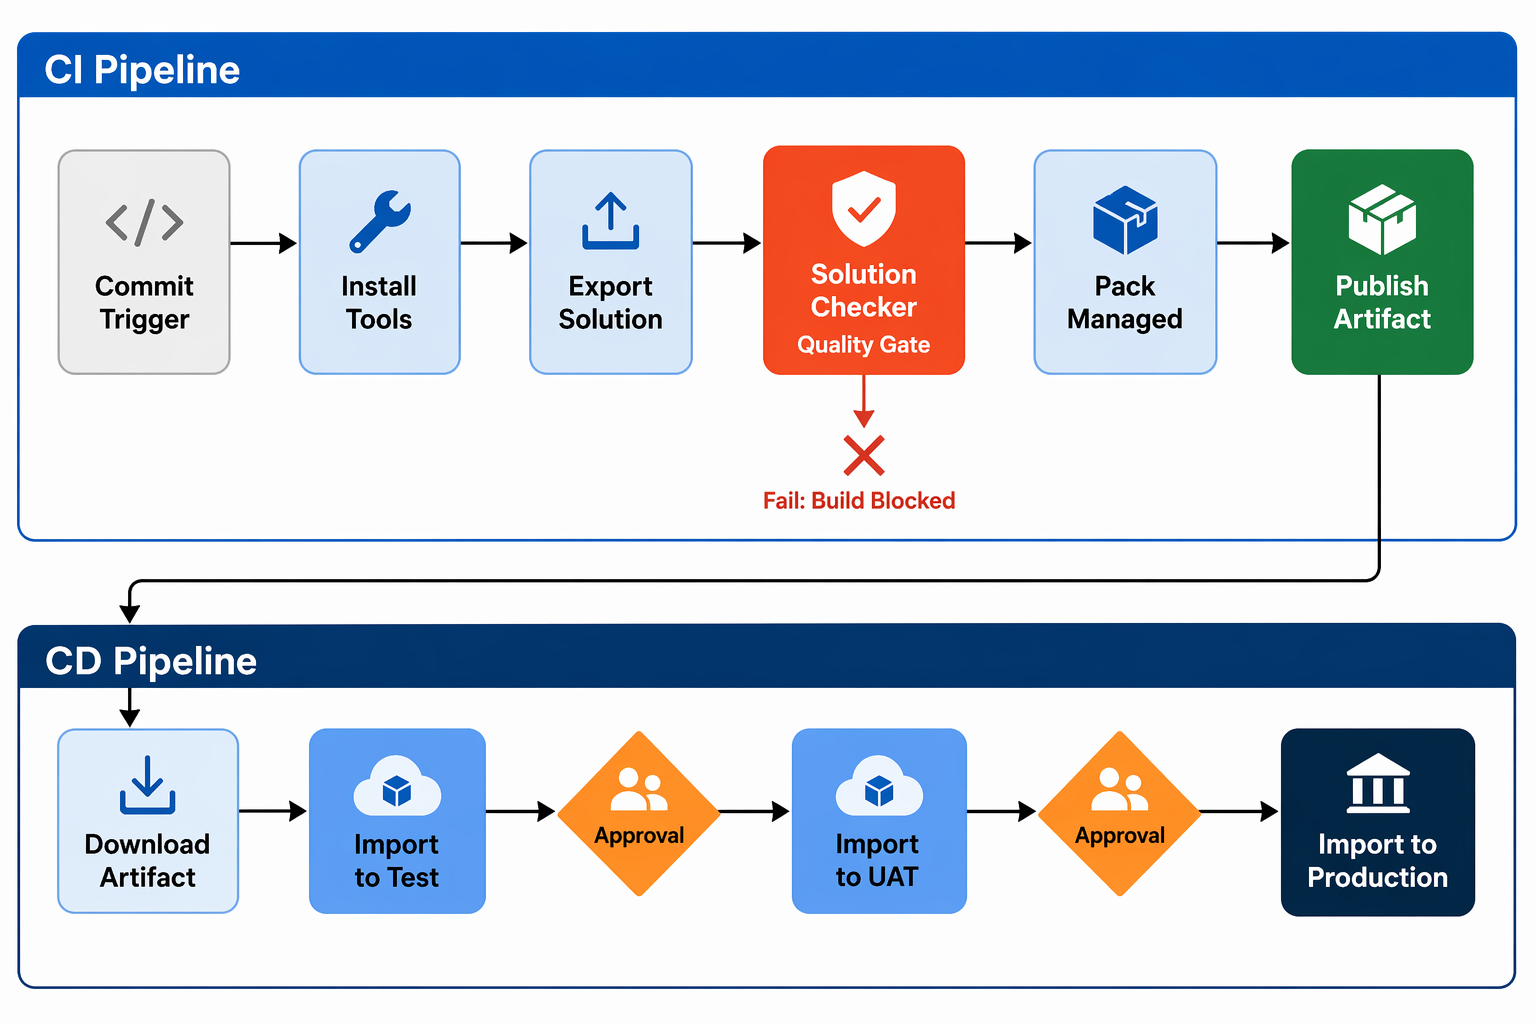
A continuous integration (CI) pipeline triggers on every commit or pull request to validate that the solution is healthy before merging. A typical CI pipeline includes:
- Install tools - Install the Power Platform CLI on the build agent.
- Export solution - Export the unmanaged solution from the development environment.
- Unpack solution - Convert the .zip to source-control-friendly XML files (if not using native Git integration).
- Run solution checker - Analyze the solution against best practices and fail the build if critical issues are found.
- Pack solution as managed - Repackage the solution as managed for downstream deployment.
- Publish artifact - Store the managed solution .zip as a pipeline artifact.
The solution checker step is your primary quality gate. Configure it to fail on Critical and High severity issues at minimum. You can use either the solution checker rule set or the Marketplace certification rule set depending on your quality requirements.
Build a CD pipeline
A continuous deployment (CD) pipeline imports the validated managed solution into target environments. This pipeline typically triggers after the CI pipeline completes successfully or when a release is approved:
- Download artifact - Retrieve the managed solution from the CI pipeline output.
- Import solution - Import into the target environment using a deployment settings file for connection references and environment variables.
- Publish customizations - Ensure all imported changes are active.
- Run validation - Optionally run post-deployment smoke tests.
For staged deployments across multiple environments (test → UAT → production), add approval gates between stages:
- Azure DevOps: Use environment approvals and checks in your YAML pipeline.
- GitHub: Use environment protection rules with required reviewers.
Configure solution checker as a quality gate
The solution checker analyzes your solution's components against known patterns of poor quality, security vulnerabilities, and performance anti-patterns. In an automated pipeline, it acts as a gatekeeper:
# Azure DevOps example
- task: microsoft-IsvExpTools.PowerPlatform-BuildTools.checker.PowerPlatformChecker@2
  displayName: 'Run Solution Checker'
  inputs:
    authenticationType: 'PowerPlatformSPN'
    PowerPlatformSPN: '$(ServiceConnection)'
    FilesToAnalyze: '$(Build.ArtifactStagingDirectory)/**/*.zip'
    RuleSet: 'Solution Checker'
    ErrorLevel: 'HighIssueCount'
    ErrorThreshold: '0'
Configure the ErrorLevel to define which severity causes a pipeline failure. Setting ErrorThreshold to 0 means any high-severity issue blocks the deployment.
Handle versioning
Consistent solution versioning helps you track which version is deployed to each environment and supports rollback scenarios. Automate version stamping in your pipeline:
- Use the Set Solution Version task to stamp the solution with the build number before export.
- Follow semantic versioning:
major.minor.build.revision(for example,1.2.$(Build.BuildId).0). - Record the deployed version in your release notes or deployment history.
When a deployment fails and you need to roll back, import the previous version's managed solution artifact. Because each pipeline run produces a versioned artifact, reverting is as simple as redeploying an earlier artifact.