Exercise - Add a deployment script to an ARM template
Important
You need your own Azure subscription to complete this exercise, and you might incur charges. If you don't already have an Azure subscription, create a free account before you begin.
As part of your team's application-deployment process, you need to create a storage account and stage a file in blob storage for the application to read. Up to this point, you've been manually copying the file every time a new environment is set up. You decide to use a deployment script to automate this step as part of your environment-creation process.
In this exercise, you take an existing Azure Resource Manager (ARM) template and add a new deployment script.
During this process, you:
- Create a starting template.
- Add the prerequisites for deployment scripts including a user-assigned managed identity and role assignment.
- Add a deployment script.
- Deploy the template, and verify the outcome.
This exercise uses the Azure Resource Manager Tools for Visual Studio Code. Be sure to install this extension in Visual Studio Code.
This exercise uses the Bicep extension for Visual Studio Code. Be sure to install this extension in Visual Studio Code.
Create the starting template
You start with an existing template that your team has been using. The template creates the storage account, sets up blob services and requires HTTPS, and creates the blob container for your configuration files.
Open Visual Studio Code.
Create a new file called azuredeploy.json.
Save the empty file so that Visual Studio Code loads the ARM template tooling.
You can either select File > Save As or select Ctrl+S in Windows (⌘+S on macOS). Be sure and remember where you saved the file. For example, you might want to create a scripts folder in which to save it.
Copy the following starting template into azuredeploy.json.
{
    "$schema": "https://schema.management.azure.com/schemas/2019-04-01/deploymentTemplate.json#",
    "contentVersion": "1.0.0.1",
    "apiProfile": "",
    "parameters": {},
    "variables": {
        "storageAccountName": "[concat('storage', uniqueString(resourceGroup().id))]",
        "storageBlobContainerName": "config"
    },
    "functions": [],
    "resources": [
        {
            "name": "[variables('storageAccountName')]",
            "type": "Microsoft.Storage/storageAccounts",
            "apiVersion": "2023-01-01",
            "tags": {
                "displayName": "[variables('storageAccountName')]"
            },
            "location": "[resourceGroup().location]",
            "kind": "StorageV2",
            "sku": {
                "name": "Standard_LRS",
                "tier": "Standard"
            },
            "properties": {
                "allowBlobPublicAccess": true,
                "encryption": {
                    "services": {
                        "blob": {
                            "enabled": true
                        }
                    },
                    "keySource": "Microsoft.Storage"
                },
                "supportsHttpsTrafficOnly": true
            }
        },
        {
            "type": "Microsoft.Storage/storageAccounts/blobServices",
            "apiVersion": "2019-04-01",
            "name": "[concat(variables('storageAccountName'), '/default')]",
            "dependsOn": [
                "[resourceId('Microsoft.Storage/storageAccounts', variables('storageAccountName'))]"
            ]
        },
        {
            "type": "Microsoft.Storage/storageAccounts/blobServices/containers",
            "apiVersion": "2019-04-01",
            "name": "[concat(variables('storageAccountName'),'/default/',variables('storageBlobContainerName'))]",
            "dependsOn": [
                "[resourceId('Microsoft.Storage/storageAccounts/blobServices', variables('storageAccountName'), 'default')]",
                "[resourceId('Microsoft.Storage/storageAccounts', variables('storageAccountName'))]"
            ],
            "properties": {
                "publicAccess": "Blob"
            }
        }
    ]
}
Save the template.
Open Visual Studio Code.
Create a new file called main.bicep.
Save the empty file so that Visual Studio Code loads the Bicep tooling.
You can either select File > Save As or select Ctrl+S in Windows (⌘+S on macOS). Be sure to remember where you saved the file. For example, you might want to create a scripts folder to save it in.
Copy the following starting template into main.bicep.
var storageAccountName = 'storage${uniqueString(resourceGroup().id)}'
var storageBlobContainerName = 'config'

resource storageAccount 'Microsoft.Storage/storageAccounts@2023-01-01' = {
  name: storageAccountName
  tags: {
    displayName: storageAccountName
  }
  location: resourceGroup().location
  kind: 'StorageV2'
  sku: {
    name: 'Standard_LRS'
    tier: 'Standard'
  }
  properties: {
    allowBlobPublicAccess: true
    encryption: {
      services: {
        blob: {
          enabled: true
        }
      }
      keySource: 'Microsoft.Storage'
    }
    supportsHttpsTrafficOnly: true
  }

  resource blobService 'blobServices' existing = {
    name: 'default'
  }
}

resource blobContainer 'Microsoft.Storage/storageAccounts/blobServices/containers@2019-04-01' = {
  parent: storageAccount::blobService
  name: storageBlobContainerName
  properties: {
    publicAccess: 'Blob'
  }
}
Save the template.
Add a user-assigned managed identity
Next, you need to create a user-assigned managed identity. Given the infrastructure-as-code approach, you can create the identity in the template.
Edit the
variablessection of azuredeploy.json to include:"userAssignedIdentityName": "configDeployer",Edit the
resourcessection of azuredeploy.json to include:{ "type": "Microsoft.ManagedIdentity/userAssignedIdentities", "apiVersion": "2018-11-30", "name": "[variables('userAssignedIdentityName')]", "location": "[resourceGroup().location]" }Save the template.
Under the variable definitions in main.bicep, add:
var userAssignedIdentityName = 'configDeployer'Under the resource definitions, add:
resource userAssignedIdentity 'Microsoft.ManagedIdentity/userAssignedIdentities@2018-11-30' = { name: userAssignedIdentityName location: resourceGroup().location }Save the template.
Set the contributor role for the managed identity
Now that you have a managed identity defined, you can assign it a role with rights to the resource group. Assign it the Contributor role. You identify a role by its role definition ID, which is a GUID. The Contributor role is built into Azure so the role definition ID is documented.
The role assignment also needs a GUID name. You can use the guid function to create a GUID that's unique to the resource group and role name.
Edit the
variablessection of azuredeploy.json to include:"roleAssignmentName": "[guid(concat(resourceGroup().id, 'contributor'))]", "contributorRoleDefinitionId": "[resourceId('Microsoft.Authorization/roleDefinitions', 'b24988ac-6180-42a0-ab88-20f7382dd24c')]",Edit the
resourcessection of azuredeploy.json to include:{ "type": "Microsoft.Authorization/roleAssignments", "apiVersion": "2020-04-01-preview", "name": "[variables('roleAssignmentName')]", "dependsOn": [ "[resourceId('Microsoft.ManagedIdentity/userAssignedIdentities', variables('userAssignedIdentityName'))]" ], "properties": { "roleDefinitionId": "[variables('contributorRoleDefinitionId')]", "principalId": "[reference(resourceId('Microsoft.ManagedIdentity/userAssignedIdentities', variables('userAssignedIdentityName')), '2015-08-31-preview').principalId]", "scope": "[resourceGroup().id]", "principalType": "ServicePrincipal" } }Save the template.
Under the variable definitions in main.bicep, add:
var roleAssignmentName = guid(resourceGroup().id, 'contributor') var contributorRoleDefinitionId = resourceId('Microsoft.Authorization/roleDefinitions', 'b24988ac-6180-42a0-ab88-20f7382dd24c')Under the resource definitions, add:
resource roleAssignment 'Microsoft.Authorization/roleAssignments@2020-04-01-preview' = { name: roleAssignmentName properties: { roleDefinitionId: contributorRoleDefinitionId principalId: userAssignedIdentity.properties.principalId principalType: 'ServicePrincipal' } }Save the template.
Create the deployment script
Now, you have all the prerequisites for the deployment script. You start with the common values that the deployment script needs. There are two dependencies, the role assignment and the blob storage container. Your script needs both of these dependencies to exist before it can run.
Edit the
variablessection of azuredeploy.json to include:"deploymentScriptName": "CopyConfigScript"Edit the
resourcessection of azuredeploy.json to include:{ "type": "Microsoft.Resources/deploymentScripts", "apiVersion": "2020-10-01", "name": "[variables('deploymentScriptName')]", "location": "[resourceGroup().location]", "kind": "AzurePowerShell", "dependsOn": [ "[resourceId('Microsoft.Authorization/roleAssignments', variables('roleAssignmentName'))]", "[resourceId('Microsoft.Storage/storageAccounts/blobServices/containers', variables('storageAccountName'), 'default', variables('storageBlobContainerName'))]" ], "identity": { "type": "UserAssigned", "userAssignedIdentities": { "[resourceId('Microsoft.ManagedIdentity/userAssignedIdentities',variables('userAssignedIdentityName'))]": {} } } }Add a
propertiessection to the resource that defines the script and the other required values."properties": { "azPowerShellVersion": "3.0", "scriptContent": " Invoke-RestMethod -Uri 'https://raw.githubusercontent.com/Azure/azure-docs-json-samples/master/mslearn-arm-deploymentscripts-sample/appsettings.json' -OutFile 'appsettings.json' $storageAccount = Get-AzStorageAccount -ResourceGroupName 'learndeploymentscript_exercise_1' | Where-Object { $_.StorageAccountName -like 'storage*' } $blob = Set-AzStorageBlobContent -File 'appsettings.json' -Container 'config' -Blob 'appsettings.json' -Context $StorageAccount.Context $DeploymentScriptOutputs = @{} $DeploymentScriptOutputs['Uri'] = $blob.ICloudBlob.Uri $DeploymentScriptOutputs['StorageUri'] = $blob.ICloudBlob.StorageUri ", "retentionInterval": "P1D" }Save the template.
Under the variable definitions in main.bicep, add:
var deploymentScriptName = 'CopyConfigScript'Under the resource definitions, add:
resource deploymentScript 'Microsoft.Resources/deploymentScripts@2020-10-01' = { name: deploymentScriptName location: resourceGroup().location kind: 'AzurePowerShell' identity: { type: 'UserAssigned' userAssignedIdentities: { '${userAssignedIdentity.id}': {} } } dependsOn: [ roleAssignment blobContainer ] }Add a
propertiessection to the resource that defines the script and the other required values.properties: { azPowerShellVersion: '3.0' scriptContent: ''' Invoke-RestMethod -Uri 'https://raw.githubusercontent.com/Azure/azure-docs-json-samples/master/mslearn-arm-deploymentscripts-sample/appsettings.json' -OutFile 'appsettings.json' $storageAccount = Get-AzStorageAccount -ResourceGroupName 'learndeploymentscript_exercise_1' | Where-Object { $_.StorageAccountName -like 'storage*' } $blob = Set-AzStorageBlobContent -File 'appsettings.json' -Container 'config' -Blob 'appsettings.json' -Context $storageAccount.Context $DeploymentScriptOutputs = @{} $DeploymentScriptOutputs['Uri'] = $blob.ICloudBlob.Uri $DeploymentScriptOutputs['StorageUri'] = $blob.ICloudBlob.StorageUri ''' retentionInterval: 'P1D' }Save the template.
Add a template output
Now that you have a deployment script uploading a file into Azure Blob Storage, you might need to reference that file location in later automation. (Perhaps you run a test to validate that the file is where you think it should be.)
After the resources section of the ARM template, add an output that references the URI for the file as reported by the deployment script.
"outputs": {
"fileUri": {
"type": "string",
"value": "[reference(variables('deploymentScriptName')).outputs.Uri]"
}
}
At the bottom of the file, after the resource definitions, add an output that references the URI for the file as reported by the deployment script.
output fileUri string = deploymentScript.properties.outputs.Uri
Verify your template
Your template should look like:
{
"$schema": "https://schema.management.azure.com/schemas/2019-04-01/deploymentTemplate.json#",
"contentVersion": "1.0.0.1",
"apiProfile": "",
"parameters": {},
"variables": {
"storageAccountName": "[concat('storage', uniqueString(resourceGroup().id))]",
"storageBlobContainerName": "config",
"userAssignedIdentityName": "configDeployer",
"roleAssignmentName": "[guid(concat(resourceGroup().id, 'contributor'))]",
"contributorRoleDefinitionId": "[resourceId('Microsoft.Authorization/roleDefinitions', 'b24988ac-6180-42a0-ab88-20f7382dd24c')]",
"deploymentScriptName": "CopyConfigScript"
},
"functions": [],
"resources": [
{
"name": "[variables('storageAccountName')]",
"type": "Microsoft.Storage/storageAccounts",
"apiVersion": "2023-01-01",
"tags": {
"displayName": "[variables('storageAccountName')]"
},
"location": "[resourceGroup().location]",
"kind": "StorageV2",
"sku": {
"name": "Standard_LRS",
"tier": "Standard"
},
"properties": {
"allowBlobPublicAccess": true,
"encryption": {
"services": {
"blob": {
"enabled": true
}
},
"keySource": "Microsoft.Storage"
},
"supportsHttpsTrafficOnly": true
}
},
{
"type": "Microsoft.Storage/storageAccounts/blobServices",
"apiVersion": "2019-04-01",
"name": "[concat(variables('storageAccountName'), '/default')]",
"dependsOn": [
"[resourceId('Microsoft.Storage/storageAccounts', variables('storageAccountName'))]"
]
},
{
"type": "Microsoft.Storage/storageAccounts/blobServices/containers",
"apiVersion": "2019-04-01",
"name": "[concat(variables('storageAccountName'),'/default/',variables('storageBlobContainerName'))]",
"dependsOn": [
"[resourceId('Microsoft.Storage/storageAccounts/blobServices', variables('storageAccountName'), 'default')]",
"[resourceId('Microsoft.Storage/storageAccounts', variables('storageAccountName'))]"
],
"properties": {
"publicAccess": "Blob"
}
},
{
    "type": "Microsoft.ManagedIdentity/userAssignedIdentities",
    "apiVersion": "2018-11-30",
    "name": "[variables('userAssignedIdentityName')]",
    "location": "[resourceGroup().location]"
},
{
"type": "Microsoft.Authorization/roleAssignments",
"apiVersion": "2020-04-01-preview",
"name": "[variables('roleAssignmentName')]",
"dependsOn": [ "[resourceId('Microsoft.ManagedIdentity/userAssignedIdentities', variables('userAssignedIdentityName'))]" ],
"properties": {
"roleDefinitionId": "[variables('contributorRoleDefinitionId')]",
"principalId": "[reference(resourceId('Microsoft.ManagedIdentity/userAssignedIdentities', variables('userAssignedIdentityName')), '2015-08-31-preview').principalId]",
"scope": "[resourceGroup().id]",
"principalType": "ServicePrincipal"
}
},
{
"type": "Microsoft.Resources/deploymentScripts",
"apiVersion": "2020-10-01",
"name": "[variables('deploymentScriptName')]",
"location": "[resourceGroup().location]",
"kind": "AzurePowerShell",
"dependsOn": [
"[resourceId('Microsoft.Authorization/roleAssignments', variables('roleAssignmentName'))]",
"[resourceId('Microsoft.Storage/storageAccounts/blobServices/containers', variables('storageAccountName'), 'default', variables('storageBlobContainerName'))]"
],
"identity": {
"type": "UserAssigned",
"userAssignedIdentities": {
"[resourceId('Microsoft.ManagedIdentity/userAssignedIdentities',variables('userAssignedIdentityName'))]": {}
}
},
"properties": {
"azPowerShellVersion": "3.0",
"scriptContent": "
Invoke-RestMethod -Uri 'https://raw.githubusercontent.com/Azure/azure-docs-json-samples/master/mslearn-arm-deploymentscripts-sample/appsettings.json' -OutFile 'appsettings.json'
$storageAccount = Get-AzStorageAccount -ResourceGroupName 'learndeploymentscript_exercise_1' | Where-Object { $_.StorageAccountName -like 'storage*' }
$blob = Set-AzStorageBlobContent -File 'appsettings.json' -Container 'config' -Blob 'appsettings.json' -Context $StorageAccount.Context
$DeploymentScriptOutputs = @{}
$DeploymentScriptOutputs['Uri'] = $blob.ICloudBlob.Uri
$DeploymentScriptOutputs['StorageUri'] = $blob.ICloudBlob.StorageUri
",
"retentionInterval": "P1D"
}
}
],
"outputs": {
"fileUri": {
"type": "string",
"value": "[reference(variables('deploymentScriptName')).outputs.Uri]"
}
}
}
var storageAccountName = 'storage${uniqueString(resourceGroup().id)}'
var storageBlobContainerName = 'config'
var userAssignedIdentityName = 'configDeployer'
var roleAssignmentName = guid(resourceGroup().id, 'contributor')
var contributorRoleDefinitionId = resourceId('Microsoft.Authorization/roleDefinitions', 'b24988ac-6180-42a0-ab88-20f7382dd24c')
var deploymentScriptName = 'CopyConfigScript'
resource storageAccount 'Microsoft.Storage/storageAccounts@2023-01-01' = {
name: storageAccountName
tags: {
displayName: storageAccountName
}
location: resourceGroup().location
kind: 'StorageV2'
sku: {
name: 'Standard_LRS'
tier: 'Standard'
}
properties: {
allowBlobPublicAccess: true
encryption: {
services: {
blob: {
enabled: true
}
}
keySource: 'Microsoft.Storage'
}
supportsHttpsTrafficOnly: true
}
resource blobService 'blobServices' existing = {
name: 'default'
}
}
resource blobContainer 'Microsoft.Storage/storageAccounts/blobServices/containers@2019-04-01' = {
parent: storageAccount::blobService
name: storageBlobContainerName
properties: {
publicAccess: 'Blob'
}
}
resource userAssignedIdentity 'Microsoft.ManagedIdentity/userAssignedIdentities@2018-11-30' = {
  name: userAssignedIdentityName
  location: resourceGroup().location
}
resource roleAssignment 'Microsoft.Authorization/roleAssignments@2020-04-01-preview' = {
  name: roleAssignmentName
  properties: {
    roleDefinitionId: contributorRoleDefinitionId
    principalId: userAssignedIdentity.properties.principalId
    principalType: 'ServicePrincipal'
  }
}
resource deploymentScript 'Microsoft.Resources/deploymentScripts@2020-10-01' = {
name: deploymentScriptName
location: resourceGroup().location
kind: 'AzurePowerShell'
identity: {
type: 'UserAssigned'
userAssignedIdentities: {
'${userAssignedIdentity.id}': {}
}
}
properties: {
  azPowerShellVersion: '3.0'
  scriptContent: '''
    Invoke-RestMethod -Uri 'https://raw.githubusercontent.com/Azure/azure-docs-json-samples/master/mslearn-arm-deploymentscripts-sample/appsettings.json' -OutFile 'appsettings.json'
    $storageAccount = Get-AzStorageAccount -ResourceGroupName 'learndeploymentscript_exercise_1' | Where-Object { $_.StorageAccountName -like 'storage*' }
    $blob = Set-AzStorageBlobContent -File 'appsettings.json' -Container 'config' -Blob 'appsettings.json' -Context $storageAccount.Context
    $DeploymentScriptOutputs = @{}
    $DeploymentScriptOutputs['Uri'] = $blob.ICloudBlob.Uri
    $DeploymentScriptOutputs['StorageUri'] = $blob.ICloudBlob.StorageUri
  '''
  retentionInterval: 'P1D'
}
dependsOn: [
roleAssignment
blobContainer
]
}
output fileUri string = deploymentScript.properties.outputs.Uri
If it doesn't, either copy the example or adjust your template to match the example.
Deploy the template
To deploy this template to Azure, you need to sign in to your Azure account from the Visual Studio Code terminal. Be sure you've installed the Azure CLI tools.
On the Terminal menu, select New Terminal. The terminal window usually opens in the lower half of your screen.
If the terminal window displays bash on the right side, it means the correct shell is already open. Alternatively, if you see a bash shell icon on the right, you can select it to launch the shell.

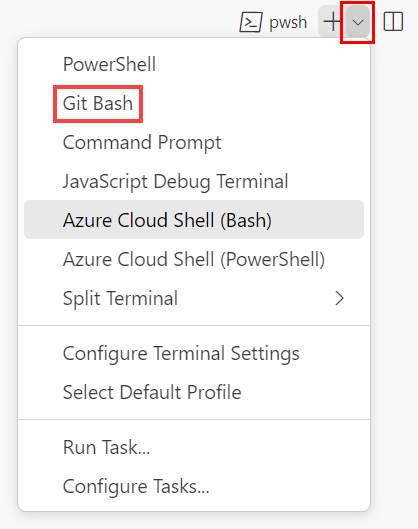
If a shell other than bash appears, select the shell dropdown arrow, and then select Git Bash.
In the terminal, go to the directory where you saved your template. For example, if you saved your template to the templates folder, you can use this command:
cd templates
Sign in to Azure by using Azure CLI
In the Visual Studio Code terminal, sign in to Azure by running the following command:
az loginIn the browser that opens, sign in to your Azure account.
The Visual Studio Code terminal displays a list of the subscriptions associated with this account.
In the list, find the subscription that you want to use for this exercise.
If you missed the list from the sign-in, you can use the following snippet to list your subscriptions again.
az account list --output tableSet the default subscription for all the Azure CLI commands that you run in this session.
az account set --subscription "Your Subscription Name or ID"
To deploy this template to Azure, you need to sign in to your Azure account from the Visual Studio Code terminal. Be sure you've installed the Azure CLI tools.
On the Terminal menu, select New Terminal. The terminal window usually opens in the lower half of your screen.
If the terminal window displays bash on the right side, it means the correct shell is already open. Alternatively, if you see a bash shell icon on the right, you can select it to launch the shell.
If a shell other than bash appears, select the shell dropdown arrow, and then select Git Bash.
In the terminal, go to the directory where you saved your template. For example, if you saved your template to the templates folder, you can use this command:
cd templates
Install Bicep
Run the following command to ensure you have the latest version of Bicep:
az bicep install && az bicep upgrade
Sign in to Azure by using Azure CLI
In the Visual Studio Code terminal, sign in to Azure by running the following command:
az loginIn the browser that opens, sign in to your Azure account.
The Visual Studio Code terminal displays a list of the subscriptions associated with this account.
In the list, find the subscription that you want to use for this exercise.
If you missed the list from the sign-in, you can use the following snippet to list your subscriptions again.
az account list --output tableSet the default subscription for all the Azure CLI commands that you run in this session.
az account set --subscription "Your Subscription Name or ID"
To deploy this template to Azure, sign in to your Azure account from the Visual Studio Code terminal. Be sure you've installed Azure PowerShell, and sign in to the same account that activated the sandbox.
On the Terminal menu, select New Terminal. The terminal window usually opens in the lower half of your screen.
If the terminal window displays pwsh or powershell on the right side, it means the correct shell is already open. Alternatively, if you see a PowerShell shell icon on the right, you can select it to launch the shell.

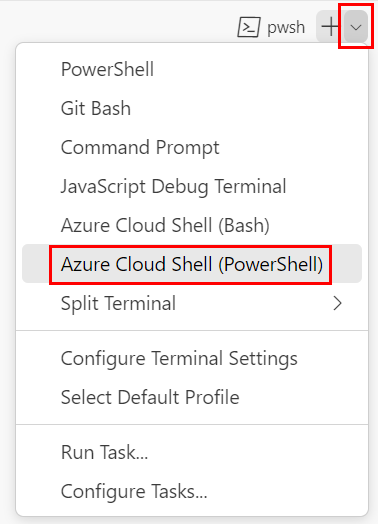
If a shell other than pwsh or powershell appears, select the shell dropdown arrow, and then select PowerShell.
In the terminal, go to the directory where you saved your template. For example, if you saved your template in the templates folder, you can use this command:
Set-Location -Path templates
Sign in to Azure by using Azure PowerShell
In the Visual Studio Code terminal, sign in to Azure by running the following command:
Connect-AzAccountIn the browser that opens, sign in to your Azure account.
Get the ID of the subscription that you want to use for this exercise by running the following command:
Get-AzSubscriptionThe subscription ID is the second column. Copy the second column. It looks something like aaaa0a0a-bb1b-cc2c-dd3d-eeeeee4e4e4e.
Set the default subscription for all the Azure PowerShell commands that you run in this session.
Set-AzContext -SubscriptionId {Your subscription ID}
To deploy this template to Azure, sign in to your Azure account from the Visual Studio Code terminal. Be sure you've installed Azure PowerShell.
On the Terminal menu, select New Terminal. The terminal window usually opens in the lower half of your screen.
If the terminal window displays pwsh or powershell on the right side, it means the correct shell is already open. Alternatively, if you see a PowerShell shell icon on the right, you can select it to launch the shell.
If a shell other than pwsh or powershell appears, select the shell dropdown arrow, and then select PowerShell.
In the terminal, go to the directory where you saved your template. For example, if you saved your template in the templates folder, you can use this command:
Set-Location -Path templates
Install the Bicep CLI
To use Bicep from Azure PowerShell, install the Bicep CLI.
Sign in to Azure by using Azure PowerShell
In the Visual Studio Code terminal, sign in to Azure by running the following command:
Connect-AzAccountIn the browser that opens, sign in to your Azure account.
Get the ID of the subscription that you want to use for this exercise by running the following command:
Get-AzSubscriptionThe subscription ID is the second column. Copy the second column. It looks something like aaaa0a0a-bb1b-cc2c-dd3d-eeeeee4e4e4e.
Set the default subscription for all the Azure PowerShell commands that you run in this session.
Set-AzContext -SubscriptionId {Your subscription ID}
Next, you need to create a resource group to contain the resources you create as part of this exercise. By using a new resource group, you'll make cleaning up after the exercise easier.
From the terminal in Visual Studio Code, run this command to create the resource group for this exercise:
Create a resource group for the exercise
resourceGroupName="learndeploymentscript_exercise_1"
az group create --location eastus --name $resourceGroupName
$resourceGroupName = 'learndeploymentscript_exercise_1'
New-AzResourceGroup -Location eastus -Name $resourceGroupName
Note
If you use a different name for your resource group, you need to make sure you update the script. Later in this module, you see how to avoid hard-coding resource group names in your scripts.
Deploy the template to Azure
The following code deploys the ARM template to Azure. You should see a successful deployment.
Deploy the template by using Azure CLI commands in the Visual Studio Code terminal.
templateFile="azuredeploy.json"
today=$(date +"%d-%b-%Y")
deploymentName="deploymentscript-"$today

az deployment group create \
    --resource-group $resourceGroupName \
    --name $deploymentName \
    --template-file $templateFile
The following code deploys the ARM template to Azure. You should see a successful deployment.
Deploy the template by using Azure CLI commands in the Visual Studio Code terminal.
templateFile="main.bicep"
today=$(date +"%d-%b-%Y")
deploymentName="deploymentscript-"$today

az deployment group create \
    --resource-group $resourceGroupName \
    --name $deploymentName \
    --template-file $templateFile
The following code deploys the template to Azure. You should see a successful deployment.
Deploy the template by using Azure PowerShell commands in the terminal.
$templateFile = 'azuredeploy.json'
$today = Get-Date -Format 'MM-dd-yyyy'
$deploymentName = "deploymentscript-$today"
New-AzResourceGroupDeployment `
  -ResourceGroupName $resourceGroupName `
  -Name $deploymentName `
  -TemplateFile $templateFile
The following code deploys the template to Azure. You should see a successful deployment.
Deploy the template by using Azure PowerShell commands in the terminal.
$templateFile = 'main.bicep'
$today = Get-Date -Format 'MM-dd-yyyy'
$deploymentName = "deploymentscript-$today"
New-AzResourceGroupDeployment `
  -ResourceGroupName $resourceGroupName `
  -Name $deploymentName `
  -TemplateFile $templateFile
Review the result of your template
After the deployment is complete, you'll be given a URL that points to the file that your deployment script copied into blob storage.
Retrieve that file by using the URL output from the template deployment to confirm that the deployment script worked properly.
uri=$(az deployment group show --resource-group $resourceGroupName --name $deploymentName --query 'properties.outputs.fileUri.value' --output tsv)
curl $uri
The command returns the following code.
{
  "environment": "production",
  "hostname": "tailwindtraders.com",
  "Logging": {
    "LogLevel": {
      "Default": "Debug"
    }
  },
  "ApplicationInsights": {
    "InstrumentationKey": ""
  },
  "AllowedHosts": "*",
  "CosmosDb": {
    "Host": "",
    "Key": "",
    "Database": "Products"
  }
}
Review the logs and other details about the deployment from the Azure portal. Or, you can use the following command.
az deployment-scripts show-log --resource-group $resourceGroupName --name CopyConfigScript
Retrieve that file by using the URL output from the template deployment to confirm that the deployment script worked properly.
$fileUri = (Get-AzResourceGroupDeployment -ResourceGroupName $resourceGroupName -Name $deploymentName).Outputs.fileUri.Value
Invoke-RestMethod $fileUri
The command returns the following code.
environment         : production
hostname            : tailwindtraders.com
Logging             : @{LogLevel=}
ApplicationInsights : @{InstrumentationKey=}
AllowedHosts        : *
CosmosDb            : @{Host=; Key=; Database=Products}
Review the logs and other details about the deployment from the Azure portal. Or, you can use the following command.
Get-AzDeploymentScriptLog -ResourceGroupName $resourceGroupName -Name CopyConfigScript
Clean up the resource group
Now that you successfully deployed an ARM template with a deployment script, you can remove the resource group that contains all the resources and role assignments you created.
az group delete --name $resourceGroupName
Remove-AzResourceGroup -Name $resourceGroupName