Access cloud-hosted development environments
Cloud-hosted environments provide a fully managed service by Microsoft. They offer several advantages, such as faster implementation, fewer required customizations, and lower IT infrastructure costs. Cloud architecture provides a consistent, predictable, and seamless update process.
In this unit, you learn how to:
Deploy a cloud-hosted environment in Dynamics 365 Lifecycle Services.
Access a developer instance by using Remote Desktop, with credentials provided on the Lifecycle Services project page.
Access the finance and operations apps front end.
Cloud architecture
You can set up, deploy, and manage cloud deployments in Lifecycle Services. The architecture for cloud deployment includes several main components:
Licenses - Customers must purchase subscription licenses for their organization or for their affiliates' employees and on-site agents, vendors, or contractors who directly or indirectly access finance and operations apps.
Subscription - A subscription to finance and operations apps gives you an online cloud environment.
Microsoft Entra ID (formerly Azure Active Directory - Azure AD) - Microsoft Entra ID is the multitenant, cloud-based directory, and identity management service from Microsoft that combines core directory services, application access management, and identity protection in a single solution.
Microsoft 365 admin help center - A subscription management portal that Microsoft 365 provides for administrators.
Microsoft Azure DevOps – A tool to use primarily for code version control and to deploy a build environment.
Deploy cloud-hosted development environments
Before you can deploy an instance of finance and operations apps, you need to configure your Lifecycle Services project and link it to your Azure subscription. You can do so in your Lifecycle Services project on the Project settings page. For more information, see Add an Azure subscription to a Lifecycle Services project.
To deploy a cloud-hosted development environment in your Lifecycle Services project, use the following procedure:
Note
To create a connection between a Lifecycle Services project and your Azure subscription, you need your Azure subscription ID, and you need to authorize the use of the subscription.
Note
You must have the proper permissions in your Lifecycle Services project to deploy and manage cloud-hosted environments. For more information, see Configure Lifecycle Services security.
From the Lifecycle Services navigation menu, select Cloud-hosted environments.
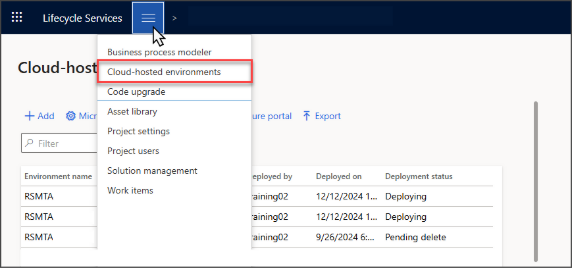
Select + Add.

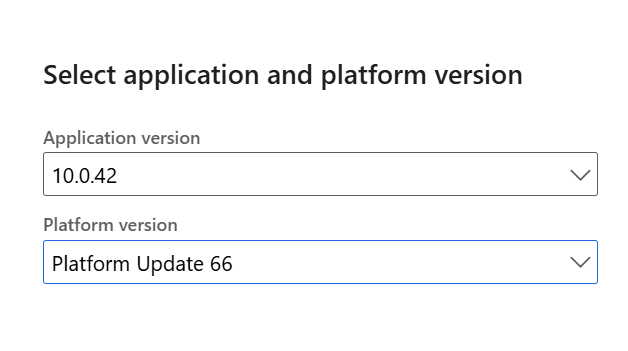
Select an application and platform version, for example:
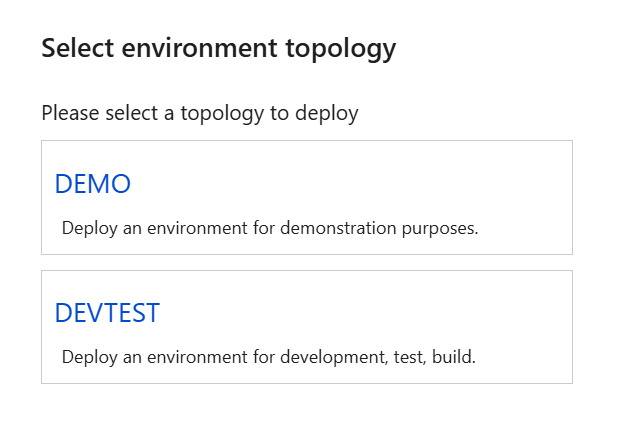
Select an environment topology. For more information, see Sign up for preview subscriptions.
Select which Azure connector that you want to use. (The options display according to the available Azure connectors in your subscription.)
Select Deploy.


Cloud environments provisioned through Lifecycle Services
Lifecycle Services serves as the central hub for managing cloud environments in finance and operations apps. The system automatically deploys the following configurations with cloud-hosted environments.
The system provisions the user who requests the cloud environment as the administrator in that environment.
The system provisions user accounts on the development VM to allow access to the environment by using Remote Desktop. These credentials are on the environment page in Lifecycle Services.
The cloud environment is visible in Lifecycle Services, where administrators can monitor its health, performance, and resource use. Lifecycle Services also provides tools to help manage environment life cycle tasks, such as applying updates, maintaining backups, and scaling resources.
Cloud environments that you provision through Lifecycle Services tightly integrate with Microsoft Azure, which allows organizations to use other Azure services, such as Microsoft Entra ID for authentication and Microsoft Azure Monitor for performance tracking.
Access the finance and operations apps front end
Follow these steps to access the finance and operations apps front end from Lifecycle Services:
Sign in to Lifecycle Services:
Go to the Lifecycle Services website.
Sign in with your Microsoft account credentials.
Go to your project. In the Lifecycle Services dashboard, select the project that contains your finance and operations apps environment.
Access the cloud-hosted environment by going to the project navigation menu and selecting Cloud-hosted environments.
Select the environment. In the environment list, find and select the deployed environment that you want to access.
Sign in to the application:
On the Environment details page, select Login in the upper-right corner.
Select Log on to finance and operations.
Use your valid user credentials to sign in to the application.
Access the cloud instance through Remote Desktop
You must connect to the cloud instance by using Remote Desktop. This connection provides access to a development environment that includes Visual Studio. You can sign in to the system by using Remote Desktop credentials, which are readily available on the environment page in the Lifecycle Services project site. Then, follow these steps:
Select the environment in the environment list and then find and select the deployed environment that you want to access.
Select the Full details option to view the full details.
Find and select local accounts. In the Local accounts section, find the credentials that you need to connect.
Select the VM name to download the .rdp file.
Connect by using local administrator credentials. Use the local administrator username and password shown to connect to the cloud-hosted VM through Remote Desktop. You can reveal the password by selecting the show password icon.
After you sign in to the environment through Remote Desktop, if you want to access the local application from the browser, use the same base URL that you use to access the application from a remote computer. The previous section explains how to obtain this base URL from Lifecycle Services.