Get data from relational data sources
If your organization uses a relational database for sales, you can use Power BI Desktop to connect directly to the database instead of using exported flat files.
Connecting Power BI to your database will help you to monitor the progress of your business and identify trends, so you can forecast sales figures, plan budgets and set performance indicators and targets. Power BI Desktop can connect to many relational databases that are either in the cloud or on-premises.
Scenario
The Sales team at Tailwind Traders has requested that you connect to the organization's on-premises SQL Server database and get the sales data into Power BI Desktop so you can build sales reports.

Connect to data in a relational database
You can use the Get data feature in Power BI Desktop and select the applicable option for your relational database. For this example, you would select the SQL Server option, as shown in the following screenshot.
Tip
Next to the Get Data button are quick access data source options, such as SQL Server.

Your next step is to enter your database server name and a database name in the SQL Server database window. The two options in data connectivity mode are: Import (selected by default, recommended) and DirectQuery. Mostly, you select Import. Other advanced options are also available in the SQL Server database window, but you can ignore them for now.

After you've added your server and database names, you'll be prompted to sign in with a username and password. You'll have three sign-in options:
Windows - Use your Windows account (Azure Active Directory credentials).
Database - Use your database credentials. For instance, SQL Server has its own sign-in and authentication system that is sometimes used. If the database administrator gave you a unique sign-in to the database, you might need to enter those credentials on the Database tab.
Microsoft account - Use your Microsoft account credentials. This option is often used for Azure services.
Select a sign-in option, enter your username and password, and then select Connect.

Select data to import
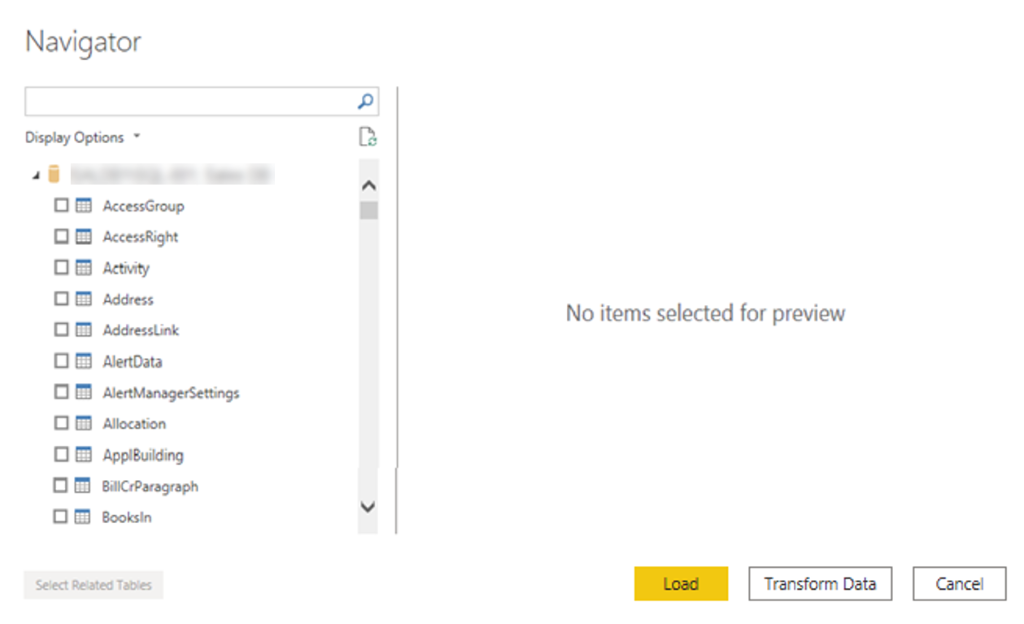
After the database has been connected to Power BI Desktop, the Navigator window displays the data that is available in your data source (the SQL database in this example). You can select a table or entity to preview its contents and make sure that the correct data will be loaded into the Power BI model.
Select the check box(es) of the table(s) that you want to bring in to Power BI Desktop, and then select either the Load or Transform Data option.
Load - Automatically load your data into a Power BI model in its current state.
Transform Data - Open your data in Microsoft Power Query, where you can perform actions such as deleting unnecessary rows or columns, grouping your data, removing errors, and many other data quality tasks.

Import data by writing an SQL query
Another way you can import data is to write an SQL query to specify only the tables and columns that you need.
To write your SQL query, on the SQL Server database window, enter your server and database names, and then select the arrow next to Advanced options to expand this section and view your options. In the SQL statement box, write your query statement, and then select OK. In this example, you'll use the Select SQL statement to load the ID, NAME and SALESAMOUNT columns from the SALES table.

Change data source settings
After you create a data source connection and load data into Power BI Desktop, you can return and change your connection settings at any time. This action is often required due to a security policy within the organization, for example, when the password needs to be updated every 90 days. You can change the data source, edit permissions or clear permissions.
On the Home tab, select Transform data, and then select the Data source settings option.

From the list of data sources that displays, select the data source that you want to update. Then, you can right-click that data source to view the available update options or you can use the update option buttons on the lower left of the window. Select the update option that you need, change the settings as required, and then apply your changes.

You can also change your data source settings from within Power Query. Select the table, and then select the Data source settings option on the Home ribbon. Alternatively, you can go to the Query Settings panel on the right side of the screen and select the settings icon next to Source (or double Select Source). In the window that displays, update the server and database details, and then select OK.

After you have made the changes, select Close and Apply to apply those changes to your data source settings.
Write an SQL statement
As previously mentioned, you can import data into your Power BI model by using an SQL query. SQL stands for Structured Query Language and is a standardized programming language that is used to manage relational databases and perform various data management operations.
Consider the scenario where your database has a large table that is comprised of sales data over several years. Sales data from 2009 isn't relevant to the report that you're creating. This situation is where SQL is beneficial because it allows you to load only the required set of data by specifying exact columns and rows in your SQL statement and then importing them into your semantic model. You can also join different tables, run specific calculations, create logical statements, and filter data in your SQL query.
The following example shows a simple query where the ID, NAME and SALESAMOUNT are selected from the SALES table.
The SQL query starts with a Select statement, which allows you to choose the specific fields that you want to pull from your database. In this example, you want to load the ID, NAME, and SALESAMOUNT columns.
SELECT
ID
, NAME
, SALESAMOUNT
FROM
FROM specifies the name of the table that you want to pull the data from. In this case, it's the SALES table. The following example is the full SQL query:
SELECT
ID
, NAME
, SALESAMOUNT
FROM
SALES
When using an SQL query to import data, try to avoid using the wildcard character (*) in your query. If you use the wildcard character (*) in your SELECT statement, you import all columns that you don't need from the specified table.
The following example shows the query using the wildcard character.
SELECT *
FROM
SALES
The wildcard character (*) will import all columns within the Sales table. This method isn't recommended because it will lead to redundant data in your semantic model, which will cause performance issues and require extra steps to normalize your data for reporting.
All queries should also have a WHERE clause. This clause will filter the rows to pick only filtered records that you want. In this example, if you want to get recent sales data after January 1st, 2020, add a WHERE clause. The evolved query would look like the following example.
SELECT
ID
, NAME
, SALESAMOUNT
FROM
SALES
WHERE
OrderDate >= ‘1/1/2020’
It's a best practice to avoid doing this directly in Power BI. Instead, consider writing a query like this in a view. A view is an object in a relational database, similar to a table. Views have rows and columns, and can contain almost every operator in the SQL language. If Power BI uses a view, when it retrieves data, it participates in query folding, a feature of Power Query. Query folding will be explained later, but in short, Power Query will optimize data retrieval according to how the data is being used later.