Exercise – Create a new project and map it to a sales quote.
In this exercise, you will create a new project for Adventure Works that will include tasks, durations, assignments, and dependencies. You will then create a sales quote, map the project to the sales quote, and then win the quote.
You can access a trial environment of Project Operations by selecting Get started in the top-right corner of the Dynamics 365 Project Operations page on microsoft.com.
Task 1: Create a project
In this task, you will be signed in as Admin Account and will create a new project for professional services for Adventure Works.
Switch to the web browser, which is signed in as Admin Account. In the navigation menu, select Projects > Projects > + New Project.
On the New Project page, complete the following settings and then select Save.
- Name - Enter PP1 Adventure Works Prof Services (Project)
- Description - Enter Professional Services Project for Adventure Works
- Customer - Select Adventure Works
- Calendar template - Select 9-5 for PST Template
- Estimated Start Date - Select the calendar icon and then select the date that is Monday (this week)
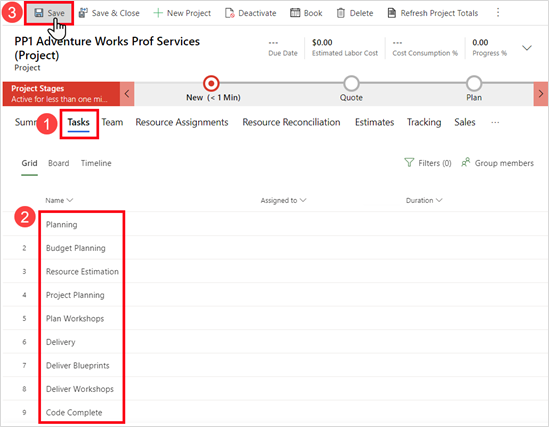
Select the Tasks tab and then select + Add new task. Add the following task names and numbers and then select Save.
- 1 Planning
- 2 Budget Planning
- 3 Resource Estimation
- 4 Project Planning
- 5 Plan Workshops
- 6 Delivery
- 7 Deliver Blueprints
- 8 Deliver Workshops
- 9 Code Complete
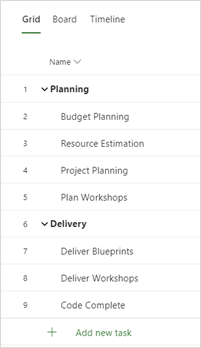
On the Budget Planning task, select the more commands icon and then select Make subtask.
Repeat step 3 for the following tasks:
- Resource Estimation
- Project Planning
- Plan Workshops
- Deliver Blueprints
- Deliver Workshops
- Code Complete
Your Grid view should look like the following image:
Add task dates and duration
To add task dates and duration, follow these steps:
On the Budget Planning task, select the details icon.
On the Budget Planning pane, complete the following settings and then select Close pane (X).
- Start - Select Monday this week
- Duration - Enter 2d
- Finish - The finish date is automatically calculated
Complete the remaining tasks with the following settings.
- Task: Resource Estimation
- Start - Select Monday this week
- Duration - Enter 5d
- Task: Project Planning
- Start - Select Wednesday this week
- Duration - Enter 5d
- Task: Plan Workshops
- Start - Select Wednesday this week
- Duration - Enter 3d
- Task: Deliver Blueprints
- Start – Select the second Monday from this week
- Duration - Enter 10d
- Task: Deliver Workshops
- Start – Select the second Monday from this week
- Duration - Enter 10d
- Task: Code Complete
- Start – Select the third Monday from this week
- Duration - Enter 10d
- Task: Resource Estimation
Your Grid view should look similar to the following image.

Note
The summary task durations for your plan might be different in your plan due to non-working days or statutory holidays in the default calendar template.
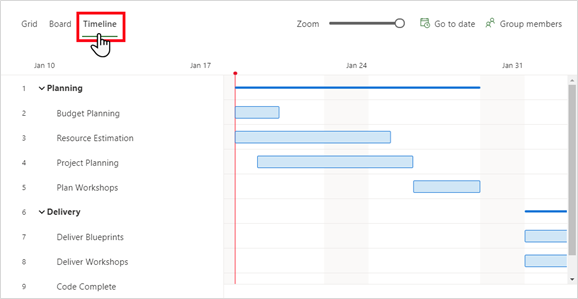
Select Timeline. Your view should look similar to the following image.
Add task dependencies
To add task dependencies, follow these steps:
On the Deliver Workshops task, select the details icon.
On the Deliver Workshops pane, scroll to the bottom of the pane and select Add dependency.
On the Suggested tasks list, select 5 Plan Workshops task and then close the Deliver Workshops pane.
Repeat steps 1-3 for task 4 Project Planning being dependent on task 2 Budget Planning.
Review the Timeline view. Notice that Plan Workshops and Deliver Workshops are now linked, which means that when the Plan Workshops task has finished, the Deliver Workshops task can start.
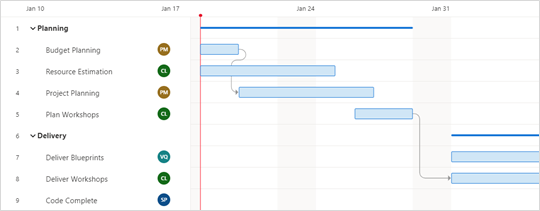
Note
The preceding timeline image differs because January 18, 2021 is a non-working day (Martin Luther King Day holiday).
Prepare for the next task
Right-click the web browser tab and select Duplicate.
From the new web browser tab, select the change area menu and then select Sales.
Task 2: Create a project sales quote and map a project
In this task, you will create a sales quote for Adventure Works for professional services.
- In the navigation pane, under the Sales section, select Quotes > + New.
- On the New Quote page, complete the following settings and then select Save.
- Name - Enter PP1 Adventure Works Prof Services (Onsite)
- Potential Customer - Select Adventure Works
- Quote Expires On - Select the calendar icon and then select two weeks from today’s date
- On the PP1 Adventure Works Prof Services (Onsite) page, select the Quote Lines tab and then select + Add New Quote Line.
- On the New Quote Line page, complete the following settings and then select Save & Close.
- Name - Enter Professional Services
- Billing Method - Select Time and Material
- Project - Select PP1 Adventure Works Prof Services (Project)
- Quoted Amount - Enter 135,600.00
- Customer Budget - Enter 150,000.00
- On the Quote page, from the menu bar, select Close as Won and then select Yes in the dialog box. After processing is complete, the sales quote will be converted to a project contract.
- On the PP1 Order page, in the Requested Delivery Date field, select four months in the future from today’s date. In the Not-to-exceed Limit field, enter 150,000 and then select Save & Close.
- On the navigation menu, under the Sales section, select Project Contracts. Your quote will now be converted to a project contract.
Task 3: Add resources to the project plan
In this task, you will create and assign generic and named resources to the project plan.
Create and assign generic resources
To create and assign generic resources, follow these steps:
- Switch to the (Project) web browser tab and then select the Grid view. For the Budget Planning task, in the Assigned to column, hover over and select the Assign this task icon, select the ellipsis (…), and then select Add generic resource.
- On the Quick Create: Project Team Member pane, in the Position Name field, enter Project Manager. In the Role field, change the role to Project Manager and then select Save and Close. The generic resource Project Manager is now assigned to the Budget Planning task.
- Assign the generic resource Project Manager to the Project Planning task.
- Repeat steps 1-2 for generic resource Consulting Lead with the Consulting Lead role assigned to Resource Estimation, Plan Workshops, and Deliver Workshops tasks.
Assign named resources
To assign named resources, follow these steps:
For the Deliver Blueprints task, in the Assigned to column, hover over and select the Assign this task icon. In the Enter text to search field, enter Veronica and then select Veronica Quek.
Repeat step 1 and assign Sara Perez for the Code Complete task.
When you are finished, the Grid view should resemble the following image.

Note
The summary duration totals might be different due to a statutory holiday (non-working) days.
Task 4: Add expense estimates
In this task, you will add the airfare, hotel, and mileage expense estimates to the project plan.
- Select the Expense Estimates tab and then select + Add Expense Estimate.
- In the Category field, complete the following settings and then select Save.
- Category - Select Flight
- Start Date - Select Monday this week
- Quantity - Enter 2.00
- In the Category field, complete the following settings and then select Save.
- Category - Select Hotel
- Start Date - Select Monday this week
- Quantity - Enter 10.00
- In the Category field, complete the following settings and then select Save.
- Category - Select Mileage
- Start Date - Select Monday this week
- Quantity - Enter 100.00
- Unit Cost Price - Change to 2.00
- Select the Estimates tab to review total estimate pricing. When you are finished, select Save.
Task 5: Generate and submit resource requirements
In this task, you are playing the role of a project manager who is generating resource requirements from the generic resources that are assigned to project tasks. After the requirements have been created, you will review and submit the requirements to the Resource Manager.
Generate generic resource requirements
To generate generic resource requirements, follow these steps:
- Select the Team tab and then change the view to Generic Team Members. Select all generic resources and then select Generate Requirement.
- After the processing is complete, select OK.
Review and submit resource requirements
To review and submit resource requirements, follow these steps:
- Right-click the web browser tab and then select Duplicate.
- From the new web browser tab, on the navigation menu, select the change area menu and then select Resources.
- In the navigation pane, under the Resource section, select Requirements and then, on the Active Resource Requirements page, select PP1 Adventure Works Prof Services (Project) – Consulting Lead.
- On the Consulting Lead page, in the Skills section, select the more commands icon and then select + New Requirement Characteristic.
- On the Quick Create: Requirement Characteristic pane, in the Characteristic field, enter Training. In the Rating Value field, select search/select Good and then select Save and Close.
- On the Consulting Lead page, on the menu bar, select Save > Submit Request.
- On the Request Submitted dialog box, select OK.
- On the Resource Requirement page, notice that a new action on the menu bar called Recall Request appears. When you are finished reviewing, select Save & Close.
- Repeat steps 3-8 for PP1 Adventure Works Prof Services (Project) – Project Manager by using the Project Management characteristic and rating of Good.