Customize your workflow with environment variables
In this unit, you learn how to configure and manage environment-specific behavior using variables, contexts, and custom scripts in GitHub Actions workflows.
To implement this process, you'll learn how to:
- Use default and custom environment variables.
- Access contextual information in workflows.
- Set environment variables at different workflow scopes.
- Use custom scripts with the run keyword.
- Apply environment protections for deployments.
Default environment variables and contexts
Within the GitHub Actions workflow, several default environment variables are available for you to use, but only within the runner that's executing a job. These default variables are case-sensitive, and they refer to configuration values for the system and for the current user. We recommend that you use these default environment variables to reference the filesystem rather than using hard-coded file paths. To use a default environment variable, specify $ followed by the environment variable's name.
jobs:
  prod-check:
    steps:
      - run: echo "Deploying to production server on branch $GITHUB_REF"
In addition to default environment variables, you can use defined variables as contexts. Contexts and default variables are similar in that they both provide access to environment information, but they have some important differences. Although default environment variables can be used only within the runner, you can use context variables at any point in the workflow. For example, context variables allow you to run an if statement to evaluate an expression before the runner is executed.
name: CI
on: push
jobs:
  prod-check:
    if: github.ref == 'refs/heads/main'
    runs-on: ubuntu-latest
    steps:
      - run: echo "Deploying to production server on branch $GITHUB_REF"
This example is using the github.ref context to check the branch that triggered the workflow. If the branch is main, the runner is executed and prints "Deploying to production server on branch $GITHUB_REF." The default environment variable $GITHUB_REF is used in the runner to refer to the branch. Notice that default environment variables are all uppercase where context variables are all lowercase.
Contextual information available in a workflow
Use contexts to access information about workflow runs, variables, runner environments, jobs, and steps. Each context is an object that contains properties that can be other objects or strings. Available contexts include github, env, vars, job, jobs, steps, runner, secrets, strategy, matrix, needs, and inputs.
The following table lists workflow contexts and descriptions:
| Context | Description |
|---|---|
github |
Information about the workflow run. For more information, see github context. |
env |
Contains variables that you set in a workflow, job, or step. For more information, see env context. |
vars |
Contains variables that you set at the repository, organization, or environment level. For more information, see vars context. |
job |
Information about the currently running job. For more information, see job context. |
jobs |
For reusable workflows only, contains outputs of jobs from the reusable workflow. For more information, see jobs context. |
steps |
Information about the steps that ran in the current job. For more information, see steps context. |
runner |
Information about the runner that is running the current job. For more information, see runner context. |
secrets |
Contains the names and values of secrets that are available to a workflow run. For more information, see secrets context. |
strategy |
Information about the matrix execution strategy for the current job. For more information, see strategy context. |
matrix |
Contains the matrix properties defined in the workflow that apply to the current job. For more information, see matrix context. |
needs |
Contains the outputs of all jobs that are defined as a dependency of the current job. For more information, see needs context. |
inputs |
Contains the inputs of a reusable or manually triggered workflow. For more information, see inputs context. |
Different contexts are available at different times in a workflow run. For example, you can use the secrets context only at specific places in a job. Also, you can use some functions, like the hashFiles function, only in specific places.
The following table lists restrictions for each context and special function in a workflow. The listed contexts are available only for the indicated workflow key. You can't use them anywhere else. You can use a function anywhere unless it's listed in the following table.
| Workflow key | Context | Special functions |
|---|---|---|
run-name |
github, inputs, vars |
None |
concurrency |
github, inputs, vars |
None |
env |
github, secrets, inputs, vars |
None |
jobs.<job_id>.concurrency |
github, needs, strategy, matrix, inputs, vars |
None |
jobs.<job_id>.container |
github, needs, strategy, matrix, vars, inputs |
None |
jobs.<job_id>.container.credentials |
github, needs, strategy, matrix, env, vars, secrets, inputs |
None |
jobs.<job_id>.container.env.<env_id> |
github, needs, strategy, matrix, job, runner, env, vars, secrets, inputs |
None |
jobs.<job_id>.container.image |
github, needs, strategy, matrix, vars, inputs |
None |
jobs.<job_id>.continue-on-error |
github, needs, strategy, vars, matrix, inputs |
None |
jobs.<job_id>.defaults.run |
github, needs, strategy, matrix, env, vars, inputs |
None |
jobs.<job_id>.env |
github, needs, strategy, matrix, vars, secrets, inputs |
None |
jobs.<job_id>.environment |
github, needs, strategy, matrix, vars, inputs |
None |
jobs.<job_id>.environment.url |
github, needs, strategy, matrix, job, runner, env, vars, steps, inputs |
None |
jobs.<job_id>.if |
github, needs, vars, inputs |
always, canceled, success, failure |
jobs.<job_id>.name |
github, needs, strategy, matrix, vars, inputs |
None |
jobs.<job_id>.outputs.<output_id> |
github, needs, strategy, matrix, job, runner, env, vars, secrets, steps, inputs |
None |
jobs.<job_id>.runs-on |
github, needs, strategy, matrix, vars, inputs |
None |
jobs.<job_id>.secrets.<secrets_id> |
github, needs, strategy, matrix, secrets, inputs, vars |
None |
jobs.<job_id>.services |
github, needs, strategy, matrix, vars, inputs |
None |
jobs.<job_id>.services.<service_id>.credentials |
github, needs, strategy, matrix, env, vars, secrets, inputs |
None |
jobs.<job_id>.services.<service_id>.env.<env_id> |
github, needs, strategy, matrix, job, runner, env, vars, secrets, inputs |
None |
jobs.<job_id>.steps.continue-on-error |
github, needs, strategy, matrix, job, runner, env, vars, secrets, steps, inputs |
hashFiles |
jobs.<job_id>.steps.env |
github, needs, strategy, matrix, job, runner, env, vars, secrets, steps, inputs |
hashFiles |
jobs.<job_id>.steps.if |
github, needs, strategy, matrix, job, runner, env, vars, steps, inputs |
always, canceled, success, failure, hashFiles |
jobs.<job_id>.steps.name |
github, needs, strategy, matrix, job, runner, env, vars, secrets, steps, inputs |
hashFiles |
jobs.<job_id>.steps.run |
github, needs, strategy, matrix, job, runner, env, vars, secrets, steps, inputs |
hashFiles |
jobs.<job_id>.steps.timeout-minutes |
github, needs, strategy, matrix, job, runner, env, vars, secrets, steps, inputs |
hashFiles |
jobs.<job_id>.steps.with |
github, needs, strategy, matrix, job, runner, env, vars, secrets, steps, inputs |
hashFiles |
jobs.<job_id>.steps.working-directory |
github, needs, strategy, matrix, job, runner, env, vars, secrets, steps, inputs |
hashFiles |
jobs.<job_id>.strategy |
github, needs, vars, inputs, |
None |
jobs.<job_id>.timeout-minutes |
github, needs, strategy, matrix, vars, inputs |
None |
jobs.<job_id>.with.<with_id> |
github, needs, strategy, matrix, inputs, vars |
None |
on.workflow_call.inputs.<inputs_id>.default |
github, inputs, vars |
None |
on.workflow_call.outputs.<output_id>.value |
github, jobs, vars, inputs |
None |
Custom environment variables
Similar to using default environment variables, you can use custom environment variables in your workflow file. To create a custom variable, you need to define it in your workflow file using the env context. If you want to use the value of an environment variable inside a runner, you can use the runner operating system's normal method for reading environment variables.
name: CI
on: push
jobs:
  prod-check:
    if: github.ref == 'refs/heads/main'
    runs-on: ubuntu-latest
    steps:
      - run: echo "Nice work, $First_Name. Deploying to production server on branch $GITHUB_REF"
        env:
          First_Name: Mona
Set custom environment variables in a workflow
You can define environment variables that are scoped to the entire workflow by using env at the top level of the workflow file. Scope the contents of a job within a workflow by using jobs.<job_id>.env. You can scope an environment variable at a specific step within a job by using jobs.<job_id>.steps[*].env.
Here's an example that shows all three scenarios in a workflow file:
name: Greeting on variable day

on:
  workflow_dispatch

env:
  DAY_OF_WEEK: Monday

jobs:
  greeting_job:
    runs-on: ubuntu-latest
    env:
      Greeting: Hello
    steps:
      - name: "Say Hello Mona it's Monday"
        run: echo "$Greeting $First_Name. Today is $DAY_OF_WEEK!"
        env:
          First_Name: Mona
Use a default context in a workflow
The GitHub platform sets default environment variables. They aren't defined in a workflow, but you can use a default environment variable in a workflow in the appropriate context. Most of these variables, other than CI, begin with GITHUB_* or RUNNER_*. The latter two types can't be overwritten. Also, these default variables have a corresponding and similarly named context property. For instance, the RUNNER_* series of default variables have a matching context property of runner.*.
Here's an example of how to access default variables in a workflow by applying these methods:
on: workflow_dispatch

jobs:
  if-Windows-else:
    runs-on: macos-latest
    steps:
      - name: condition 1
        if: runner.os == 'Windows'
        run: echo "The operating system on the runner is $env:RUNNER_OS."
      - name: condition 2
        if: runner.os != 'Windows'
        run: echo "The operating system on the runner is not Windows, it's $RUNNER_OS."
For more information, see Default environment variables.
Pass custom environment variables to a workflow
You can pass custom environment variables from one step of a workflow job to subsequent steps within the job. Generate a value in one step of a job, and assign the value to an existing or new environment variable. Next, you write the variable/value pair to the GITHUB_ENV environment file. You can use the environment file in an action or from a shell command in the workflow job by using the run keyword.
The step that creates or updates the environment variable doesn't have access to the new value, but all subsequent steps in a job have access.
Here's an example:
steps:
  - name: Set the value
    id: step_one
    run: |
      echo "action_state=yellow" >> "$GITHUB_ENV"
  - name: Use the value
    id: step_two
    run: |
      printf '%s\n' "$action_state" # This will output 'yellow'
Add environment protections
You can add protection rules for environments defined for your GitHub repository.
To add an environment, in your repository:
Select Settings.

On the left pane, select Environment.
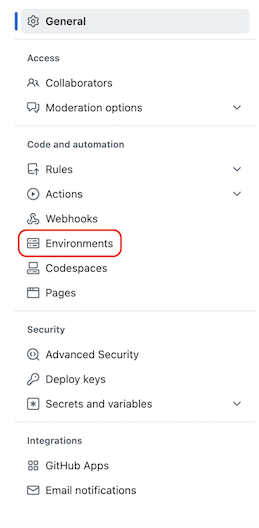
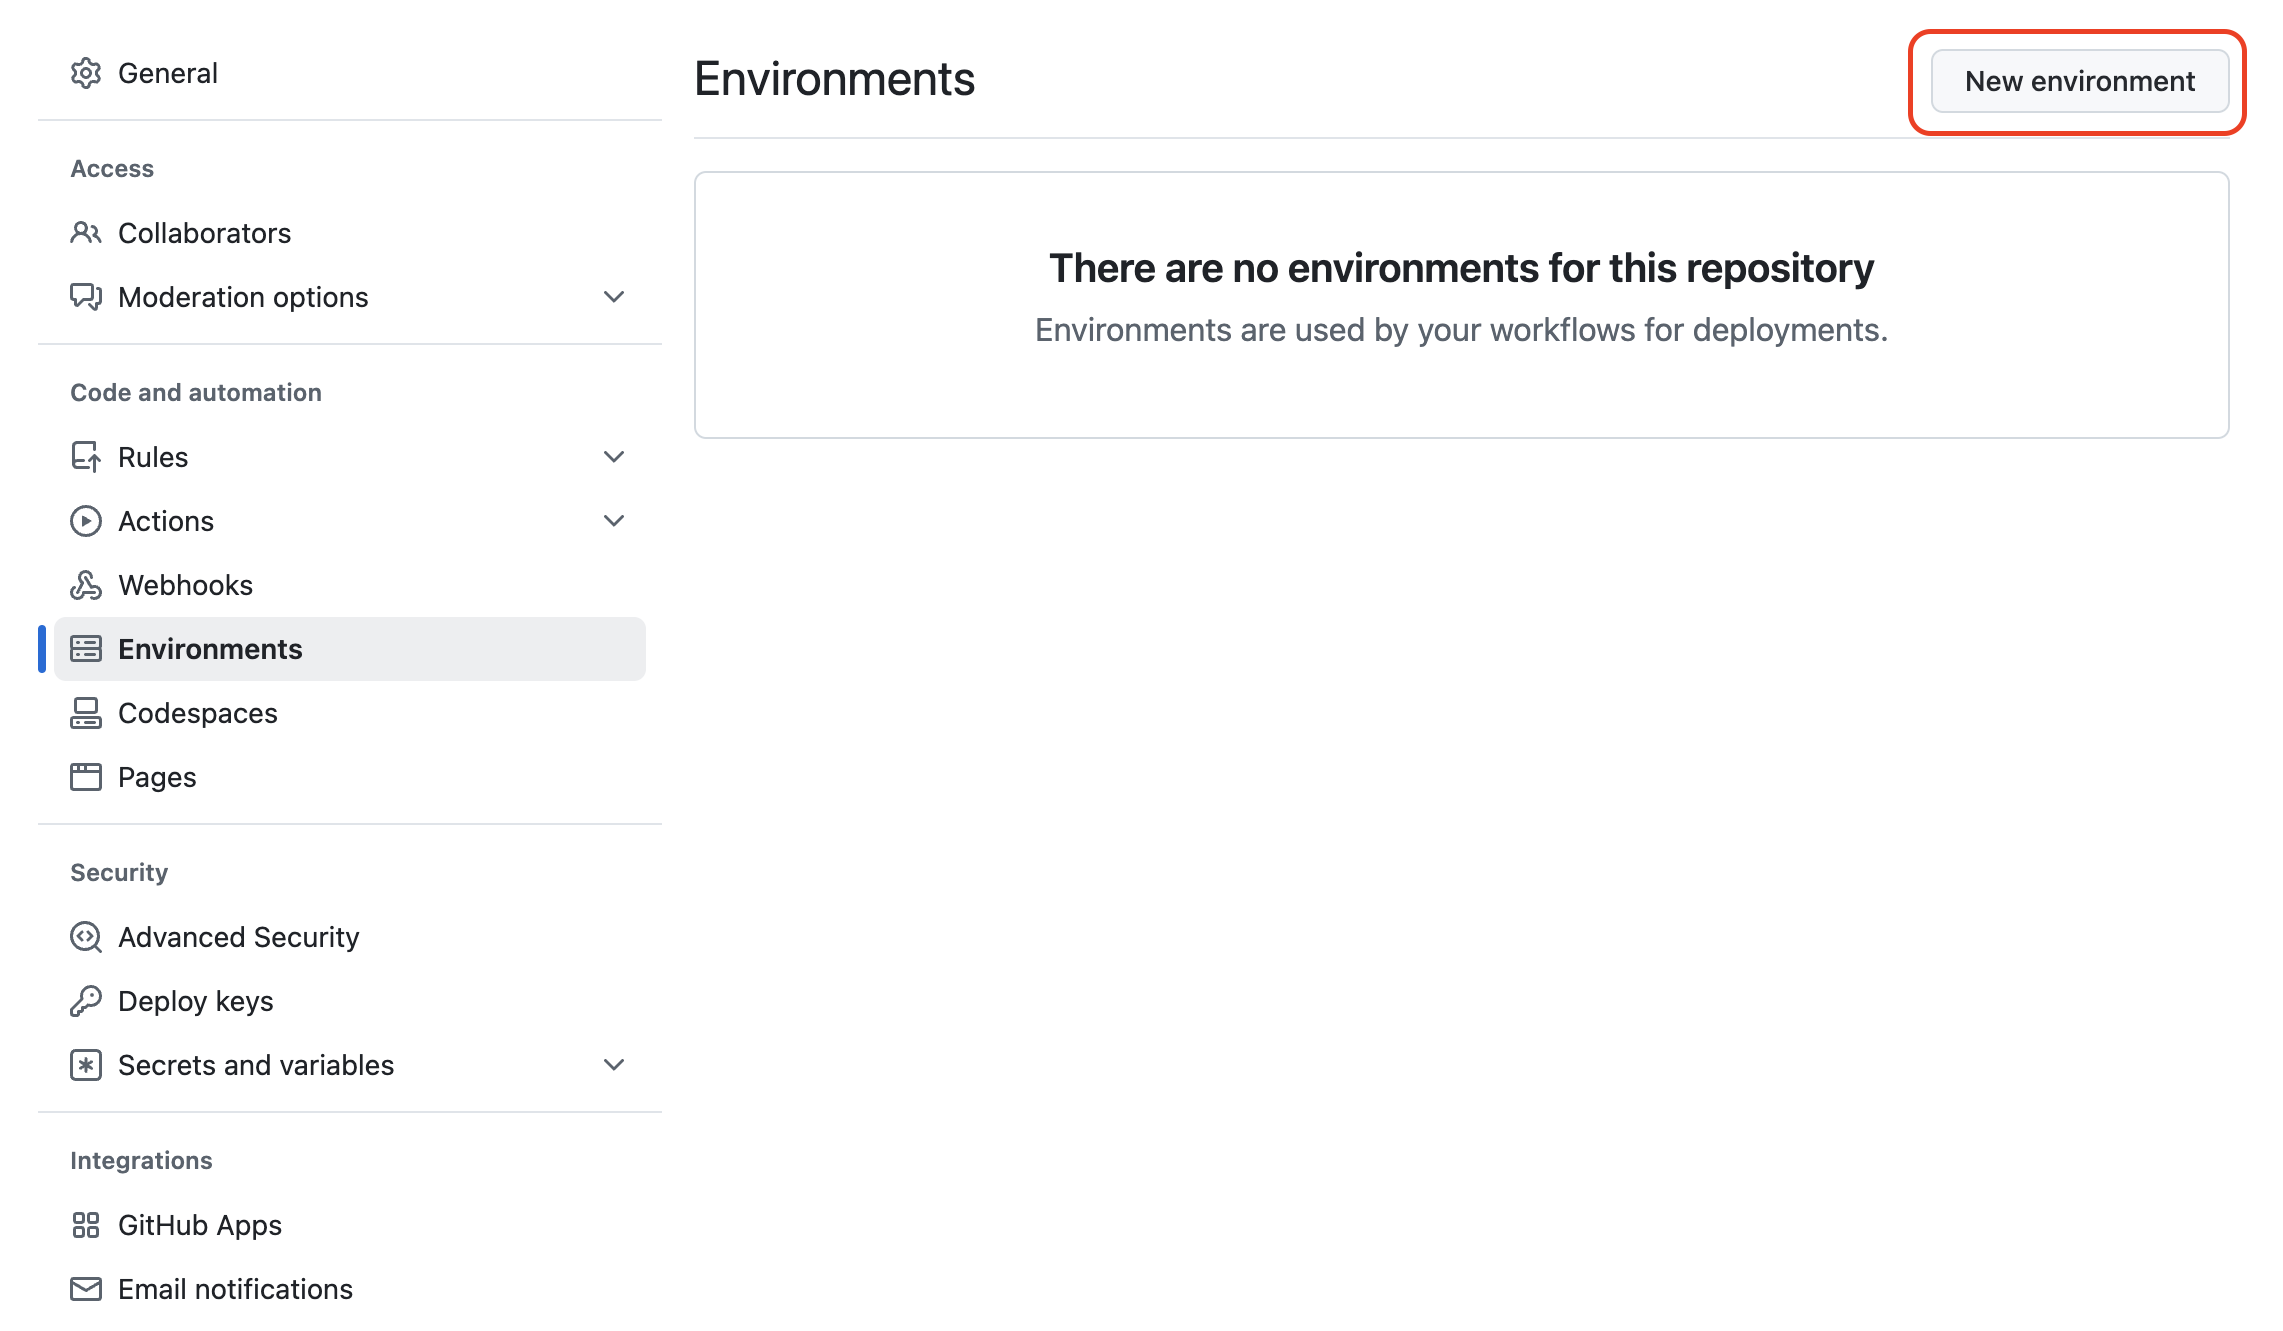
Select the New environment button to add and configure an environment and add protections.
About environments
Use environments to describe a general deployment target like production, staging, or development. When a GitHub Actions workflow deploys to an environment, the environment appears on the main page of the repository. You can use environments to require approval for a job to proceed, restrict which branches can trigger a workflow, gate deployments by using custom deployment protection rules, or limit access to secrets.
Each job in a workflow can reference one environment. Any protection rules that you set for the environment must pass before a job that references the environment is sent to a runner. The job can access the environment's secrets only after the job is sent to a runner.
When a workflow references an environment, the environment appears in the repository's deployments.
Environment protection rules
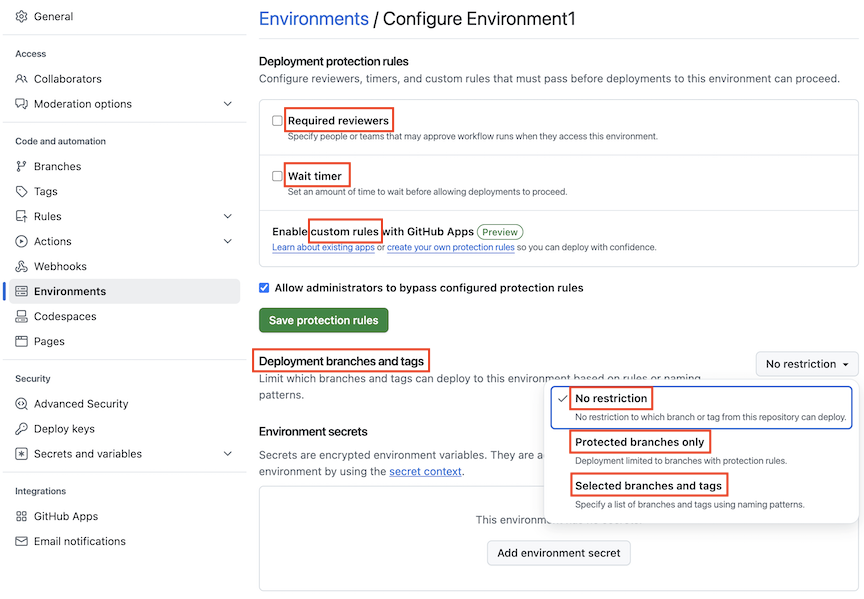
Environment deployment protection rules require specific conditions to pass before a job that references the environment proceeds. You can use deployment protection rules to require a manual approval, delay a job, or restrict the environment to specific branches. You can also create and implement custom protection rules powered by GitHub Apps to use partner systems to control deployments that reference environments that are configured on GitHub.
Here's an explanation of these protection rules:
Required reviewers protection rules. Use this rule to require a specific person or team to approve workflow jobs that reference the environment. You can list up to six users or teams as reviewers. The reviewers must have at least Read permissions to the repository. Only one required reviewer must approve the job for it to proceed.
You also can prevent self-reviews for deployments to a protected environment. If you enable this setting, users who initiate a deployment can't approve the deployment job, even if they're a required reviewer. By enabling self-reviews, it ensures that more than one person reviews deployments to protected environments.
For more information on reviewing jobs that reference an environment with required reviewers, see Review deployments.
Wait timer projection rules. You can use a wait timer protection rule to delay a job for a specific amount of time after the job is initially triggered before the environment deployment proceeds. The time (in minutes) must be an integer between 1 and 43,200 (30 days). The wait time doesn't count toward your billable time.
Branch and tag protection rules. You can use deployment branch and tag protection rules to restrict which branches and tags are used to deploy to the environment. You have several options for deployment branch and tag protection rules for an environment.
- No restriction sets no restriction on which branch or tag can deploy to the environment.
- Protected branches only allows only branches with branch protection rules enabled to deploy to the environment. If no branch protection rules are defined for any branch in the repository, then all branches can deploy. The Selected branches and tags setting ensures Only branches and tags that match your specified name patterns can deploy to the environment.
- If you specify
releases/*as a deployment branch or tag rule, only a branch or tag with a name that begins withreleases/can deploy to the environment. (Wildcard characters don't match/. To match branches or tags that begin withrelease/and contain another single slash, userelease/*/*.) If you addmainas a branch rule, a branch namedmaincan also deploy to the environment.
Custom deployment protection rules. You can create custom protection rules to gate deployments to use partner services. For example, you can use observability systems, change management systems, code quality systems, or other manual configurations that you use to assess readiness and provide automated approvals for deployments to GitHub.
After you create custom deployment protection rules and install them on a repository, you can enable the custom deployment protection rule for any environment in the repository.
Note
If you have a GitHub Free, GitHub Pro, or GitHub Team plan, the environment deployment projection rules are only available for public repositories; except for branch and tag protection rules. For users who have GitHub Pro or GitHub Team plans, branch and tag protection rules are also available for private repositories.
Scripts in your workflow
In the preceding workflow snippet examples, the run keyword is used to print a string of text. Because the run keyword tells the job to execute a command on the runner, you use the run keyword to run actions or scripts.
jobs:
  example-job:
    steps:
      - run: npm install -g bats
In this example, you use npm to install the bats software testing package by using the run keyword. You can also run a script as an action. You can store the script in your repository, often done in a .github/scripts/ directory, and then supply the path and shell type using the run keyword.
jobs:
  example-job:
    steps:
      - name: Run build script
        run: ./.github/scripts/build.sh
        shell: bash