Manage and debug workflows in GitHub Actions
Recall that your goal is to automate the code build and publish process so that features are updated each time a developer adds a change to the code base.
To implement this process, you learn how to:
- Identify the event that triggered a workflow.
- Use GitHub Actions workflow logs.
- Save and access build artifacts.
- Automate adding a label to a pull request after a review.
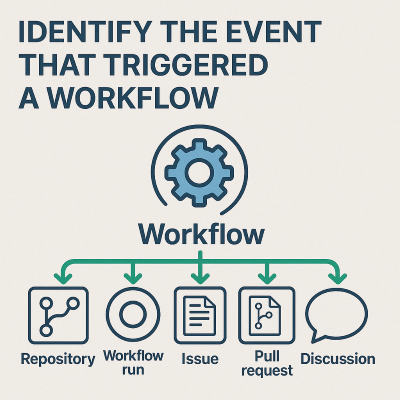
Identify the event that triggered a workflow
Understanding what triggered a GitHub Actions workflow is crucial for debugging, auditing, and improving CI/CD pipelines. Type of triggers include a push to a branch, a pull request created or updated, a scheduled job, or a manual dispatch. You can identify the triggering event by examining the workflow run, the repository changes, and the related GitHub issue or pull request.
What is a workflow trigger?
A workflow trigger is an event that causes a workflow to run. GitHub supports various types of triggers, including:
pushorpull_request(based on code changes)workflow_dispatch(a manual trigger)schedule(cron jobs)repository_dispatch(external systems)- Issue, discussion, and pull request events (for example,
issues.opened,pull_request.closed)
Identify the trigger event
You can identify a workflow trigger event in multiple ways:
Use the GitHub Actions UI:
- In your repository, select the Actions tab.
- Select a workflow run.
An event type, such as
push,pull_request, orworkflow_dispatch, appears at the top of the workflow run summary.Use
github.event_namein the logs or in a workflow.GitHub exposes context data during a workflow run. The
github.event_namevariable tells you which event triggered the workflow.You can print the information in a step for debugging:
-name: Show event trigger
  run: echo "Triggered by ${{ github.event_name }}"
Use workflow run details:
- If you inspect workflow runs programmatically, such as by using API, the run object includes an
eventproperty that specifies the trigger. - You can find the commit Secure Hash Algorithm (SHA), actor, and timestamp to trace what caused the trigger.
- If you inspect workflow runs programmatically, such as by using API, the run object includes an
Infer the trigger from repository effects
You might not have direct access to the workflow run, but you still want to infer what triggered the workflow run based on repository activity:
| Observed behavior | Trigger event |
|---|---|
A new commit was pushed to main and the workflow ran. |
push event |
| A pull request was opened or updated. | pull_request event |
| A contributor manually ran a workflow. | workflow_dispatch |
| The workflow runs daily at a specific time. | schedule (cron) |
| The workflow ran after an external service call. | repository_dispatch |
| The workflow ran when a label or comment was added to an issue. | issues.* event |
By reviewing timestamps, pull request activity, and commit history, you can often pinpoint what action caused the workflow to run.
To summarize how to identify what triggered a workflow:
- Check the workflow run summary on the Actions tab.
- Print or log
github.event_nameinside the workflow for visibility. - Compare timestamps and repository activity (commits, pull requests, issues) to infer the trigger.
- Use the full
eventcontext for deeper investigation.
These practices help you debug, audit, and improve workflow reliability across your development and deployment pipelines.
Understand a workflow effect by reading its configuration file
To understand a workflow's effects from reading its configuration file, analyze the structure and contents of the .yml file stored in .github/workflows/.
The workflow configuration file specifies the following information about the workflow:
- When it runs (in the
onsection). - What it does (in
jobsandsteps). - Where it runs (the
runs-onsection). - Why it runs (its purpose, such as testing, deploying, or linting).
- How it behaves in specific conditions (environment, filters, logic).
Interpret a workflow effect
Identify the trigger.
To identify what action initiated the workflow, see the
onsection of the workflow.For example:
on:
  push:
    branches: [main]
  pull_request:
    types: [opened, synchronize]
  workflow_dispatch:
This example workflow:
- Runs automatically when code is pushed to the main branch (
push). - Runs when a pull request is created or updated (
pull_request). - Can be triggered manually by a user (
workflow_dispatch).
- Runs automatically when code is pushed to the main branch (
Identify the workflow jobs and steps.
To determine what the workflow does, see the
jobsandstepssections of the workflow.For example:
jobs:
  test:
    runs-on: ubuntu-latest
    steps:
      - name: Checkout code
        uses: actions/checkout@v3
      - name: Install dependencies
        run: npm install
      - name: Run tests
        run: npm test
This example workflow:
- Uses a Linux virtual environment (
runs-on). - Checks out the repository's code (
steps>name). - Installs project dependencies (
steps>name). - Runs automated tests (
steps>name).
- Uses a Linux virtual environment (
Evaluate the workflow's purpose and outcome.
By reading the configuration file, you can describe the intended outcome of the workflow:
“This workflow is a continuous integration (CI) pipeline. It ensures that any new code that is pushed to the repository or submitted via pull request is automatically tested. If tests fail, the GitHub workflow UI displays this result to help you maintain code quality.”
Identify or set optional features that affect how the workflow runs:
envsets environment variables.ifadds conditional logic to run specific steps only when criteria are met.timeout-minutesorcontinue-on-errorset workflow execution and error handling.
Diagnose a failed workflow run
In your repository, go to the Actions tab.
Find the failed run (typically indicated by a red X).
Select the failed workflow to open the run summary.
In the workflow logs, review the error.
In the run summary, expand each job and step until you find the one that indicates failure.
Select the job or step to view its logs.
Look for:
- Error messages
- Stack traces
- Exit codes
For example, a failed test might show
npm ERR! Test failedorexit code 1.Check the workflow configuration file.
Use the
.ymlfile to determine:- What was each step trying to do?
- If there are environment variables (
env) or conditionals (if) that affect execution. - If the failure is due to a missing dependency, syntax error, or misconfigured step.
If a step fails, check for the following causes:
- Were dependencies installed successfully in the preceding step?
- Do test files exist and pass locally?
Common failure scenarios
The following table describes common workflow failure scenarios:
| Symptom | Likely cause |
|---|---|
A step fails and returns command not foundl |
Missing dependency or wrong setup |
npm install fails. |
Corrupt package-lock.json file or a network issue |
| A test step failsl | Unit test issues, missing configuration file, or invalid test syntax |
Permission denied appears. |
Incorrect file permissions or missing secrets |
Identify how to access workflow logs in GitHub
In your repository, go to the Actions tab.
In the list of workflows, select the relevant workflow.
For example, if your
.ymlfile has the following code, a link titled CI Workflow appears in the list:name: CI WorkflowSelect a specific run.
In the list of runs that show status, select the timestamp or commit message of the specific run you want to inspect.
Expand each job and step.
The run summary page displays jobs as they're defined in the workflow file, such as build or test:
- Select a job to expand it.
- Inside the job, expand individual steps, such as "Install dependencies" or "Run tests."
View log output.
To view the full log output, including console logs, error messages, and debug information, select a workflow step. You can copy, search, and download the logs.
The following table summarizes the steps you take to access workflow logs:
| Action | Purpose |
|---|---|
| Actions tab | View all workflow runs. |
| Select the workflow name | Filter runs by workflow. |
| Select a run | See specific job and step results. |
| Expand steps | View detailed logs. |
| Download logs | Download logs for offline or team troubleshooting. |
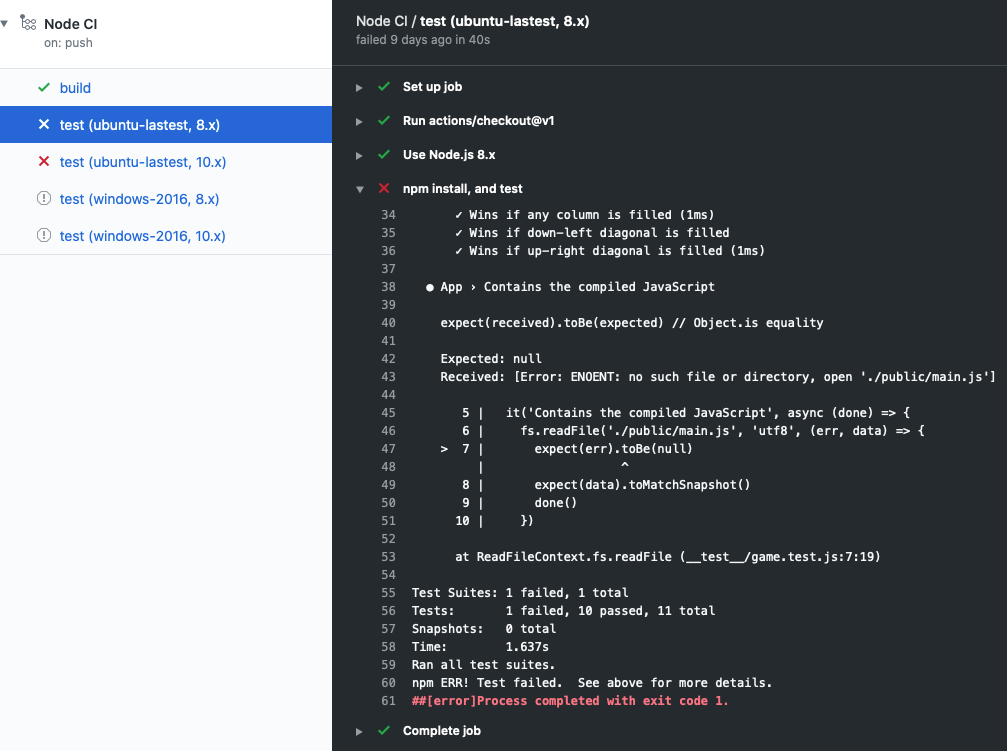
Action logs for the build
When a workflow runs, it produces a log that includes the details of what happened and any errors or test failures.
If an error occurs or if a test fails, a red X instead of a green checkmark appears in the logs. You can examine the details of the error or failure to investigate what happened.
Work with artifacts
When a workflow produces something other than a log entry, the product is called an artifact. For example, the Node.js build produces a Docker container that can be deployed. The container is an artifact that you can upload to storage by using the actions/upload-artifact action. You can later download the artifact from storage by using actions/download-artifact.
Storing an artifact preserves it between jobs. Each job uses a fresh instance of a VM, so you can't reuse the artifact by saving it on the VM. If you need your artifact in a different job, you can upload the artifact to storage in one job, and download it for the other job.
Artifact storage
Artifacts are stored in storage space on GitHub. The space is free for public repositories, and some storage is free for private repositories, depending on the account. GitHub stores your artifacts for 90 days.
In the following workflow snippet, notice that in the actions/upload-artifact@main action there's a path attribute. The value of this attribute is the path to store the artifact. In this example, you specify public/ to upload everything to a directory. If you wanted only to upload a single file, use something like public/mytext.txt.
  build:
    runs-on: ubuntu-latest
    steps:
      - uses: actions/checkout@v3
      - name: npm install and build webpack
        run: |
          npm install
          npm run build
      - uses: actions/upload-artifact@main
        with:
          name: webpack artifacts
          path: public/
To download the artifact for testing, the build must complete successfully and upload the artifact. In the following code, you specify that the test job depends on the build job.
test:
    needs: build
    runs-on: ubuntu-latest
In the following workflow snippet, you download the artifact. Now the test job can use the artifact for testing.
steps:
    - uses: actions/checkout@v3
    - uses: actions/download-artifact@main
      with:
        name: webpack artifacts
        path: public
For more information about using artifacts in workflows, see Storing workflow data as artifacts.
Automate reviews in GitHub by using workflows
In addition to starting a workflow via GitHub events like push and pull-request, you can run a workflow on a schedule or after some event outside GitHub.
You might want a workflow to run only after a user completes a specific action, such as after a reviewer approves a pull request. For this scenario, you can trigger on pull-request-review.
Another action you can take is to add a label to the pull request. In this case, use the pullreminders/label-when-approved-action action.
For example:
    steps:
     - name: Label when approved
       uses: pullreminders/label-when-approved-action@main
       env:
         APPROVALS: "1"
         GITHUB_TOKEN: ${{ secrets.GITHUB_TOKEN }}
         ADD_LABEL: "approved"
In the env block, you set the environment variables for the action. For example, you can set the number of approvers required to run the workflow. In this example, it's one. The secrets.GITHUB_TOKEN authentication variable is required because the action must make changes to your repository by adding a label. Finally, you enter the name of the label to add.
Adding a label might be an event that starts another workflow, such as a merge. We cover this event in the next module, which describes using continuous delivery in GitHub Actions.