Manage access to GitHub Advanced Security
In the previous unit, you learned how to enable GitHub Advanced Security according to your enterprise plan.
This unit walks you through how to configure GitHub Advanced Security for a project. It explains how to manage access to security alerts and set up security policies at the organization and repository level.
Manage access to security alerts
When setting up GitHub Advanced Security for a project, you want to make sure the right people in your organization can view and resolve any alerts. The roles and permissions required to view these alerts depend on the type of alert.
This table shows the minimum roles and permissions needed to view each type of alert in the repository's Security tab:
| Type of security alert | Roles and permissions needed |
|---|---|
| Code scanning alerts | Write permission on repository |
| Secret scanning alerts | Repository administrators and organization owners |
| Dependabot alerts | Repository administrators and organization owners |
Additionally, repository administrators and organization owners can give secret scanning and Dependabot alert access to users and teams with write permission on their repositories from the repository Security and analysis settings.
With the right set of roles and permissions, the developers involved in your security workflow can take the following actions:
- For code scanning alerts: commit corrections to the code, dismiss alerts that don't require any action, or delete alerts to clean up code scanning results.
- For secret scanning alerts: delete detected secrets, create new tokens, and update code that uses the detected secrets, or dismiss alerts that don't require any action.
- For Dependabot alerts: update vulnerable dependencies or dismiss alerts that don't require any action.
Set a security policy at the organization level
A good way to make sure that everyone in your organization is using GitHub Advanced Security is to set up a security policy at the organization level. For example, you can set a policy that allows all repository administrators in your organization to enable features for Advanced Security for their repositories.
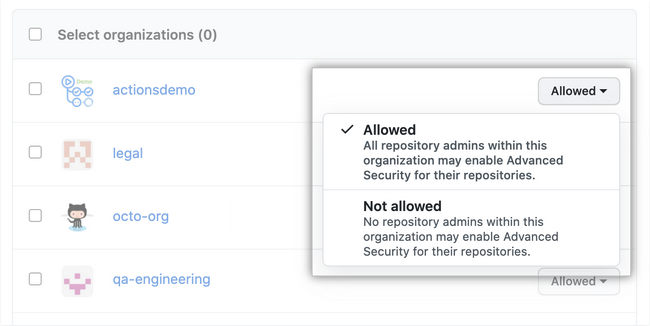
Policies can be configured for all organizations owned by your enterprise account, or for individual organizations that you choose.
Follow these steps to set up a security policy at the organization level:
In your enterprise sidebar, navigate to Policies > Advanced Security.
Under GitHub Advanced Security, select the drop-down menu and select a policy for the organizations owned by your enterprise.
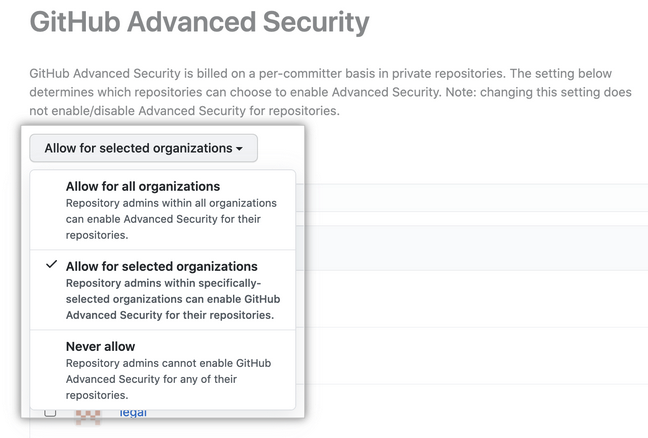
Optionally, if you chose Allow for selected organizations to the right of an organization, select the drop-down menu to allow or disallow Advanced Security for the organization. Disallowing Advanced Security for an organization prevents repository administrators from enabling Advanced Security features for other repositories, but it doesn't disable the features for repositories where the features are already enabled.
Note
Keep in mind that GitHub bills for Advanced Security on a per-committer basis when setting up a policy at the organization level.
Set a security policy at the repository level
Equally important when setting up a GitHub project is to document how to report security vulnerabilities for the project. To do so, you can add a SECURITY.md file to the root, docs, or .github folders of the project repository. Then, when someone creates an issue in a repository, they see a link to your project's security policy.
After someone reports a security vulnerability in your project, you can use GitHub Security Advisories to disclose, fix, and publish information about the vulnerability.
Follow these steps to set up a security policy at the repository level:
- In your repository, navigate to Security > Security policy.
- Select Start setup.
- In the new
SECURITY.mdfile, add information about supported versions of your project and how to report a vulnerability. - Commit the change to the repository.