Restrict connectors and actions
Connector-level classification (Business, Non-Business, Blocked) provides broad governance, but many scenarios require finer control. You might need to allow a connector while blocking specific high-risk actions within it, restrict which endpoints a connector can reach, or govern desktop flow modules alongside cloud connectors.
Configure action-level controls
Action-level control lets you allow or block individual actions within a connector. Instead of blocking an entire connector, you can permit its safe operations while restricting risky ones.
For example, the SharePoint connector offers actions like "Get items," "Create item," and "Delete item." In a regulated environment, you might allow read actions while blocking delete operations to prevent accidental data loss.
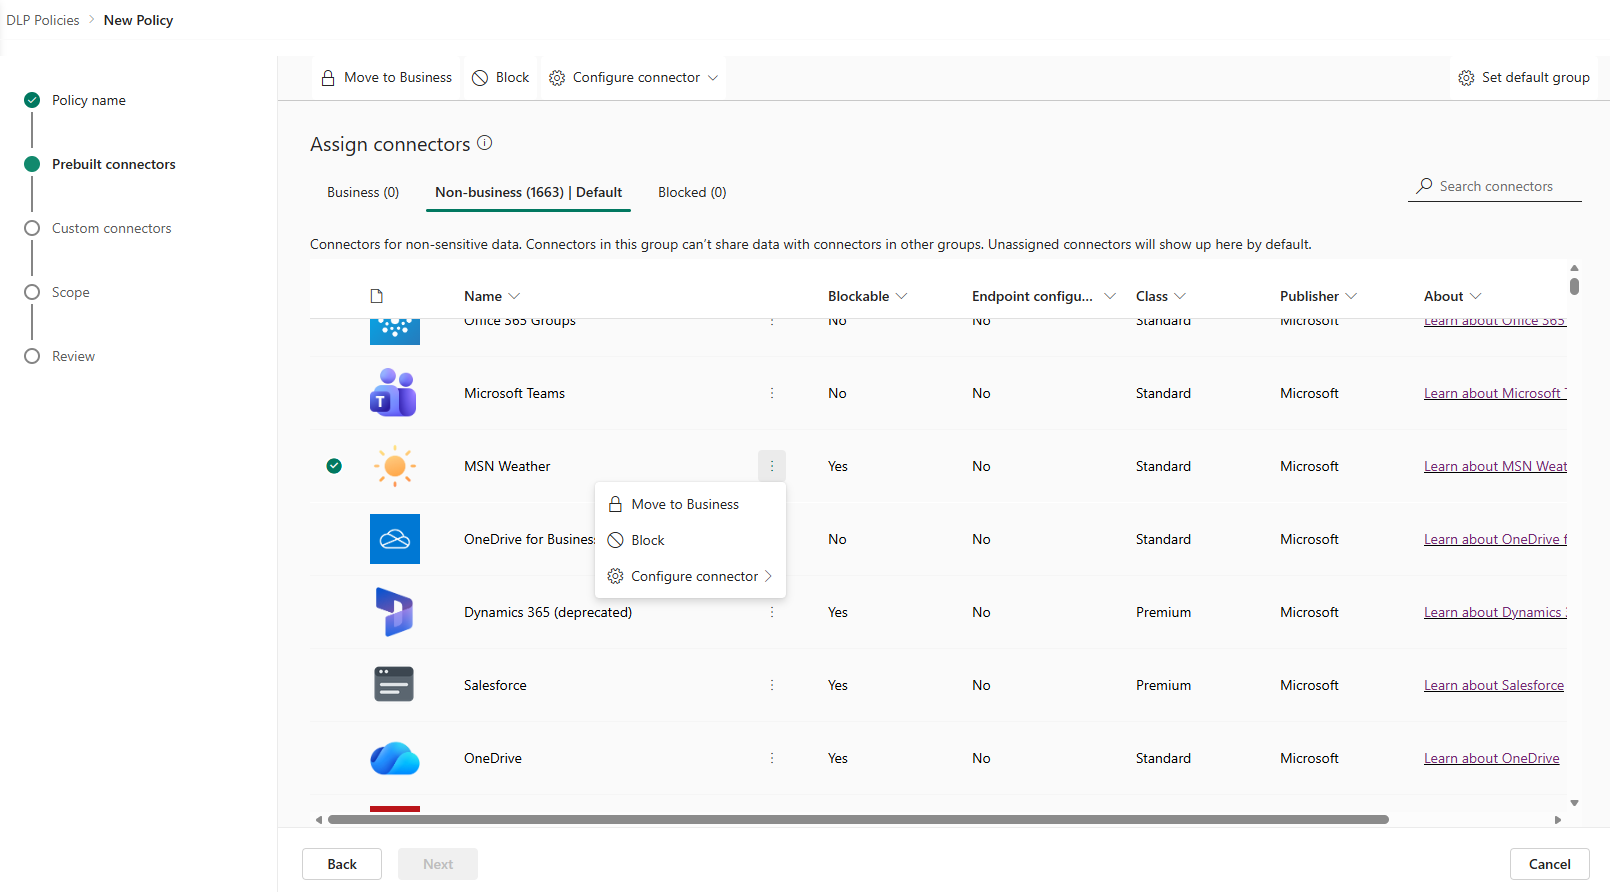
To configure connector actions in the Power Platform admin center:
- Open your data policy and select Edit.
- On the Prebuilt Connectors page, find the target connector.
- Select the three-dot menu (⋯) and choose Configure connector > Connector Actions.
- Set each action to Allow or Block.
- Set the Default for new actions to determine how future actions added to the connector are handled.
Tip
Set the default for new actions to Block for sensitive connectors. This ensures that when Microsoft adds new actions to a connector, they're blocked until you explicitly review and allow them.
Action-level controls apply to blockable connectors only. For connectors that can't be blocked (Dataverse, Teams, SharePoint), action controls are currently available through PowerShell:
# Get available actions for a connector
Get-AdminPowerAppConnectorAction -ConnectorName "shared_sharepointonline"

# Configure action controls on a policy
Set-PowerAppDlpPolicyConnectorConfigurations -PolicyName $policyId `
    -ConnectorConfigurations $actionConfig
Apply endpoint filtering
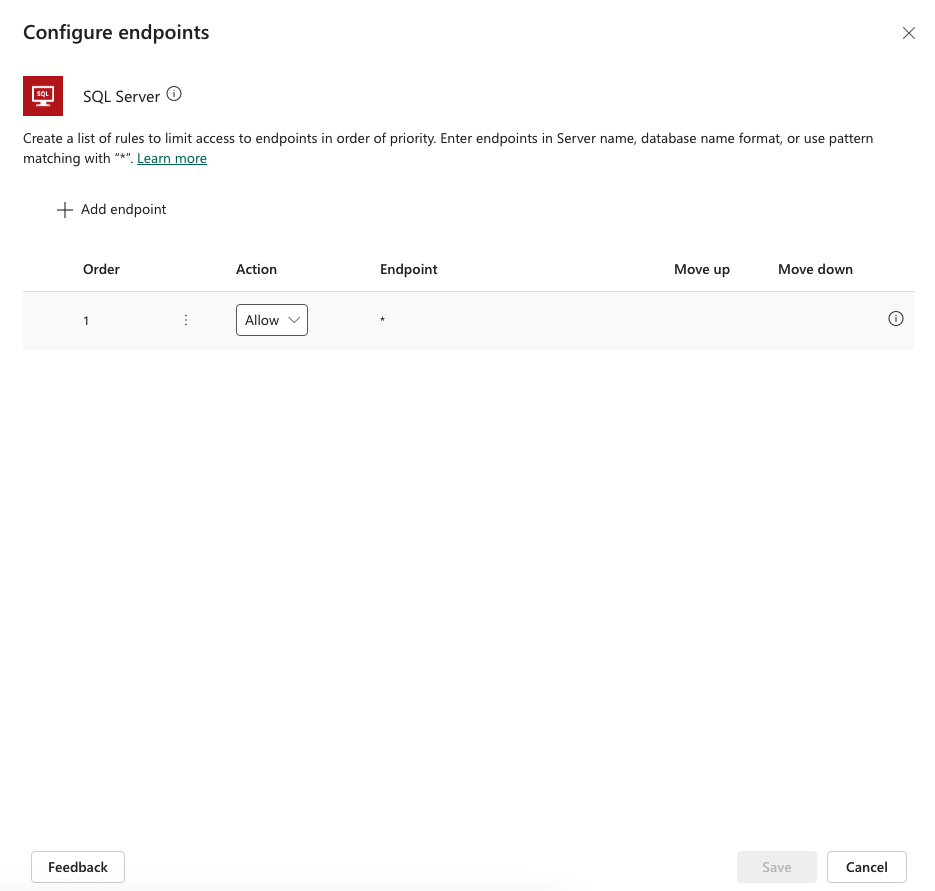
Endpoint filtering restricts which URLs or hostnames a connector can reach. Rather than blocking an entire connector, you define URL patterns that are allowed or denied.
Common scenarios for endpoint filtering include:
- SQL Server connector - Allow connections to
*.database.windows.net(Azure SQL) but deny on-premises SQL servers. - HTTP connector - Allow calls to
https://api.zava.com/*but block all other external endpoints. - Custom connectors - At the tenant level, use ordered URL patterns with wildcards to classify custom connector endpoints.
To configure endpoint filtering:
- In your data policy, select the connector that supports endpoint filtering.
- Choose Configure connector > Connector Endpoints.
- Add URL patterns in priority order (evaluated top-to-bottom, first match wins).
- Set each pattern to Allow or Deny.
- The last rule (
*) acts as the catch-all default.
Classify custom connectors
Custom connectors require different classification approaches depending on policy scope:
Environment-level policies - The policy UI shows custom connectors alongside prebuilt connectors. You can classify custom connectors directly into Business, Non-Business, or Blocked, like any other connector.
Tenant-level policies - Custom connectors are specific to an environment, so they don't appear in the tenant-level connector list. Instead, use URL pattern matching:
- In your tenant-level policy, go to the Custom Connectors page.
- Add URL patterns that match your custom connector host URLs (for example,
https://api.zava.com/*). - Classify each pattern into Business, Non-Business, or Blocked.
- The final
*rule sets the default for unmatched custom connectors.
Note
The wildcard (*) rule is always evaluated last. Set it to Blocked if you want a deny-by-default posture for unknown custom connectors at the tenant level.
Govern desktop flow action groups
Data policies extend beyond cloud connectors to cover Power Automate desktop flows. Desktop flow modules represent groups of actions (File, Email, Browser Automation, Database, HTTP, and more) that makers use in desktop flow scripts.
Before you can govern desktop flows with DLP:
- Sign in to the Power Platform admin center.
- Select Manage > Settings > Tenant settings.
- Find Desktop flow actions in DLP and turn on Show desktop flow actions in DLP policies.
Important
Once you enable desktop flow actions in DLP, you can't disable the setting. Plan your classification strategy before enabling.
After enabling, desktop flow modules appear in your DLP policies as action groups. You can classify them into Business, Non-Business, or Blocked, applying the same group-based data sharing rules as cloud connectors.
Key considerations for desktop flow governance:
- Variables and other core modules can't be blocked - they're fundamental to all desktop flows.
- Blocking all desktop flow modules suspends all desktop flows in the affected environments.
- Enforcement is synchronous for standalone flows but asynchronous (within 24 hours) for flows with child flows.
- Desktop flows require Power Automate for desktop version 2.14 or later for DLP enforcement.
A practical approach at Zava: block the Database, AWS, and Azure modules in Zava Pay environments. This approach forces desktop flows to go through approved cloud connectors for data access, while leaving Browser Automation and File modules available for marketing's RPA (robotic process automation) workflows.