Exercise - Implement classes
In this exercise, you create the Game folder in the application root and begin implementing LangtonsAnt game concepts in this folder.
Create a game folder
Ensure that you have the VS Code Editor open to your LangtonsAnt project.
Select the LangtonsAnt folder.
Now select the folder icon in the Explorer pane of the editor.
Name your new folder Game in the text box and press enter.
Create an AntDirection enum
Now that you have a Game folder, you can begin adding your application files to it. To start, you'll create an enum (enumerable) that specifies the four directions Langton's Ant can move. Using an enum makes the code more readable and easier to understand.
Select the Game folder and select the New File icon.
Name your new file AntDirection.cs and press enter.
Create a namespace so your project can find the files that belong to it.
namespace LangtonsAnt
{

}
You'll later need to reference this namespace in a 'using' statement ('using LangtonsAnt') so that your program can find your code.
Note
You may notice that your code does not always format correctly in the editor, especially if you are copying and pasting code. To get your code to format correctly, you can right-click anywhere in the text window to bring up the editor menu and select Format Document or type Shift-Alt-F.
Now you'll add what an enum to your code. It allows you to easily know the number that corresponds to each movement.
namespace LangtonsAnt
{
    public enum AntDirection
    {
        Up = 0,
        Right = 1,
        Down = 2,
        Left = 3
    }
}
Create an Ant class and add Ant properties and a constructor
Add an Ant class in your new namespace in a file called Ant.cs.
Select the Game folder and select the New File icon.
Name the new file you're creating Ant.cs and press enter.
Add your namespace to the new file.
namespace LangtonsAnt
{

}
Inside the namespace, create the Ant class.
namespace LangtonsAnt
{
    public class Ant
    {

    }
}
You'll need an 'I' integer property for the rows index and a 'J' property for the columns index. You'll also need a Direction property to store the information about the ants orientation. Let's start by adding the properties.
namespace LangtonsAnt
{
    public class Ant
    {
        public int I { get; set; }
        public int J { get; set; }
        public AntDirection Direction { get; set; }
    }
}
Add your Ant constructor and initialize your properties.
namespace LangtonsAnt
{
    public class Ant
    {
        public int I { get; set; }
        public int J { get; set; }
        public AntDirection Direction { get; set; }

        public Ant(int i, int j, AntDirection direction)
        {
            I = i;
            J = j;
            Direction = direction;
        }
    }
}
Add ant Act method and helper methods
As you may notice, your Ant class implements the game mechanics and the movement of an ant. Your Act method will get the new field cell color and Ant location and orientation, based on the previous values. It will use helper methods for calculating the new Ant's location and orientation.
Add a method below the constructor called Act that takes a byte variable called oldValue and returns a byte.
public virtual byte Act(byte oldValue)
{
    byte ret;
    if (oldValue == 0)
    {
        ret = 1;
        RotateCW();
    }
    else
    {
        ret = 0;
        RotateCCW();
    }
    Move();
    return ret;
}
Add a Move method.
protected void Move()
{
    if (AntDirection.Up == Direction) I--;
    if (AntDirection.Right == Direction) J++;
    if (AntDirection.Down == Direction) I++;
    if (AntDirection.Left == Direction) J--;
}
Add a RotateCW (rotate clock-wise) method.
public void RotateCW()
{
    Direction = (AntDirection)(((int)Direction + 1) % 4);
}
Add a RotateCCW (rotate counter clock-wise) statement.
public void RotateCCW()
{
    Direction = (AntDirection)((int)Direction == 0 ? 3 : (int)Direction - 1);
}
Add a Game class
You'll now create your Game class and add a few properties to it. The Game class holds information about the state of the game. The state of the game has a generation number, the game field, and an ant instances collection.
Select the Game folder, then select the New File icon.
Enter the name of the new file, Game.cs, and press enter.
Add your namespace.
namespace LangtonsAnt
{

}
Create your class.
namespace LangtonsAnt
{
    public class Game
    {

    }
}
Add a GenerationN property
The first item you'll add to your new class is a property called 'GenerationN' used to create a new ant. In your class, type the word
prop(short for property) and press Tab twice to highlight the name of your new property.Enter your property name
GenerationN.Tab to the end of the line and add
= 0 ;.namespace LangtonsAnt { public class Game { public int GenerationN { get; set; } = 0; } }
Add a Field property
Beneath the previous property, type the word
propagain and press Tab.Enter
byte[,]for a dimensional byte array.Press Tab again.
Enter your property name
Fieldand Tab to go to the end of the line.Press Enter to drop down a line, giving yourself a little room for the next property.
namespace LangtonsAnt
{
    public class Game
    {
        public int GenerationN { get; set; } = 0;
        public byte[,] Field { get; set; }
    }
}
Note
You will get errors saying that your properties contain Non-nullable values. You can ignore these for now. When you create your Ant constructor you will initialize these properties and the errors will go away.
Add an Ants property
- Now, beneath your Field property, type the word
propand press Tab once. - Enter
Ant[]. - Press Tab again.
- Enter your property name
Antsand press Tab twice to get to the end of the line. - Again, press Enter to drop down a line, giving yourself a little room for the next property.
Your growing class should look like this, so far. Again, don't worry about the 'Non-nullable' error for now. You'll fix them shortly.
namespace LangtonsAnt
{
    public class Game
    {
        public int GenerationN { get; set; } = 0;
        public byte[,] Field { get; set; }
        public Ant[] Ants { get; set; }
    }
}
Create a "getter" only Size property
As you know, properties 'get' and 'set' values of a particular type (int, string, etc.). You can, however, customize them so that they only either 'get' or 'set' a value, but not both. Here you're customizing your Size property so that it only gets the size of the field.
namespace LangtonsAnt
{
    public class Game
    {
        public int GenerationN { get; set; } = 0;
        public byte[,] Field { get; set; }
        public Ant[] Ants { get; set; }
        public int Size
        {
            get => Field.GetLength(0);
        }
    }
}
Add a constructor
Add a constructor that sets a default 'size' variable to 64 for the two dimensional byte array that is your playing field. You'll also now initialize your 'Field' and 'Ants' properties. Adding these items should make the 'Non-nullable' errors you have been seeing go away.
namespace LangtonsAnt
{
    public class Game
    {
       public int GenerationN { get; set; } = 0;
       public byte[,] Field { get; set; }
       public Ant[] Ants { get; set; }
       public int Size
       {
            get => Field.GetLength(0);
       }

       public Game(int size = 64)
       {
            Field = new byte[size, size];
            Ants = new Ant[] {
                new Ant(i: size/2 + 1, j: size / 2 + 1, direction: AntDirection.Up)
            };
       }
    }
}
Implement the Game methods
Now you have a Game class with a constructor that initializes the size of your byte array. Since you have created your properties and initialize your grid, you're ready to begin. Start by implementing the methods you'll need. You begin by creating a method called CalcNextGeneration and then adding the method that calls it called NextGeneration.
You're separating out your NextGeneration methods into two methods for clarity sake. It's the CalcNextGeneration method that does the real work of the two methods.
You begin by creating the CalcNextGeneration method, then adding the NextGeneration method that calls it.
Note
The 'CalcNextGeneration' method calculates the next presentation of the grid, displaying the new position of the ant in the grid. It is literally calculating a new presentation (or generation) of the grid based on the ants movements.
Beneath your constructor, create a public method called
CalcNextGenerationthat looks like this.public byte[,] CalcNextGeneration() { }
Add code to CalcNextGeneration method.
Create a variable called
newFieldfrom your byte array that you can use for your new cell value.public byte[,] CalcNextGeneration() { var newField = (byte[,])Field.Clone(); }Beneath that variable, create a
forloop so you can loop through each ant and set the newField value(s).for (int index = Ants.Length - 1; index >= 0; index--) { }Get the current ant and assign it to a variable called
ant.for (int index = Ants.Length - 1; index >= 0; index--) { var ant = Ants[index]; }Now check if the ant is still within the field with this 'if' statement, below your 'ant' variable.
This next bit of code checks to see if the ant is still in the grid. The following
ifstatement checks to see if an ant has exceeded the bound of the grid. If an ant has exceeded the bounds of the grid, youcontinueand skip processing that ants movements and begin the loop again with our next ant.// Check if the ant is still within the field if (ant.i < 0 || ant.j < 0 || ant.j >= Size || ant.i >= Size) { // TODO later you can act on ants going out of the field, // for now you just exclude them from processing continue; }The next several lines of code essentially swap out the old grid value (initially a
0) and replace it with the new one (initially a1), now that the ant has landed on it. The first thing you do is take the newField variable you created which is our entire grid and grab the individual cell the ant is currently on.Add the following line below the
ifstatementbyte v = newField[ant.i, ant.j];.Now put the
iandjinteger values into their own variables for clarity sake, in preparation for updating our grid:int i = ant.i; int j = ant.j;Add the following line
byte newVal = ant.Act(v);.Add the following line
newField[i, j] = newVal;.Add a return statement that returns the updated grid
return newField;(outside of theforloop). Your code should look like this.private byte[,] CalcNextGeneration() { var newField = (byte[,])Field.Clone(); for (int index = Ants.Length - 1; index >= 0; index--) { var ant = Ants[index]; // Check if the ant is still within the field if (ant.i < 0 || ant.j < 0 || ant.j >= Size || ant.i >= Size) { // TODO later you will act on ants going out of the field, // now you just exclude them from processing continue; } byte v = newField[ant.i, ant.j]; int i = ant.i; int j = ant.j; byte newVal = ant.Act(v); newField[i, j] = newVal; } return newField; }Below the previous method, create the NextGeneration method that calls the 'CalcNextGeneration()' method.
public void NextGeneration()
{
    Field = CalcNextGeneration();
    GenerationN++;
}
Note
The generation (or number of ants) is also incremented.
Rewrite Program.cs to print the game state
Your final task for this exercise is to rewrite the Program.cs file so that it prints the state of the game. Create a Print method that takes a Game object. Put your existing print code inside the new method, changing the 'field' byte array to game.Field, so that it's now associated with an instance of the game.
Delete the 'field' byte array ('int[,] field = new int[16, 16];') we created in Program.cs to demo the playing field.
Replace it with a 'using' statement so that your code knows where to find the code you have been writing that is in that namespace, 'using LangtonsAnt;'.
Create your Print method that takes a Game object.
using LangtonsAnt;

void Print(Game game)
{

}
Copy your 'for' loops into your new Print method.
using LangtonsAnt;

void Print(Game game)
{
    for(int i = 0; i < field.GetLength(0); i++) {
        for(int j = 0; j < field.GetLength(1); j++){
            Console.Write($"{field[i, j]}  ");
        }
        Console.WriteLine();
    }
}
Rework your 'for' loops so that they now use the 'Field' property in the Game object you're passing in.
using LangtonsAnt;

void Print(Game game)
{
    for (int i = 0; i < game.Field.GetLength(0); i++)
    {
        for (int j = 0; j < game.Field.GetLength(1); j++)
        {
            Console.Write($"{game.Field[i, j]}  ");
        }
        Console.WriteLine();
    }
    Console.WriteLine();
}
Console.WriteLine();
Note
You will get an error saying that your Print method is declared but never used. The error will go away shortly, as you will now be adding code to invoke the method.
Create a game instance and go through a few generations
Now you should be ready to create an instance of the Game class and call NextGeneration and print it with your Print method.
Open your Program.cs file, if it isn't already open.
Create an instance of the Game class beneath your last 'Console.WriteLine()' statement.
void Print(Game game)
{
    for (int i = 0; i < game.Field.GetLength(0); i++)
    {
        for (int j = 0; j < game.Field.GetLength(1); j++)
        {
            Console.Write($"{game.Field[i, j]}  ");
        }
        Console.WriteLine();
    }
    Console.WriteLine();
}
Console.WriteLine();

Game game = new Game(16);
Now add several calls to your 'Print' method, passing it the 'Game' object ('game') you created, then call the 'NextGeneration()' property on the game ('game.NextGeneration') to create more ants.
void Print(Game game)
{
    for (int i = 0; i < game.Field.GetLength(0); i++)
    {
        for (int j = 0; j < game.Field.GetLength(1); j++)
        {
            Console.Write($"{game.Field[i, j]}  ");
        }
        Console.WriteLine();
    }
    Console.WriteLine();
}
Console.WriteLine();

Game game = new Game(16);
Print(game);
game.NextGeneration();
Print(game);
game.NextGeneration();
Print(game);
game.NextGeneration();
Print(game);
Press Ctrl-s to save your work.
Check your work
Open a terminal window by selecting View --> Terminal from the menu.
Build your code with the following statement, 'dotnet build'.
Run your code, 'dotnet run'.
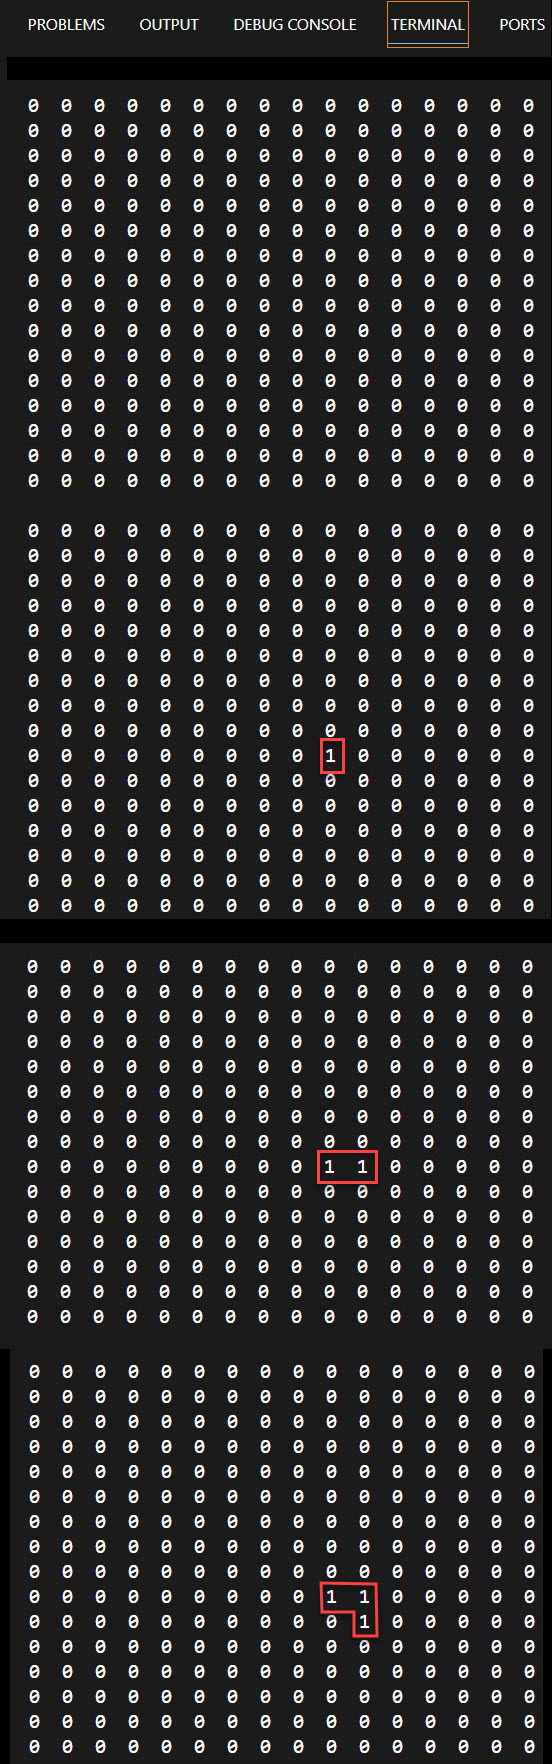
Compare your output. It should look similar to the output shown, with the game field being output three times. Each game field changes with each generation according to the LangtonsAnt rules.